Silverlight
4 Out-of-Browser apps now have the ability to be elevated trust
applications, if you request it and your users consent. One of the
more powerful features of trusted applications is the ability to
use IDispatch COM servers on the local machine. Basically, if you
can access the COM object from script, you can access it from
Silverlight. That includes everything from Word and Excel
automation to what we're going to tackle in this post: automating
local devices.
While working on ShoeBoxScan today, I decided to try and rip out
some of the scanner code and plug it into
Silverlight to see if it worked, and how well it worked.
Setup
Make sure you're running Visual Studio 2010 and have the SL4
bits installed. Then create a new Silverlight 4 solution with an
associated web site.
In the Silverlight project, set the project properties to mark
it as an out-of-browser application

Then open up the out-of-browser settings dialog and mark the
application as requiring elevated trust.

While you're at it, open up the debug tab and set your OOB app
as the start action. I didn't realize this option was even here
until I asked Tim
Heuer if we could have it in the next version of Silverlight :)
This will allow you to debug your out-of-browser application
without the manual install step.
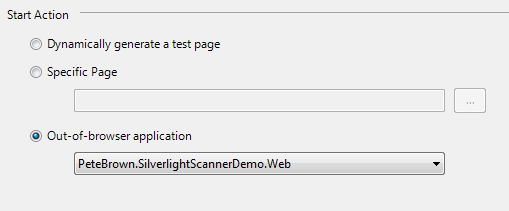
The screenshot above is correct, the web project is what is
picked for the start action, not the Silverlight project.
Finally, since we'll be using the dynamic keyword, you'll need
to add a reference to Microsoft.CSharp.dll, located in the
Silverlight 4 SDK

Support Classes
I pulled this code from my WPF app, which is using MVVM. We'll need to add
a couple little classes to support that here. Each of these support
classes need to be added to your Silverlight project.
The first is the Observable class. Insert your favorite flavor
of INotifyPropertyChange code here, or simply use mine:
public abstract class Observable : INotifyPropertyChanged
{
    public event PropertyChangedEventHandler PropertyChanged;

    protected void NotifyPropertyChanged(string propertyName)
    {
        if (PropertyChanged != null)
            PropertyChanged(this, new PropertyChangedEventArgs(propertyName));
    }
}
That's the base class for anything that's going to be used in
binding.
Next, we'll add a simple container class for the scanned image.
I did this because I didn't want to pass WIA types around in the
application; I wanted them all behind the Scanner service.
class ScannerImage : Observable
{
    private BitmapSource _image;
    public BitmapSource Image
    {
        get { return _image; }
        internal set { _image = value; NotifyPropertyChanged("Image"); }
    }

}
ScannerService Class
Add a class named "ScannerService" to your Silverlight
project.
We don't have access to the constants and enumerations exposed
by WIA, so we need to duplicate them in our code. Luckily, the
documentation has all the values we need.
Constants and Enumerations
I added the constants and enumerations as nested classes and
enums in the ScannerService class
class ScannerService
{
    // http://msdn.microsoft.com/en-us/library/ms630792(v=VS.85).aspx
    private enum WiaDeviceType
    {
        UnspecifiedDeviceType = 0,
        ScannerDeviceType = 1,
        CameraDeviceType = 2,
        VideoDeviceType = 3
    }

    // http://msdn.microsoft.com/en-us/library/ms630798(v=VS.85).aspx
    private enum WiaImageIntent
    {
        UnspecifiedIntent = 0,
        ColorIntent = 1,
        GrayscaleIntent = 2,
        TextIntent = 4
    }

    // http://msdn.microsoft.com/en-us/library/ms630796(v=VS.85).aspx
    private enum WiaImageBias
    {
        MinimizeSize = 65536,
        MaximizeQuality = 131072
    }

    // http://msdn.microsoft.com/en-us/library/ms630810(v=VS.85).aspx
    private class FormatID
    {
        public const string wiaFormatBMP = "{B96B3CAB-0728-11D3-9D7B-0000F81EF32E}";
        public const string wiaFormatPNG = "{B96B3CAF-0728-11D3-9D7B-0000F81EF32E}";
        public const string wiaFormatGIF = "{B96B3CB0-0728-11D3-9D7B-0000F81EF32E}";
        public const string wiaFormatJPEG = "{B96B3CAE-0728-11D3-9D7B-0000F81EF32E}";
        public const string wiaFormatTIFF = "{B96B3CB1-0728-11D3-9D7B-0000F81EF32E}";
    }


// scan method will go here

}
Scan Method
Here's the first version of the scan method. It doesn't return
or convert the image, because we're just testing to see if we can
invoke the WIA dialog from Silverlight.
public void Scan()
{
    try
    {
        dynamic wiaDialog = AutomationFactory.CreateObject("WIA.CommonDialog");

        dynamic imageFile = wiaDialog.ShowAcquireImage(
                (int)WiaDeviceType.ScannerDeviceType,
                (int)WiaImageIntent.ColorIntent,
                (int)WiaImageBias.MaximizeQuality,
                FormatID.wiaFormatJPEG, false, true, false);
    }
    catch (Exception ex)
    {
        // need to do something here. Old WPF code is below
        //if (ex.ErrorCode == -2145320939)
        //{
        //    throw new ScannerNotFoundException();
        //}
        //else
        //{
        //    throw;
        //}
    }

}
Note that the casts to "int" are required to avoid a runtime
exception. the COM API knows what to do with an int, but has no
idea what to do with our own WiaDeviceType and other enums
ViewModel
Here's the first rev of our viewmodel. It surfaces an
ImageSource, but we won't do anything with that just yet.
public class ScannerViewModel : Observable
{
    private ImageSource _scannerImage;
    public ImageSource ScannerImage
    {
        get { return _scannerImage; }
        set { _scannerImage = value; NotifyPropertyChanged("ScannerImage"); }
    }

    public void Scan()
    {
        ScannerService service = new ScannerService();
        service.Scan();
    }

}
By now, you should have a project that looks something like
this:
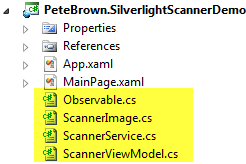
The next step is to slap some xaml into MainPage and then call
the Scan method to test this out.
MainPage
We're at a point where we can test some basic functionality, so
let's whip up some xaml and call the Scan method. We'll set up the
grid so there's room for the image, but for now, all we'll have is
a single Scan button.
<UserControl x:Class="PeteBrown.SilverlightScannerDemo.MainPage"
    xmlns="http://schemas.microsoft.com/winfx/2006/xaml/presentation"
    xmlns:x="http://schemas.microsoft.com/winfx/2006/xaml"
    xmlns:d="http://schemas.microsoft.com/expression/blend/2008"
    xmlns:mc="http://schemas.openxmlformats.org/markup-compatibility/2006"
    mc:Ignorable="d"
    d:DesignHeight="478" d:DesignWidth="650">

    <Grid x:Name="LayoutRoot" Background="White">
        <Grid.RowDefinitions>
            <RowDefinition Height="*" />
            <RowDefinition Height="Auto" />
        </Grid.RowDefinitions>

        <Button x:Name="Scan"
                Content="Scan"
                Width="100"
                Height="30"
                Margin="10"
                Grid.Row="1" />
    </Grid>
</UserControl>
In the code behind (no commands in this demo, but you can find
info on them here and elsewhere) I wire up both the loaded event to
set the datacontext (used later) and the click event for the scan
button.
public partial class MainPage : UserControl
{
    private ScannerViewModel _viewModel = new ScannerViewModel();

    public MainPage()
    {
        InitializeComponent();

        Loaded += new RoutedEventHandler(MainPage_Loaded);
        Scan.Click += new RoutedEventHandler(Scan_Click);
    }

    void Scan_Click(object sender, RoutedEventArgs e)
    {
        _viewModel.Scan();
    }

    void MainPage_Loaded(object sender, RoutedEventArgs e)
    {
        DataContext = _viewModel;
    }
}
Running the App
Run the app and click the "Scan" button. If you have a
recognized WIA-compatible scanner attached, you'll get the scan
dialog:
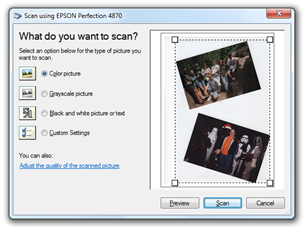
Yes, from frickin Silverlight! Pretty awesome
:)
Converting the WIA Image to a Bitmap Silverlight
Understands
The code here converts from the WIA image type to something
Silverlight will understand. There is an in-memory way to do the
conversion, but you overrun the limits of the core COM types if you
work with a large image (like a 1200dpi scan). Unfortunately,
Silverlight 4 doesn't let you use the Path.GetTempFileName API, and
doesn't include the BitmapFrame type, so I can't use the same code
as the WPF version. That said, I can come close.
The main issue I ran into was with the file format used by WIA
when saving images. Even though we specified "JPEG" in the scanning
format, WIA saves to a bitmap. I found this out when I kept getting
catastrophic failures trying to use the stream as an image source.
I went and looked at the temp files, and they were all the same
size. Cracked one open in notepad and I saw the BMP file
header.
Silverlight doesn't understand the BMP file format. Luckily, Joe Stegman has created a BMP Decoder sample we
can use.
WiaImageFileToBitmap Method
This method handles getting the bits from the scanned image and
transforming them into a BitmapSource for use in Silverlight.
private BitmapSource WiaImageFileToBitmap(dynamic imageFile)
{
    if (imageFile == null)
        return null;

    // I hate to stick temp files in MyDocuments, but that's the only real option here
    string filepath = Environment.GetFolderPath(Environment.SpecialFolder.MyDocuments);
    string name = "Scan_" + Guid.NewGuid().ToString() + ".jpg";
    string filename = filepath + @"\" + name;

    // WIA saves in bitmap format
    imageFile.SaveFile(filename);

    WriteableBitmap bitmap;

    using (FileStream stream = File.OpenRead(filename))
    {
        Texture tex = BMPDecoder.Decode(stream);
        bitmap = tex.GetWriteableBitmap();
        stream.Close();
    }

    // cleanup
    File.Delete(filename);

    return bitmap;
}
The Bitmap Decoder
I snagged the bitmap decoder from Joe Stegman's blog as mentioned above. Other
than changing the namespace, I made no changes to the source.
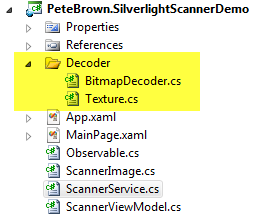
Changes to the Scan method
We'll also need to change the Scan method to use the new
conversion and actually return the image.
public ScannerImage Scan()
{
    try
    {
        dynamic wiaDialog = AutomationFactory.CreateObject("WIA.CommonDialog");

        dynamic imageFile = wiaDialog.ShowAcquireImage(
                (int)WiaDeviceType.ScannerDeviceType,
                (int)WiaImageIntent.ColorIntent,
                (int)WiaImageBias.MaximizeQuality,
                FormatID.wiaFormatJPEG, false, true, false);

        ScannerImage image = new ScannerImage();
        image.Image = WiaImageFileToBitmap(imageFile);

        return image;
    }
    catch (Exception ex)
    {
        //if (ex.ErrorCode == -2145320939)
        //{
        //    throw new ScannerNotFoundException();
        //}
        //else
        //{
        //    throw;
        //}

        throw;
    }

}
ViewModel update
Update the Scan method in the view model as well.
public class ScannerViewModel : Observable
{
    private ImageSource _scannerImage;
    public ImageSource ScannerImage
    {
        get { return _scannerImage; }
        internal set { _scannerImage = value; NotifyPropertyChanged("ScannerImage"); }
    }

    public void Scan()
    {
        ScannerService service = new ScannerService();
        ScannerImage image = service.Scan();

        if (image != null)
        {
            ScannerImage = image.Image;
        }
        else
        {
            ScannerImage = null;
        }
    }

}
UI Change
The final change is to the UI to bind the image
<Grid x:Name="LayoutRoot" Background="White">
    <Grid.RowDefinitions>
        <RowDefinition Height="*" />
        <RowDefinition Height="Auto" />
    </Grid.RowDefinitions>

    <Image x:Name="ScannedImage"
            Source="{Binding ScannerImage}"
            Stretch="Uniform" />

    <Button x:Name="Scan"
            Content="Scan"
            Width="100"
            Height="30"
            Margin="10"
            Grid.Row="1" />
</Grid>
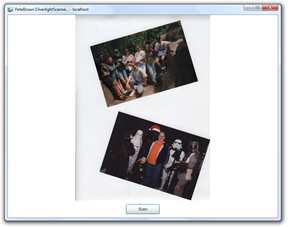
End Result
Once you have all the bits in place, run the app again. Here's
what mine looks like, with an image hot off my scanner:
Conclusion
If you're building a Silverlight app, and want to do a little
local Scanner integration, it's certainly possible. While it takes
a bit more work than doing the same thing in WPF, once you wrap the
code in a nice class, it's pretty easy to use.
Make sure that your own implementation includes some checks to
make sure you are running with elevated permissions. Set it up so
it fails gracefully, and you'll have a nice little light-up feature
for your Windows users.
