Over the holidays, Scott assigned to me a project to wrap up some
of the WPF-ness in the shoebox scanner he had built.
He had the scanning in place, but not some of the cropping/resizing
against the original image, and the UI was a dev UI.
The scanning part is pretty interesting, so I thought I'd share
that with you.
The app Scott and I have put together is a WPF 3.5 application,
but I thought I'd continue with sticking to the latest and pull us
up into WPF 4 for this demo.
Introduction to Windows Image Acquisition/Architecture
(WIA)
WIA was introduced in Windows 2000 as a way to enable access to
scanners and cameras. In versions prior to Windows Vista, it also
supported basic video. WIA is the still image acquisition platform
in the Windows family of operating systems starting with Windows
Millennium Edition (Windows Me) and Windows XP. [msdn]
.png)
WIA does a decent job of abstracting away the details of
interfacing with different scanners and other image acquisition
devices. It includes functionality and common dialogs to help us
with using those devices from script, COM and managed code (via
COM).
Now, the COM interface does lean a little to the ugly side when
compared to your normal .NET code. It's code you'll want to
encapsulate in into something you can test, and then expose a clean
interface to the rest of the app.
Project Setup
Create a new WPF 4 Windows application to start. We'll then need
to add a reference to WIA and create a couple of the usual folders
and ViewModel pattern support classes.
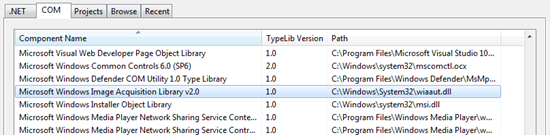
WIA Reference
WIA is a COM library, so you'll need to add a reference and
create the interop DLL. Simply add a COM reference and select
"Microsoft Windows Image Acquisition Library v2.0" and Visual
Studio will create the interop wrapper for you.
If you want to avoid embedding errors with the FormatID class we'll
discuss below, set Embed Interop Types to false in the reference
properties once you have the reference in your solution. The other
option, as the article mentions, is to create your own class of
constants, but I'd rather not do that.
Structure
We'll take an approach I often take here, and implement a
relatively simple version of the ViewModel pattern.
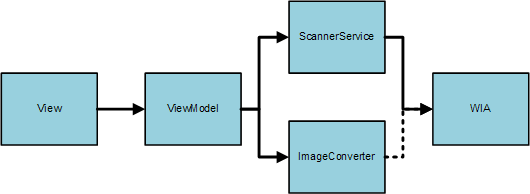
There's a dotted line from the ImageConverter to WIA just
because it's not going back to WIA to get anything, it's using some
stuff returned originally from the Scanner service. Not an
important distinction, but one I wanted to make.
Scanner Service
The scanner code, due to the nature of WIA, includes both UI
dialogs and functionality. For that reason and others, it makes
sense to pull it out into its own service class. In the project, I
created a Services folder and a new class named ScannerService.
Inside that same service class file, I added two exception
types. The first, ScannerException, is used for anything we can't
easily classify, but which comes from the scanner. The second is
the ScannerNotFoundException which is used exactly when you think
it would be based on the name.
public class ScannerException : ApplicationException
{
    public ScannerException()
        : base()
    { }

    public ScannerException(string message)
        : base(message)
    { }

    public ScannerException(string message, Exception innerException)
        : base(message, innerException)
    { }

}

public class ScannerNotFoundException : ScannerException
{
    public ScannerNotFoundException()
        : base("Error retrieving a list of scanners. Is your scanner or multi-function printer turned on?")
    {
    }
}


public class ScannerService
{
    public ImageFile Scan()
    {
        ImageFile image;

        try
        {
            CommonDialog dialog = new CommonDialog();

            image = dialog.ShowAcquireImage(
                    WiaDeviceType.ScannerDeviceType,
                    WiaImageIntent.ColorIntent,
                    WiaImageBias.MaximizeQuality,
                    WIA.FormatID.wiaFormatJPEG,
                    false,
                    true,
                    false);

            return image;
        }
        catch (COMException ex)
        {
            if (ex.ErrorCode == -2145320939)
            {
                throw new ScannerNotFoundException();
            }
            else
            {
                throw new ScannerException("COM Exception", ex);
            }
        }
    }

}
The ScannerService.Scan method uses the WIA CommonDialog class
to prompt the user for the scan. You can do the scan without a
dialog, but you lose out on a bunch of useful UI.
ShowAcquireImage parameters
| DeviceType |
Scanner, camera, or other device |
| Intent |
Whether you want color, black and
white, text etc |
| Bias |
Quality |
| Format |
The format for the image, Jpeg in this
case |
| AlwaysSelectDevice |
Whether or not to always prompt the
user to select the device |
| UseCommonUI |
True or false to show the ui |
| CancelError |
If true, cancelling throws an
error |
ViewModel and Command Structure
Observable Base Class
ViewModel and model classes typically need to have some goo
inserted to notify when properties changed. The way I usually
handle that in real applications is to create an Observable
abstract base class in a project accessible to both the ViewModels
and Models. Since everything's in on project in this demo, just put
it in the root of your project.
public abstract class Observable : INotifyPropertyChanged
{
    public event PropertyChangedEventHandler PropertyChanged;

    protected void NotifyPropertyChanged(string propertyName)
    {
        if (PropertyChanged != null)
            PropertyChanged(this, new PropertyChangedEventArgs(propertyName));
    }

}
Main ViewModel
As is often the case in demo-land, I have only one form in this
particular application, so I have only one ViewModel. Still, create
a ViewModels folder and add the ScanViewModel class to it.
In the past, I've used the RelayCommand class from this MSDN article. I'll
use that again here. Rather than repeat the code, simply refer to
the link and look at Figure 3 for the RelayCommand source code.
class ScanViewModel : Observable
{
    private BitmapSource _scannedImage;
    public BitmapSource ScannedImage
    {
        get { return _scannedImage; }
        set { _scannedImage = value; NotifyPropertyChanged("ScannedImage"); }
    }

    // Command for scanning
    private RelayCommand _scanCommand;
    public ICommand ScanCommand
    {
        get
        {
            if (_scanCommand == null)
            {
                _scanCommand = new RelayCommand(param => this.Scan(), param => this.CanScan);
            }

            return _scanCommand;
        }
    }

    // implemented for the command pattern completeness. We don't currently
    // have any situations where we'd disable the ability to scan
    public bool CanScan
    {
        get { return true; }
    }

    // method to do the actual scanning
    public void Scan()
    {
        var scanner = new ScannerService();

        try
        {
            ImageFile file = scanner.Scan();

            if (file != null)
            {
                var converter = new ScannerImageConverter();

                ScannedImage = converter.ConvertScannedImage(file);
            }
            else
            {
                ScannedImage = null;
            }

        }
        catch (ScannerException ex)
        {
            // yeah, I know. Showing UI from the VM. Shoot me now.
            MessageBox.Show(ex.Message, "Unable to Scan Image");
        }
        catch (Exception ex)
        {
            MessageBox.Show(ex.Message, "Error");
        }
    }
}
The method that does the heavy lifting is the Scan method. It
isn't called directly from outside the VM (but certainly could be).
Instead, it is called via the ScanCommand.
The ScannedImage property exposes a WPF-friendly version of the
scanned image.
The CanScan property is there just to support the relay command.
In this application, there aren't any points when scanning would be
disallowed, so I always return true.
ScannerImageConverter Service
In the Scan method of the ViewModel above, you can see that I
call out to an image conversion class to do the conversion. I felt
that code had no real business being in the VM, as it was reusable
and seemed a little heavy for that class. I also felt it shouldn't
be in the Scanner service, as that would introduce (through the
BitmapImage type) a dependency on WPF that I wanted to avoid. The
Scanner service should live on its own.
For that reason, I created a separate class to handle the image
conversion. It takes a dependency both on the scanner and on
WPF.
In this service, I implemented two ways to handle the image
conversion. I only use one in the code, but I wanted to share both
with you. The in-memory approach is great, until you get into large
scans, such as 1200dpi full-pagers. Then, the COM library chokes on
the conversion because it can't handle transferring that many bytes
across the COM interface using the variant types it has.
The second approach uses a temp file. I save the image using WIA
then load it back in via WPF. It's simpler, but does assume the
code will have permission to read and write files.
public class ScannerImageConverter
{
    // this could be in the ScannerService, but then that service
    // takes a dependency on WPF, which I didn't want. Better to have
    // the dependencies wrapped into this service instead. Requires
    // FileIOPermission
    public BitmapSource ConvertScannedImage(ImageFile imageFile)
    {
        if (imageFile == null)
            return null;

        // save the image out to a temp file
        string fileName = Path.GetTempFileName();

        // this is pretty hokey, but since SaveFile won't overwrite, we
        // need to do something to both guarantee a unique name and
        // also allow SaveFile to write the file
        File.Delete(fileName);

        // now save using the same filename
        imageFile.SaveFile(fileName);

        BitmapFrame img;

        // load the file back in to a WPF type, this is just
        // to get around size issues with large scans
        using (FileStream stream = File.OpenRead(fileName))
        {
            img = BitmapFrame.Create(stream, BitmapCreateOptions.None, BitmapCacheOption.OnLoad);

            stream.Close();
        }

        // clean up
        File.Delete(fileName);

        return img;
    }


    // this will choke on large images (like 1200dpi scans)
    // for that reason, you may want to do the conversion by
    // saving the ImageFile to a temp file and then loading it
    // in to convert it, as we do in the revised method above
    public BitmapSource InMemoryConvertScannedImage(ImageFile imageFile)
    {
        if (imageFile == null)
            return null;

        Vector vector = imageFile.FileData;

        if (vector != null)
        {
            byte[] bytes = vector.get_BinaryData() as byte[];

            if (bytes != null)
            {
                var ms = new MemoryStream(bytes);
                return BitmapFrame.Create(ms);
            }
        }

        return null;
    }

}
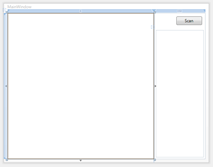
Creating the UI
The user interface is pretty simple. We need a place to show the
scanned image, and a button to start the scan. Here's the resulting
screen in design view.
And here's the xaml. I wired up the ViewModel using the data
context for the window, and bound the Scan Button to the
ScanCommand in the VM. The image is bound to the ScannerImage
property of the same VM.
<Window x:Class="WpfScannerDemo.MainWindow"
        xmlns="http://schemas.microsoft.com/winfx/2006/xaml/presentation"
        xmlns:x="http://schemas.microsoft.com/winfx/2006/xaml"
        xmlns:viewModels="clr-namespace:WpfScannerDemo.ViewModels"
        Title="MainWindow" Height="466" Width="600">
    <Window.DataContext>
        <viewModels:ScanViewModel />
    </Window.DataContext>

    <Grid>
        <Grid.ColumnDefinitions>
            <ColumnDefinition Width="*" />
            <ColumnDefinition Width="150" />
        </Grid.ColumnDefinitions>

        <Image x:Name="ScannerImage"
               Stretch="Uniform"
               Grid.Column="0"
               Source="{Binding ScannedImage}"
               />

        <Button x:Name="Scan"
                Grid.Column="1"
                Margin="10"
                Height="25"
                Width="75"
                HorizontalAlignment="Right"
                VerticalAlignment="Top"
                Content="Scan"
                Command="{Binding ScanCommand}" />
    </Grid>
</Window>
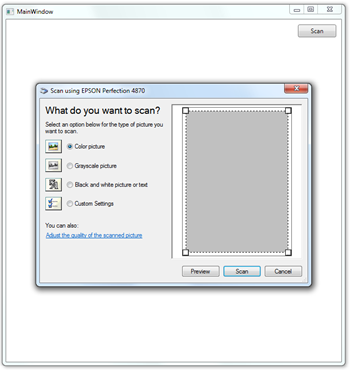
Testing it Out
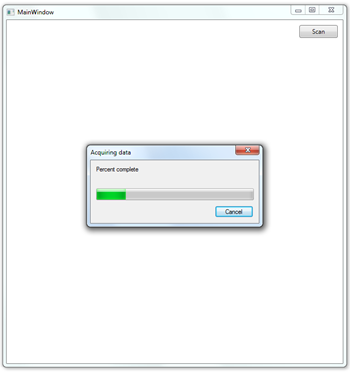
Run the application and hit the Scan button. You'll get the WIA
dialog that lets you configure a bunch of parameters such as
resolution, type of scan etc.
The first time you scan, the scanner will need to warm up, which
will make the WIA status dialog do nothing useful for a bit. Then
it will start the scan.
Once it finishes, the image will be scanned in and available to
your WPF application. Pretty neat, eh?
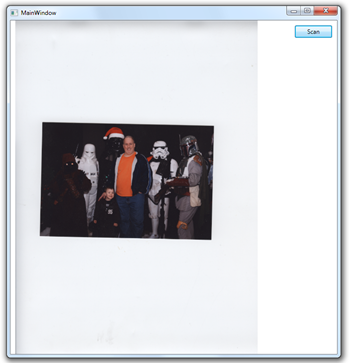
Yes, that image is me and my son just before Christmas, at the
Toys for Tots fundraiser. Donate a toy, get your photo taken with a
bunch of Star Wars dudes. He loved it :) It's just for the kids,
you know? ;)
Conclusion
That covers the basics of using the scanner from WPF. I'll post
some follow-up information on how we did cropping, rotation and
other image manipulation goodies.
