In this post, I show how to have bidirectional UDP
communication: The Win8 Metro style app will send messages to the
Gadgeteer device which responds with ACKs.
This is part 3 in a series of posts about using sockets to
communicate between Windows 8 Metro apps and a microcontroller. The
rest of the series may be found here:
About two-way communication
UDP socket communication involves a pair of endpoints. Each
endpoint is made up of an IP address and a port. In my example, the
addresses and ports are as shown in this graphic:
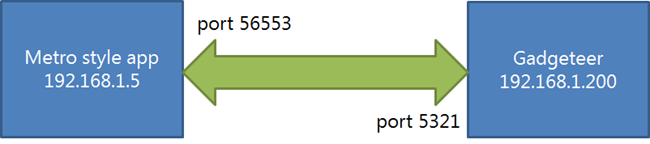
When the Metro style app sends a message, it picks a port
number. In the examples here, the port is 56553. The number itself
isn't all that important, and isn't something you'd typically try
to control. The destination port, however, is more important - it
needs to be known. As long as the originator knows the destination
port, you can have two-way communication, as the destination is
informed of the originating port and IP with each message.
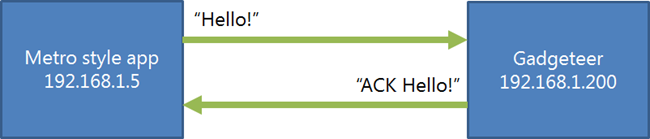
In the previous posts, the communication was one way. In this
post, I want to send a message to the Gadgeteer app, and have it
respond with an acknowledgment consisting of "ACK" plus whatever
data was sent to it.
Let's get started.
Setting up Windows 8 to listen for messages
To support sending and receiving messages, as well as displaying
the results on-screen, we'll need three changes:
- Add receive code to the NetworkInterface class
- Add a new Message class to encapsulate the data and give us
something to bind to
- Add a new MessageReceivedEventArgs class to be used when
notifying the client of new messages
Updated NetworkInterface class
The previous NetworkInterface class had code only for sending
messages to the Gadgeteer. This new version adds an event
MessageReceived and an OnSocketMessageReceived function. Also, note
the changes in SendMessage - to support sending more than one
message, the DataWriter is now cached and created only as
necessary.
using System;

using System.Collections.Generic;

using System.Linq;

using System.Text;

using System.Threading.Tasks;

using Windows.Networking;

using Windows.Networking.Sockets;

using Windows.Storage.Streams;


namespace MetroSocketsDemo.Services

{

    class NetworkInterface

    {

        private DatagramSocket _socket;


        public bool IsConnected { get; set; }


        public NetworkInterface()

        {

            IsConnected = false;


            _socket = new DatagramSocket();


            _socket.MessageReceived += OnSocketMessageReceived;

        }


        public async void Connect(HostName remoteHostName, string remoteServiceNameOrPort)

        {

            await _socket.ConnectAsync(remoteHostName, remoteServiceNameOrPort);


            IsConnected = true;

        }


        public event EventHandler<MessageReceivedEventArgs> MessageReceived;


        private void OnSocketMessageReceived(DatagramSocket sender, DatagramSocketMessageReceivedEventArgs args)

        {

            var reader = args.GetDataReader();


            var count = reader.UnconsumedBufferLength;


            var data = reader.ReadString(count);


            if (MessageReceived != null)

            {

                var ea = new MessageReceivedEventArgs();

                ea.Message = new Message() { Data = data };

                ea.RemoteHostName = args.RemoteAddress;

                ea.RemotePort = args.RemotePort;


                MessageReceived(this, ea);

            }

        }


        // we're talking to only one client, so need only one writer

        // keep a dictionary identified by endpoint if you need multiple

        DataWriter _writer = null;

        public async void SendMessage(string message)

        {

            if (_writer == null)

            {

                var stream = _socket.OutputStream;

                _writer = new DataWriter(stream);

            }


            _writer.WriteString(message);


            await _writer.StoreAsync();

        }

    }

}
New Message class
The message class is a simple entity/model class; it has only a
single bindable property: Data. The message class I'll use in the
future will have quite a bit more data, but for now, this is
good.
using System;

using System.Collections.Generic;

using System.Linq;

using System.Text;

using System.Threading.Tasks;


namespace MetroSocketsDemo.Services

{

    class Message

    {

        public string Data { get; set; }

    }

}
New MessageReceivedEventArgs class
The MessageReceivedEventArgs class includes the Message as well
as information about the source of the message. It is used in the
MessageReceived event on the NetworkInterface class.
using System;

using Windows.Networking;


namespace MetroSocketsDemo.Services

{

    class MessageReceivedEventArgs

    {

        public Message Message { get; set; }

        public HostName RemoteHostName { get; set; }

        public string RemotePort { get; set; }

    }

}
That's it for new classes. Now to turn to the user
interface.
Updated MainPage.xaml
The updated user interface separates out the Connect and Send
buttons. It also adds a TextBox which is used for entering your own
message.
<Page

    x:Class="MetroSocketsDemo.MainPage"

    IsTabStop="false"

    xmlns="http://schemas.microsoft.com/winfx/2006/xaml/presentation"

    xmlns:x="http://schemas.microsoft.com/winfx/2006/xaml"

    xmlns:local="using:MetroSocketsDemo"

    xmlns:d="http://schemas.microsoft.com/expression/blend/2008"

    xmlns:mc="http://schemas.openxmlformats.org/markup-compatibility/2006"

    mc:Ignorable="d">


    <Grid Background="{StaticResource ApplicationPageBackgroundThemeBrush}">

        <Grid.ColumnDefinitions>

            <ColumnDefinition Width="*" />

            <ColumnDefinition Width="*" />

        </Grid.ColumnDefinitions>


        <Grid Grid.Column="0">

            <Grid.RowDefinitions>

                <RowDefinition Height="Auto" />

                <RowDefinition Height="Auto" />

            </Grid.RowDefinitions>


            <Button x:Name="ConnectButton" Content="Connect"

                    Grid.Row="0"

                    Margin="10"

                    Click="ConnectButton_Click"/>


            <Grid Grid.Row="1">

                <Grid.ColumnDefinitions>

                    <ColumnDefinition Width="*" />

                    <ColumnDefinition Width="Auto" />

                </Grid.ColumnDefinitions>


                <StackPanel Orientation="Vertical"

                            Grid.Column="0"

                            VerticalAlignment="Bottom"

                            Margin="10">

                    <TextBlock Text="Message to send"

                               FontSize="11"/>

                    <TextBox x:Name="MessageText"

                             Text="Hello!"

                             Margin="0,2,0,0" />

                </StackPanel>


                <Button x:Name="SendButton"

                        Content="Send Message"

                        Grid.Column="1"

                        VerticalAlignment="Bottom"

                        Margin="10"

                        Click="SendButton_Click" />

            </Grid>

        </Grid>


        <ListView x:Name="MessageList"

                  Margin="10"

                  Grid.Column="1">

            <ListView.ItemTemplate>

                <DataTemplate>

                    <TextBlock Text="{Binding Data}" FontSize="20" Margin="5" />

                </DataTemplate>

            </ListView.ItemTemplate>

        </ListView>

    </Grid>

</Page>
The XAML has a few event handlers defined, so let's plug those
in next.
Updated MainPage.xaml.cs code-behind
The updated code behind handles two main things:
- Sending data
- Taking the received data and adding it to the connection to be
used in the ListView
Most of this will be familiar to you from the previous
examples.
using System;

using System.Collections.Generic;

using System.Collections.ObjectModel;

using System.IO;

using System.Linq;

using System.Threading;

using MetroSocketsDemo.Services;

using Windows.Foundation;

using Windows.Foundation.Collections;

using Windows.Networking;

using Windows.UI.Popups;

using Windows.UI.Xaml;

using Windows.UI.Xaml.Controls;

using Windows.UI.Xaml.Controls.Primitives;

using Windows.UI.Xaml.Data;

using Windows.UI.Xaml.Input;

using Windows.UI.Xaml.Media;

using Windows.UI.Xaml.Navigation;


namespace MetroSocketsDemo

{

    /// <summary>

    /// An empty page that can be used on its own or navigated to within a Frame.

    /// </summary>

    public sealed partial class MainPage : Page

    {

        NetworkInterface ni = new NetworkInterface();

        SynchronizationContext _syncContext;


        public MainPage()

        {

            this.InitializeComponent();


            _syncContext = SynchronizationContext.Current;


            ni.MessageReceived += OnMessageReceived;

            MessageList.ItemsSource = _messages;

        }


        protected override void OnNavigatedTo(NavigationEventArgs e)

        {

        }


        private ObservableCollection<Message> _messages = new ObservableCollection<Message>();


        void OnMessageReceived(object sender, MessageReceivedEventArgs e)

        {

            // add message to list


            _syncContext.Post((s) =>

                {

                    _messages.Add(e.Message);

                }, null);


        }


        private void ConnectButton_Click(object sender, RoutedEventArgs e)

        {

            ni.Connect(new HostName("192.168.1.200"), "5321");

        }


        private async void SendButton_Click(object sender, RoutedEventArgs e)

        {

            if (ni.IsConnected)

            {


                string cmd = MessageText.Text.Trim();


                if (cmd != string.Empty)

                {

                    ni.SendMessage(cmd);

                }

            }

            else

            {

                var dlg = new MessageDialog(

                    "The socket has not yet been connected. Please press the 'connect' button and/or verify that the Gadgeteer listener is running.",

                    "Socket not connected"

                    );


                await dlg.ShowAsync();

            }

        }

    }

}
Most of the new code is in the OnMessageReceived handler. Note
also the check for connectivity in the SendButton_Click method. Try
clicking Send without connecting and you'll see a Metro style
dialog box.
Making the Gadgeteer send data to Metro
The Metro style app is now listening for messages. So, of
course, we need to make the Gadgeteer send it something. In this
case, it'll simply echo the data back with a prepended "ACK".
All of the Gadgeteer code is in the single module, Program.cs.
As I mentioned in the previous posts, this is for demo/prototype
purposes the app I'm working my way towards will have this factored
out into several other classes.
using System;

using System.Collections;

using System.Threading;

using Microsoft.SPOT;

using Microsoft.SPOT.Presentation;

using Microsoft.SPOT.Presentation.Controls;

using Microsoft.SPOT.Presentation.Media;

using Microsoft.SPOT.Touch;


using Gadgeteer.Networking;

using GT = Gadgeteer;

using GTM = Gadgeteer.Modules;

using Gadgeteer.Modules.GHIElectronics;

using System.Net.Sockets;

using System.Net;


namespace GadgeteerUdpDemo

{

    public partial class Program

    {

        // This method is run when the mainboard is powered up or reset.

        void ProgramStarted()

        {

            Debug.Print("Program Started");


            ethernet.UseStaticIP("192.168.1.200", "255.255.254.0", "192.168.1.1");


            // required due to Gadgeteer bug where NetworkUp event

            // doesn't fire on startup. Yes, this is brittle.

            if (ethernet.IsNetworkUp)

            {

                Debug.Print("Network is up");

                StartListener();

            }

        }


        Socket _socket;

        const int port = 5321;


        Thread _listenerThread;


        void StartListener()

        {

            Debug.Print("Starting listener");


            _socket = new Socket(AddressFamily.InterNetwork, SocketType.Dgram, ProtocolType.Udp);


            _listenerThread = new Thread(new ThreadStart(Listen));

            _listenerThread.Start();

        }


        void OnDataReceived(byte[] data, int length, EndPoint sender)

        {

            // parse the command and light up the LED

            Debug.Print("Data Received");


            char[] text = new char[length];


            for (int i = 0; i < length; i++)

            {

                text[i] = (char)data[i];

            }


            string textMessage = new string(text);

            Debug.Print("Message Received: " + textMessage);


            var ep = sender as IPEndPoint;

            if (ep != null)

            {

                Debug.Print(" -- From " + ep.Address.ToString() + ":" + ep.Port.ToString());

            }


            // Send ACK message

            SendMessage("ACK " + textMessage, sender);

        }


        public void SendMessage(string message, EndPoint endpoint)

        {

            Debug.Print("Sending " + message);


            byte[] bytes = new byte[message.Length];


            for (int i = 0; i < message.Length; i++)

            {

                bytes[i] = (byte)message[i];

            }


            _socket.SendTo(bytes, endpoint);

        }


        private void Listen()

        {

            EndPoint endpoint = new IPEndPoint(IPAddress.Any, port);

            _socket.Bind(endpoint);


            while (true)

            {

                if (_socket.Poll(-1, SelectMode.SelectRead))

                {

                    byte[] buffer = new byte[_socket.Available];


                    int length = _socket.ReceiveFrom(buffer, ref endpoint);


                    OnDataReceived(buffer, length, endpoint);

                }

            }

        }

    }

}
The main changes here include the Updated code in
OnDataReceived, where I do a little processing, and then the
SendMessage method which is used to send a UDP message back to a
specified endpoint. In this case, the endpoint is the one that sent
us the message to begin with.
Most of the code in OnDataReceived is there just for string
manipulation for display and debugging. That can all go away in a
real app. In fact, the sockets classes work quite happily with
buffers of bytes, without strings ever being involved.
That's it for code changes.
Test the application
With both the metro style app and the Gadgeteer app finished,
spin them up in debug mode. Wait for the Gadgeteer app to display
"Starting listener" in the output window before you start sending
any data. Then you can start sending messages.
Metro style app output
Click "Connect" and then send a few messages. You should see
acknowledgments almost immediately after the message is sent.
After four messages, this is what the Metro style app looks
like. The ListView on the right shows the messages back from the
Gadgeteer.

Gadgeteer debug output
The Gadgeteer debug output from the same time is shown below.
You can see four messages and then four acknowledgments.
Using mainboard GHIElectronics-FEZSpider version 1.0

Program Started

Network is up

Starting listener

Data Received

Message Received: Hello!

 -- From 192.168.1.5:56553

Sending ACK Hello!

Data Received

Message Received: Hello this is the second message

 -- From 192.168.1.5:56553

Sending ACK Hello this is the second message

Data Received

Message Received: This is the third message

 -- From 192.168.1.5:56553

Sending ACK This is the third message

Data Received

Message Received: And a fourth and final message. Bye!

 -- From 192.168.1.5:56553

Sending ACK And a fourth and final message. Bye!
I'd rate that a success :)
So now I have a decent store-friendly way to communicate between
my Gadgeteer (or other NETMF device) and my Windows 8 machine.
There's quite a bit we can do with that. Before I go there, though,
there's one last bit I want to do.
Next steps
The next step is to formalize the protocol so the ACKs are
meaningful and the messages sent to the Gadgeteer actually light up
the light. That will be in the next post, which will round out this
demo/prototype quite nicely.
