One of my pet projects requires using UDP sockets from a Windows
8 Metro style app to talk to a microcontroller. UDP sockets are a
pretty efficient way of communicating across wired and wireless
connections.
In this first part, we'll focus on prototyping the Metro style
XAML/C# app. The NETMF piece will be in the next post.
Test Setup
The first step is to figure out how we'll test this app. We're
using UDP networking, unlike the more TCP networking
(or HTTP) networking we do, you can't simply hit port 80 on a
website.
That said, when dealing with something like UDP networking, it's
good to keep the initial test as simple as possible. In this case,
I wanted to test that UDP packets could indeed be sent from the
Metro style app to another machine. Rather than create a throwaway
listener app, I simply installed Wireshark on
the destination PC and had it listen. I remote into my Windows 8
laptop from my main machine (which will run Windows 8 at release,
but not just yet). For grins, my test setup looks like this:
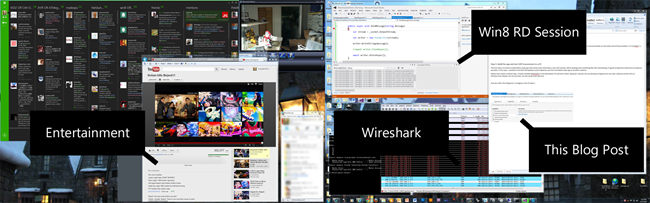
That's just for grins. And yes, that's this blog post,
in-progress. Sort of meta :)
Why Not Just Use NETMF from the start?
Creating the NETMF client at this point introduces another
variable. It's best to build (or prototype) in discrete pieces, so
we can sort out any firewall or other issues right up front. Don't
worry, we'll complicate things later. :)
Build the app
Create a new Metro style C#/XAML app. I named mine
MetroSocketsDemo.
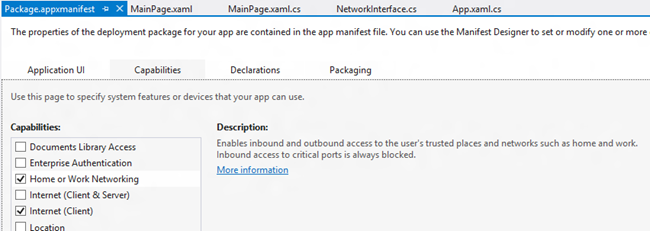
Before doing any development, double-click the
Package.appxmanifest and check off the "Home or Work Networking".
You'll need this capability to access local network resources.
If you forget to do this, you'll get an exception when you try to
open the socket in this example.
Home and work networks capability
The privateNetworkClientServer capability provides inbound and
outbound access to home and work networks through the firewall.
This capability is typically used for games that communicate across
the local area network (LAN), and for apps that share data across a
variety of local devices. If your app specifies musicLibrary,
picturesLibrary, or videosLibrary, you don't need to use this
capability to access the corresponding library in a Home Group.
The capability is shown checked on this image of the
appxmanifest designer.
If you're actually testing on a single machine instead of two
separate machines, you'll need to also set the "Allow Local Network
Loopback" property under the Debug tab of the project properties.
It's set by default, but it's important to understand why that's
there. Calls to 127.0.0.1 are not allowed in store apps, so
this is something you'd do in debugging only.
NetworkInterface Class
Next, add a class named "NetworkInterface". This will
encapsulate all the network access for the app.
using System;

using System.Collections.Generic;

using System.Linq;

using System.Text;

using System.Threading.Tasks;

using Windows.Networking;

using Windows.Networking.Sockets;

using Windows.Storage.Streams;


namespace MetroSocketsDemo.Services

{

    class NetworkInterface

    {

        private DatagramSocket _socket;


        public NetworkInterface()

        {

            _socket = new DatagramSocket();

        }


        public async void Connect(HostName remoteHostName, string remoteServiceNameOrPort)

        {

            await _socket.ConnectAsync(remoteHostName, remoteServiceNameOrPort);

        }


        public async void SendMessage(string message)

        {

            var stream = _socket.OutputStream;


            var writer = new DataWriter(stream);


            writer.WriteString(message);


            await writer.StoreAsync();

        }

    }

}
The code is easy enough to follow. In fact, if you've ever done
socket programming before, this code is probably even more simple
and compact than that. The DatagramSocket class from
Windows.Networking.Sockets (a WinRT component) makes it easy,
especially when combined with the async and await keywords. The expected use is
to call the Connect function giving it the host name (or IP
address) and the port number or service name. Once connected,
call SendMessage with a string to send across the wire.
User Interface
Next up, the XAML for the user interface. Simply add a
button and its handler, as shown here
<Page

    x:Class="MetroSocketsDemo.MainPage"

    IsTabStop="false"

    xmlns="http://schemas.microsoft.com/winfx/2006/xaml/presentation"

    xmlns:x="http://schemas.microsoft.com/winfx/2006/xaml"

    xmlns:local="using:MetroSocketsDemo"

    xmlns:d="http://schemas.microsoft.com/expression/blend/2008"

    xmlns:mc="http://schemas.openxmlformats.org/markup-compatibility/2006"

    mc:Ignorable="d">


    <Grid Background="{StaticResource ApplicationPageBackgroundThemeBrush}">

        <Button x:Name="ConnectButton" Content="Connect and Send"

                Click="ConnectButton_Click"/>

    </Grid>

</Page>
The result user interface is pretty bare - just a lonely button
on the page:

Then, in the code behind, wire up the handler
NetworkInterface ni = new NetworkInterface();


private void ConnectButton_Click(object sender, RoutedEventArgs e)

{

    ni.Connect(new HostName("192.168.1.6"), "5321");

    string cmd = "Hello!\r";


    ni.SendMessage(cmd);

}
The actual IP address to use is the one for your
destination PC/card. Use ipconfig from a command prompt to find the
address if you don't know it. Don't try this using just the IP
address I show here.
Test the app
Fire up Wireshark on the destination machine and set it to
capture. You can filter to just UDP if you want.
Once you have the capture started, run the application and click
the "Send Data" button. Give it a second, then stop the capture.
You should see an entry from your source PC, like the middle line
here:

If you double-click that line, you'll be able to inspect the
data directly:
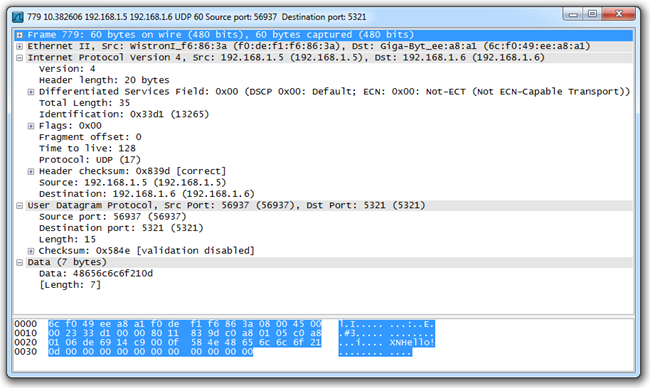
The total data sent is 7 bytes: "Hello!\n". The other characters
shown are part of the rest of the frame. In case there's any
question, the seven characters are shown in this table.
| Character |
H |
E |
L |
L |
O |
! |
\n |
| Value |
0x48 |
0x65 |
0x6c |
0x6c |
0x6f |
0x21 |
0x0d |
Next Steps
Now that we've verified that the message can make it across the
wire, we're ready to do something useful with it. The next post
will focus on building the .NET Gadgeteer Project and connecting to
it.
