In this post, I show how to set up the UDP code on the Micro
Framework side so it can listen to messages coming from the Windows
8 app.
This is part 2 in a series of posts about using sockets to
communicate between Windows 8 Metro apps and a microcontroller. The
rest of the series may be found here:
The .NET Gadgeteer endpoint
Currently, you need Visual Studio 2010 to develop .NET Gadgeteer
projects. If you have a Gadgeteer (or other .NET Micro Framework
device) you probably already know that. So, set up a new .NET
Gadgeteer Project named GadgeteerUdpDemo.
Module setup
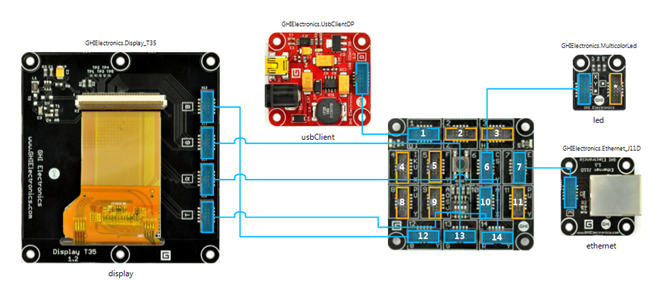
As is typical, I've included the T35 display and the UsbClientDP
modules in my circuit. The display is optional, but certainly helps
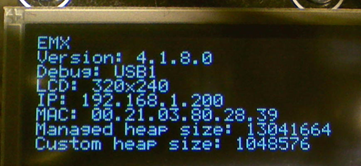
for debugging or when you want to see the IP address on bootup. In
addition, there's one MulticolorLed module and the ethernet module.
The LED module is there to provide something for us to command, and
the ethernet module is there to talk to the Windows 8 machine.

We won't use the LED in this post, but will in this overall
project.
Setting the Gadgeteer device IP
I set the IP in code as well as on the device. Let me come right
out and say that IP networking on the Gadgeteer is … troublesome.
There are some bugs, and some inconsistent behavior. Therefore, I
cover all the bases.
If your device hasn't picked up an IP, you may need to either
clear out the old one, or hard-code a new one. Open up the .NET
Micro Framework Deployment Tool (MFDeploy.exe) from the Tools
folder in your .NET Micro Framework installation. Set the transport
to USB, select the right device (EMX_Gadgeteer in my case) and ping
the device. If it pings, then select "Configuration | Network" and
set the static IP settings as appropriate for your network. You may
be able to use DHCP - if so, great. I have a post explaining how to set up networking on the
Gadgeteer which should help.
Use the MAC address provided with the board (should be on a
sticker underneath). Don't use my MAC address, Subnet and gateway
settings, but use settings for YOUR network. If you're not sure,
run ipconfig /all from a command line on your PC and see what it
gives you. That's a good starting point.

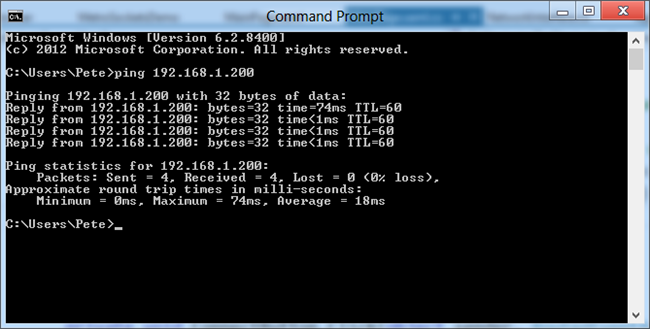
When set up, try pinging the device. The IP address of my
Gadgeteer is 192.168.1.200

Keep working at this until you can ping the device and you get a
return. Make sure your MAC address is correct, as MFDeploy likes to
put a randomly generated one in there.
The point is to verify that the Gadgeteer device is successfully
connected to the network and able to receive messages.
Main application code
To keep things demo (and proof-of-concept) simple, all the code
is right in the main program. For my actual project, I'll refactor
this out into a number of specialized classes. To set up the socket
listener code, I started from the code in this codeplex project.
using System;

using System.Collections;

using System.Threading;

using Microsoft.SPOT;

using Microsoft.SPOT.Presentation;

using Microsoft.SPOT.Presentation.Controls;

using Microsoft.SPOT.Presentation.Media;

using Microsoft.SPOT.Touch;


using Gadgeteer.Networking;

using GT = Gadgeteer;

using GTM = Gadgeteer.Modules;

using Gadgeteer.Modules.GHIElectronics;

using System.Net.Sockets;

using System.Net;


namespace GadgeteerUdpDemo

{

    public partial class Program

    {

        // This method is run when the mainboard is powered up or reset.

        void ProgramStarted()

        {

            Debug.Print("Program Started");


            ethernet.UseStaticIP("192.168.1.200", "255.255.254.0", "192.168.1.1");


            // required due to Gadgeteer bug where NetworkUp event

            // doesn't fire on startup. Yes, this is brittle.

            if (ethernet.IsNetworkUp)

            {

                Debug.Print("Network is up");

                StartListener();

            }

        }


        Socket _socket;

        const int port = 5321;


        Thread _listenerThread;


        void StartListener()

        {

            Debug.Print("Starting listener");


            _socket = new Socket(AddressFamily.InterNetwork, SocketType.Dgram, ProtocolType.Udp);


            _listenerThread = new Thread(new ThreadStart(Listen));

            _listenerThread.Start();

        }


        void OnDataReceived(byte[] data, int length, EndPoint sender)

        {

            // parse the command and light up the LED

            Debug.Print("Data Received");


            char[] text = new char[length];


            for (int i = 0; i < length; i++)

            {

                text[i] = (char)data[i];

            }


            Debug.Print(new string(text));

        }


        private void Listen()

        {

            EndPoint endpoint = new IPEndPoint(IPAddress.Any, port);

            _socket.Bind(endpoint);


            while (true)

            {

                if (_socket.Poll(-1, SelectMode.SelectRead))

                {

                    byte[] buffer = new byte[_socket.Available];


                    int length = _socket.ReceiveFrom(buffer, ref endpoint);


                    OnDataReceived(buffer, length, endpoint);

                }

            }

        }

    }

}
As I mentioned, the networking code in Gadgeteer is a bit buggy
(or strange, I haven't decided which), so rather than use the
helpful NetworkUp and NetworkDown events, I have to do a manual
check. I don't like it, it has the potential for a race condition,
but it works on my machine.
The code first sets up the same static IP address I entered in
MFDeploy. Then, it checks to see if the network is up. If so, it
starts a background thread which creates the Datagram/UDP socket
and listens for incoming messages. When a message is received, the
OnDataReceived method is executed. In there, I build a string and
spit it out to the output window. Because I only check once, if the
network doesn't come up, the code fails completely. Good enough for
a demo.
Sending data from the Metro style app
In the previous post, I showed how to send data. We sent a
simple "Hello!" message to port 5321 on another machine on the
network. Now we'll need to change that to use the IP address and
port set up on the Gadgeteer project. In my case, the Windows 8
Metro style app code looks like this:
private void ConnectButton_Click(object sender, RoutedEventArgs e)

{

    ni.Connect(new HostName("192.168.1.200"), "5321");

    string cmd = "Hello!\r";


    ni.SendMessage(cmd);

}
Make sure the IP address matches the one in the Gadgeteer code
and the port number matches the port constant in the same code.
Run the Gadgeteer project in debug mode, and then after you see
the listener on the board come up, press the "Connect and Send"
button on the Windows 8 app. You should see something like the
following in the Gadgeteer output window:

Note the "Data Received" and "Hello!" lines. That's data coming
directly from the Windows 8 app, using UDP. Success!
Next steps
Once you have that working, you'll be ready to actually do some
message processing and send something meaningful across the wire.
The next step (in the next posts) will be to set up two-way
communication and code up a simple protocol for turning the LED on
and off.
