I'm working on a little side project that requires the use of
Ethernet on the .NET Micro Framework. Here's how to get Ethernet
going on the .NET Gadgeteer, specifically the FEZ
Spider with the Ethernet
module. I also used a T35
display module. Both of the modules and the Spider were bought
as part of the larger FEZ Spider
Starter Kit.
This post covers what's needed to get started with
networking.
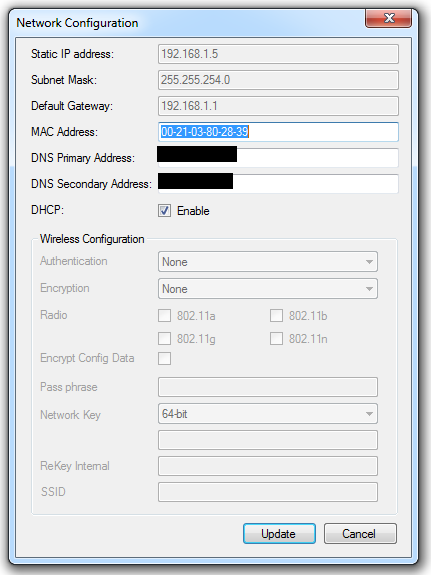
Set up the board in MFDeploy
The first step is to set up the board in MFDeploy. You can find
MFDeploy in the .NET Micro Framework SDK Tools folder off your
start menu. Connect to your board and then use the Target ->
Configuration -> Network menu option. The only thing you need to
set in this dialog is the MAC address; make sure it's the same
address as shown on the sticker on your board. This may not be
strictly necessary in all cases, but you want them to match, and
you will need a valid MAC address for most routers.

You don't need to select DHCP, as the Spider firmware will
ignore that. Other NETMF and Gadgeteer boards may use that value,
however. I'm in the habit of checking it off.
You may need to do this configuration again if you reflash your
board with new firmware (not new application, new core NETMF
firmware). Get in the habit of checking the MAC address after any
upgrade.
Once completed, you'll be ready to create the project.
Initial Connectivity and DHCP
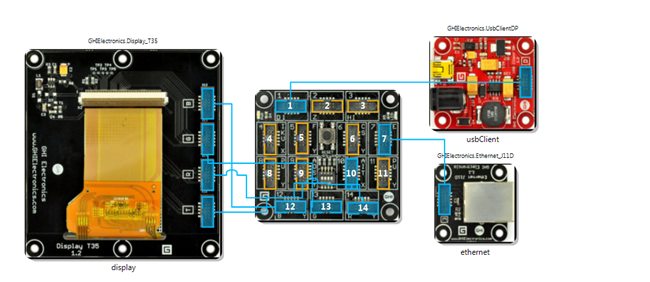
Open up Visual Studio 2010 and create a new Gadgeteer project.
For this first example, you'll need the ethernet module, your main
board (I'm using the FEZ Spider) and your power module. I also have
the display module there because it shows helpful information on
boot (including the MAC and IP), and also because I intend to use
it for another part of this project.

My internal network, like most networks, uses DHCP to allocate
network addresses. In the code to set up the board, I tell it to
use DHCP by calling the UseDHCP method of the ethernet module
driver. That method spins up a thread which attempts to get an IP
address via DHCP.
As you may know, network calls are typically high latency calls
when compared to calling local code. Just getting an IP address can
take several seconds. For those reasons, you'll need to use the
NetworkUp and NetworkDown events to get the state of your network
connection. Do not be tempted to hard code a Thread.Sleep as I've
seen in some code online. That may work on your specific network on
that specific day, but bring it someplace else, especially to a
busy network with lots of packets to process, and the results will
very likely be different.
using System;

using System.Threading;

using Microsoft.SPOT;

using Microsoft.SPOT.Presentation;

using Microsoft.SPOT.Presentation.Controls;

using Microsoft.SPOT.Presentation.Media;

using Microsoft.SPOT.Touch;


using Gadgeteer.Networking;

using GT = Gadgeteer;

using GTM = Gadgeteer.Modules;

using Gadgeteer.Modules.GHIElectronics;

using Microsoft.SPOT.Net.NetworkInformation;


namespace GadgeteerEthernetTest

{

    public partial class Program

    {

        // This method is run when the mainboard is powered up or reset.

        void ProgramStarted()

        {

            Debug.Print("Program Started");


            SetupEthernet();


            ethernet.NetworkUp += OnNetworkUp;

            ethernet.NetworkDown += OnNetworkDown;

        }


        void OnNetworkDown(GTM.Module.NetworkModule sender, GTM.Module.NetworkModule.NetworkState state)

        {

            Debug.Print("Network down.");

        }


        void OnNetworkUp(GTM.Module.NetworkModule sender, GTM.Module.NetworkModule.NetworkState state)

        {

            Debug.Print("Network up.");


            ListNetworkInterfaces();

        }


        void SetupEthernet()

        {

            ethernet.UseDHCP();

            //ethernet.UseStaticIP(

            //    "192.168.1.222",

            //    "255.255.254.0",

            //    "192.168.1.1");

        }


        void ListNetworkInterfaces()

        {

            var settings = ethernet.NetworkSettings;


            Debug.Print("------------------------------------------------");

            Debug.Print("MAC: " + ByteExtensions.ToHexString(settings.PhysicalAddress, "-"));

            Debug.Print("IP Address:   " + settings.IPAddress);

            Debug.Print("DHCP Enabled: " + settings.IsDhcpEnabled);

            Debug.Print("Subnet Mask:  " + settings.SubnetMask);

            Debug.Print("Gateway:      " + settings.GatewayAddress);

            Debug.Print("------------------------------------------------");

        }

    }

}
Here's the output from running in debug mode. Note that it takes
several seconds for the IP to be gotten via DHCP, at least on my
network. Make sure you use the events rather than a delay loop or
something. Also, I had to try three different cables (different
brands and categories) because, for some reason, the first two
didn't work with either my Netduino or the Spider. Don't put too
much stock in that just yet, just keep it in mind should you have
connectivity issues.
Using mainboard GHIElectronics-FEZSpider version 1.0

Program Started

Network down.

Network up.

------------------------------------------------

MAC: 00-21-03-80-28-39

IP Address:   192.168.1.5

DHCP Enabled: True

Subnet Mask:  255.255.254.0

Gateway:      192.168.1.1

------------------------------------------------
The ByteExtensions class is something I put together to make up
for a few things missing from NETMF (like string.Format). It
includes functions to work with bytes and byte arrays. The specific
one shown here, ToHexString, prints out bytes in hex notation. I
use a lookup table to make this nice and quick.
    private static char[] _hexCharacterTable = new char[]

                { '0', '1', '2', '3', '4', '5', '6', '7', '8', '9', 'A', 'B', 'C', 'D', 'E', 'F' };


#if MF_FRAMEWORK_VERSION_V4_1

    public static string ToHexString(byte[] array, string delimiter = "-")

#else

    public static string ToHexString(this byte[] array, string delimiter = "-")

#endif

    {

        if (array.Length > 0)

        {

            // it's faster to concatenate inside a char array than to

            // use string concatenation

            char[] delimeterArray = delimiter.ToCharArray();

            char[] chars = new char[array.Length * 2 + delimeterArray.Length * (array.Length - 1)];


            int j = 0;

            for (int i = 0; i < array.Length; i++)

            {

                chars[j++] = (char)_hexCharacterTable[(array[i] & 0xF0) >> 4];

                chars[j++] = (char)_hexCharacterTable[array[i] & 0x0F];


                if (i != array.Length - 1)

                {

                    foreach (char c in delimeterArray)

                    {

                        chars[j++] = c;

                    }


                }

            }


            return new string(chars);

        }

        else

        {

            return string.Empty;

        }

    }
Note the use of conditional compilation. If this class is being
used from NETMF 4.1 (current Gadgeteer code), which doesn't support
extension methods, then I declare this as a normal static method.
If an upcoming version of NETMF supports extension methods (I
haven't checked to see if 4.2 does), I'll update this to check for
that version specifically. Similarly, if I want to use this code on
the desktop, it's easy to compile it for that.
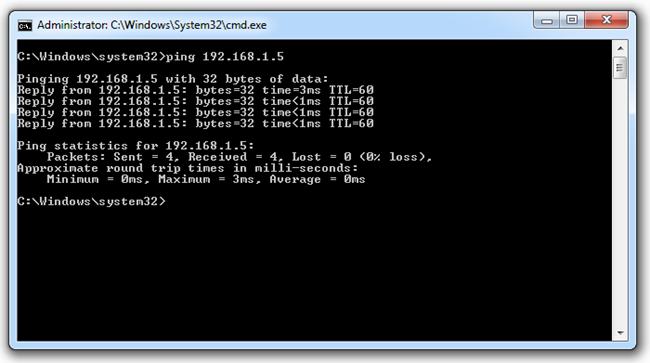
Test: Ping the Board
Open up a command prompt on your PC and ping the IP address you
see in the output window.

If your ping returns, you know the board is connected and
working correctly.
I'll be using this as the start of a fun project. Look for
future blog posts which cover additional details.
