I recently picked up a PIX-6T4 build by Fabien Royer (with games
by Fabien Royer and Bertrand Le Roy). This is a 64 pixel, two
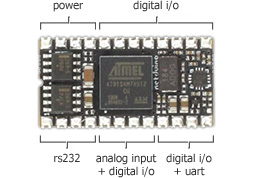
joystick/button, monophonic sound hand-held game device based
around the Netduino Mini from Secret Labs. You create games in C#
using Visual studio.
Disclaimer: I work for Microsoft and I enjoy working in the .NET
Micro Framework as well as C++ on other microcontrollers. I
purchased this product on my own, at full price; this is not a
sample or review unit. Presumably, I got the same package of
goodies everyone else gets.
Unboxing
The kit came in a regular USPS shipping box inside which were
four bags. Two bags had components, and two had joysticks.
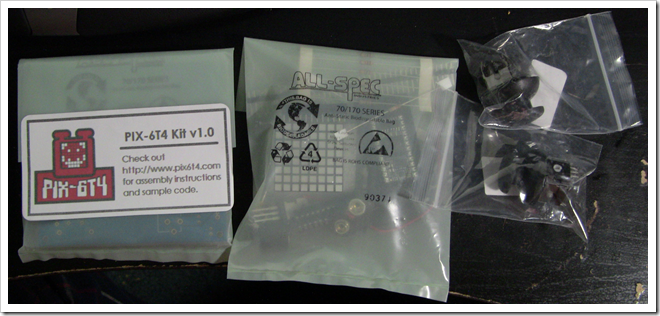
Everything was well-packed in ESD safe bags. The two joysticks
were in their original as-delivered bags.
What's inside?
What the Kit Includes
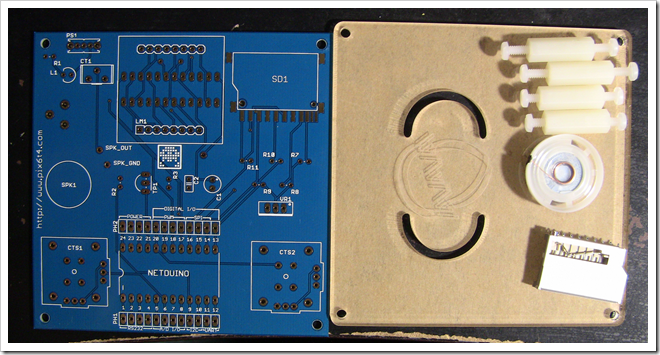
The kit includes just about everything you need to assemble a
working PIX-6T4 handheld game console. The PCB, of course, as well
as a nice laser-cut acrylic bottom.
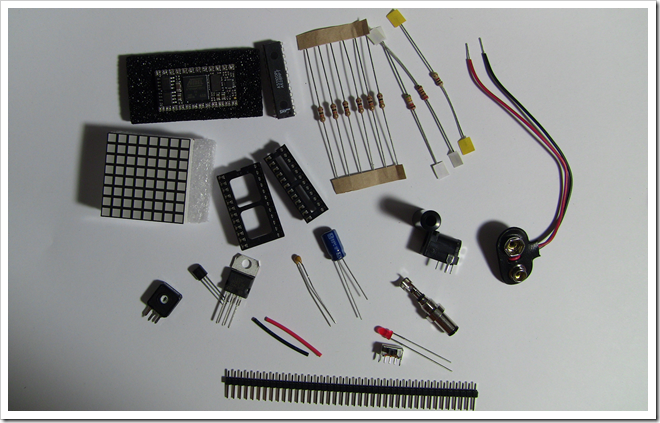
It can be powered by a 9v battery or a regular 9v power supply.
When using a battery, you solder a barrel jack on the battery lead
to make it easy to switch between the two.
The entire thing is open source hardware and software from the
Netduino all the way up to the full kit and the software to run
it.
What it doesn't Include
A USB to Serial converter. Many people with
Netduino minis already have one of these cables. You can get them
cheap online, or (worst case) get one at Best Buy or Fry's. I
happened to have one just because my C64-TPC (a connection between
my Commodore and my PC) needed one. Putting on-board USB would have
been nice, but that typically requires a surface-mount FTDI chip
which is very difficult for DIY soldering (or a breakout board from
a place like SparkFun which adds bulk, cost, and complexity). The
Netduino mini, unlike the Netduino, doesn't
offer an external USB interface. So, while I'm not a fan of the
serial approach, I do think it was the best choice here.
You can play the stock games by just loading them on the SD
card. However, if you want to do any programming or debugging
of your own, you'll really need the USB converter, as debugging is
impossible without it.
Speaking of SD card, that's the other things that you'll need:
A FAT32-formatted SD card. You'll need one of
these to store the games you write and also to load the stock
games.
Assembly
I love the blue board. I've always liked blue, black and red
PCBs. The typical green solder mask just looks too much like some
crap 486 motherboard. I'm glad they went with something attractive
here.
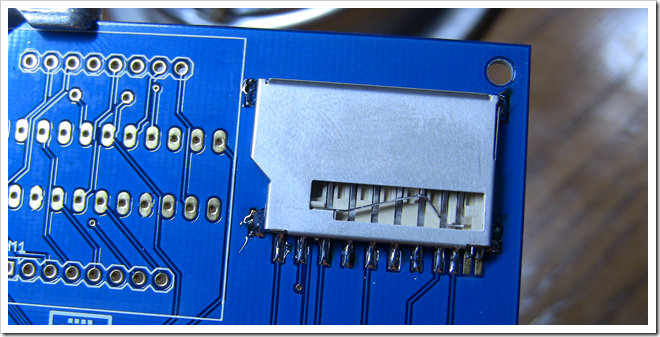
First step is the most unusual bit of soldering. There's one
surface mount component, but it's stunningly easy to solder. That's
the SD card slot. Make sure you following the video and do not
solder the two pins on the right (although if they're not connected
to anything, as long as you don't short them, I would think they'd
be fine)
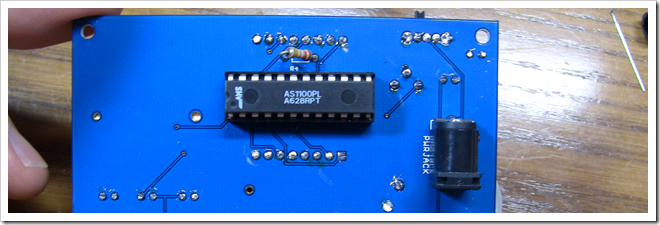
Next up, flip the board over and install the IC socket for the
LED controller, and then a resistor.
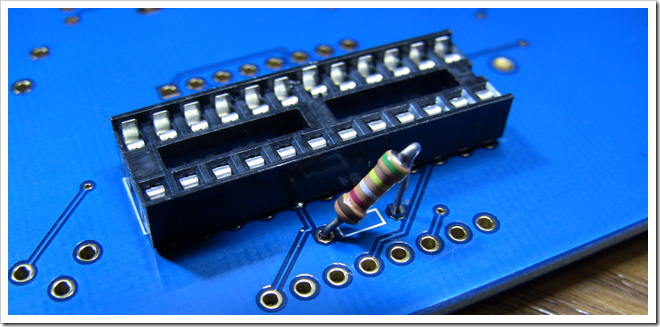
In this particular case, it seems the stencil for the resistor
was sized for a 1/8" watt resistor. The space is also cramped, but
this resistor sticking up like that just breaks my heart. At least,
it's on the bottom side of the board so we can all hide our shame
:)
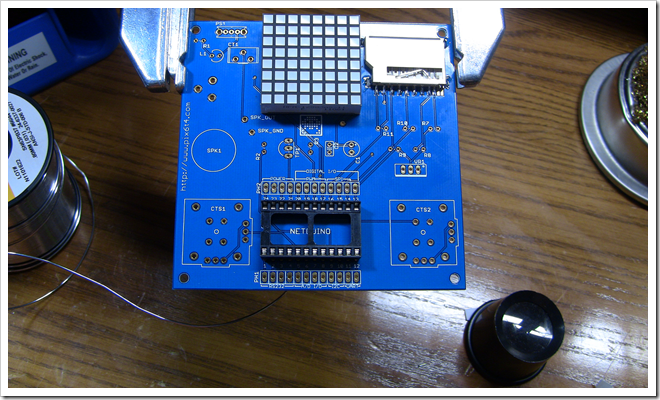
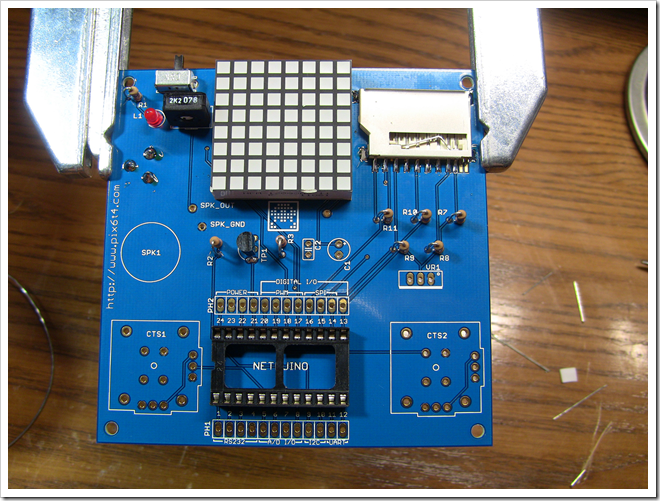
Next, up, the LED array and then the Netduino mini socket.
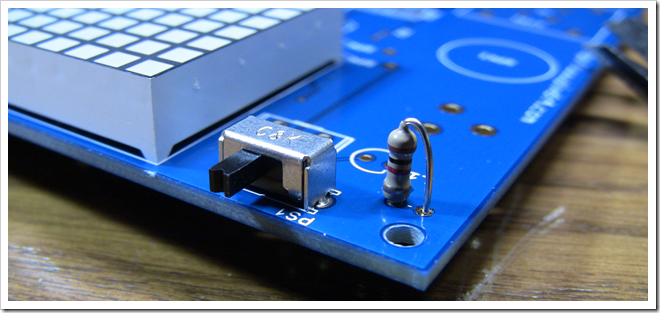
A power switch and another resistor standing at attention
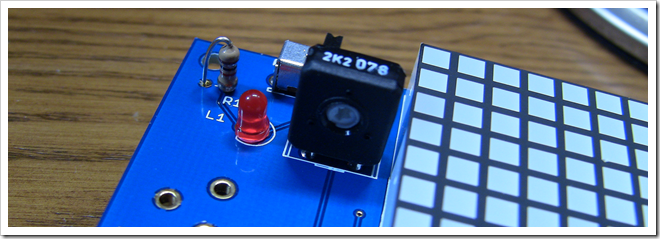
From there, it's the audio trim pot and the power LED. At this
point, I have to mention that the power LED is REALLY bright and in
your face when you're trying to play. I covered mine with a little
bit of black paint, but even that isn't quite enough. I actually
think it would be better to solder that LED upside down, so it is
on the underside of the board. That might even be a cool effect
with the acrylic down there. Fabien mentioned he might bump up the
resistor value, but the more I think about putting it upside down,
the more I like it. I might even desolder mine and put a new LED
underneath :)
I did a few more steps before taking another photo. Resistors,
the power connector (underside), and a transistor are all in
place.
In case you haven't gathered, I'm not a big fan of having
resistors stand up in general. In fact, I hate them in all but the
most cramped design with huge multi-watt resistors. They're easy to
knock over, bend, etc, and they're more difficult to solder in that
configuration. There's tons of spare room on this board, so I'm not
entirely sure why Fabien and folks did that. Just be careful when
soldering the other components so you don't break these off.
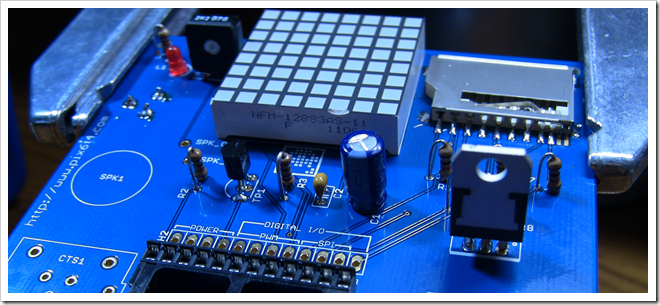
Ceramic capacitor, electrolytic capacitor, and the 3.3v power
regulator in place. If I were designing this board, I think I would
have found a way to position the regulator so it lay flat on the
board with its leads bent at 90 degree angles. That's a pretty
common approach in other builds, like the Sammich SID I built.
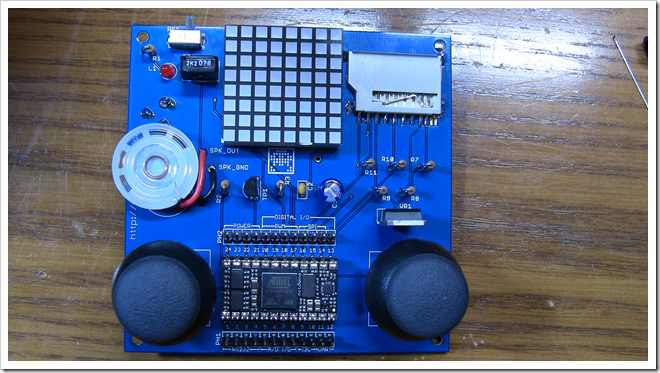
Finally, the joysticks, pin headers, and the ICs themselves.
Before I installed the ICs, I went and cleaned the bottom of the
board with flux remover spray and a cleaning brush. It helps clean
things up quite a bit. You'll see later, it also helped me see a
bad solder joint. Organic Rosin flux isn't super harmful to leave
on, but it's ugly to see on the board.
Don't forget the one IC that goes on the bottom.
Smoke Test
Time for a power-on test! After I cleaned it up, dried if off,
and installed the ICs, I powered it up without an SD card. This is
what I saw:
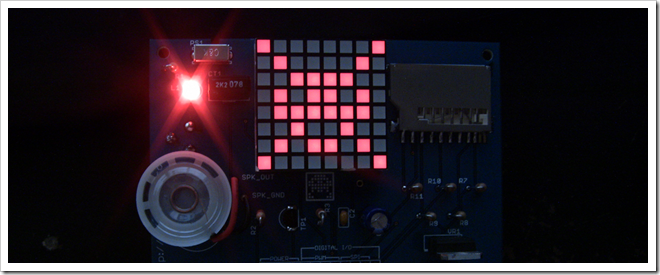
Sweet! I got the skull and crossbones, which means it's working.
As an aside, you can also see what I was talking about with the
super bright LED. It easily overpowers the playing field. Looks
cool in a photo, though, a bit like a Star Trek II photon
torpedo.
Next, I copied the three game folders (from the zip file
referenced on the PIX-6T4 site) on to a 512MB SD card and started
it up. I was greeted by the icons of the games I could choose. I
picked a game and then…
And…I got nothing.
At first I thought it was this bad solder joint (which makes no
sense, but hey, I figured the code was perfect!). It's really hard
to see in this picture (and in fact, it looks ok in this picture),
but when viewed through a lens you can see that I never heated the
pin: the solder goes around the pin but never really joins with
it.
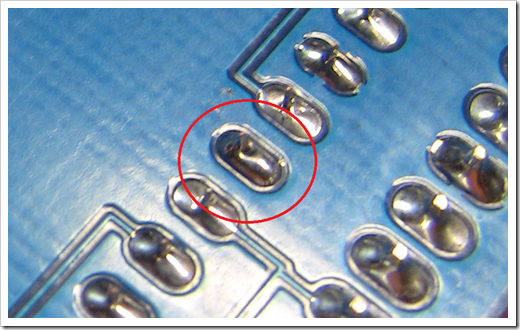
I only found this after cleaning the board with flux remover.
Flux can fill in holes like that and make it so you can't see them
without doing a continuity test. I resoldered that pin (and the one
next to it which didn't look much better), and then did a
continuity test between the mini and each of the breakout pins,
just to make sure there were no others.
Still no go.
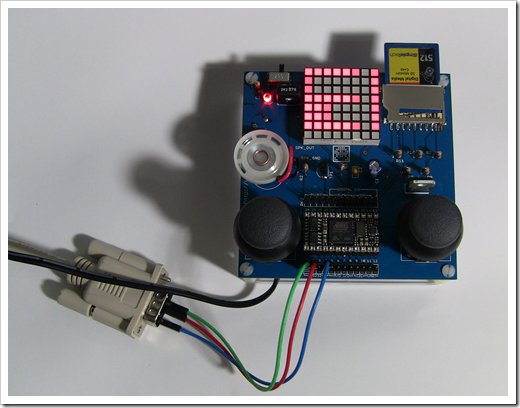
After trying out a few SD cards and getting nothing, and
following some other suggestions from Fabien, I still had nothing.
Finally, Fabien recommended I dig out that usb->serial cable (I
wasn't able to find it at first) and compile and re-deploy the current source from
Codeplex. Guess what? It worked :)
It turns out I had one of the Netduino Minis that had the old
firmware on it, and the games were built with new firmware. The
deploy got them synchronized.
Excellent. I have a working PIX-6T4 :)
The Test Games
I tried the games that come with it. One plays the Pac Man song,
one is a game of pong, and the other is an asteroid avoidance game.
You have only 64 pixels to work with, and they're all the same
color, so like the early days of video games, you need to use your
imagination.
The stock games are well done. However, since I had the
debugger/programmer connected, I wanted to go and build something
myself.
My First Game
My first game is going to be a test game. I added a new Netduino
application project named "PeteTestGame". I did this in the same
solution that contains the PIX6T4 source code and the other three
stock games. Next, I added a reference to pix6t4.netduino.helpers
project.
In the project, I also removed the reference to
SecretLabs.NETMF.Hardware.Netduino and add reference to
SecretLabs.NETMF.Hardware.NetduinoMini
Next, add a GameOfTest class. I named it this following the
naming conventions Fabien and Bertrand set up, but you can call it
anything. GameOfThrones is an obvious choice ;)
The GameOfTest class
using System;

using Microsoft.SPOT;

using netduino.helpers.Fun;


namespace PeteTestGame

{

    class GameOfTest : Game

    {

        public GameOfTest(ConsoleHardwareConfig config)

            : base(config)

        {


        }


        protected override void OnGameEnd()

        {

            base.OnGameEnd();

        }


        protected override void OnGameStart()

        {

            base.OnGameStart();


            ScrollMessage(" Hello World!");

        }


        protected override void OnLeftButtonClick(uint port, uint state, DateTime time)

        {

            base.OnLeftButtonClick(port, state, time);

        }


        protected override void OnRightButtonClick(uint port, uint state, DateTime time)

        {

            base.OnRightButtonClick(port, state, time);

        }


        public override void Loop()

        {


        }

    }


}
Program
Next, I copied the Program.cs from one of the other projects. I
made three changes to the source:
- Uncomment the #define dev at the top
- Changed the namespace to match the rest of the project
- Changed the class in the Run method to be GameOfTest instead of
the one copied from the other project
The program.cs enables you to deploy your test game as the only
game on the device, without worrying about building up a manifest
and icon and dealing with the SD card and whatnot. Obviously, this
also makes debugging possible.
Set the game project as startup. Next, right-click and select
project properties and navigate to the .NET Micro Framework tab.
Make sure the deployment is set to Serial and you have the COM port
that your Netduino mini is attached to.
Once done, you can run the project. In my case, I immediately
saw the scrolling (and repeating) Hello World text. The
ScrollMessage function is doing all the heavy lifting. It's great
that Fabien put in the nifty retro font in there as well.
Next step was to add some beeping. Because, well, it's not a
game without beeping.
using System;

using Microsoft.SPOT;

using netduino.helpers.Fun;


namespace PeteTestGame

{

    class GameOfTest : Game

    {

        public GameOfTest(ConsoleHardwareConfig config)

            : base(config)

        {


        }


        protected override void OnGameEnd()

        {

            base.Beep(440, 500);

            base.Beep(220, 500);

            base.Beep(440, 500);

        }


        protected override void OnGameStart()

        {

            base.OnGameStart();


            base.Beep(440, 500);

            base.Beep(220, 500);

            base.Beep(440, 500);


            ScrollMessage(" Hello World!");

        }


        protected override void OnLeftButtonClick(uint port, uint state, DateTime time)

        {

            base.OnLeftButtonClick(port, state, time);


            base.Beep(440, 500);


        }


        protected override void OnRightButtonClick(uint port, uint state, DateTime time)

        {

            base.OnRightButtonClick(port, state, time);


            base.Beep(220, 500);


        }


        public override void Loop()

        {


        }

    }


}
Now it plays a few beeps on startup and then beeps when you
press down on either joystick. Note that that does stop the
scrolling text, however.
I'll leave the more complex games to a later date :)
Update 1/22: To see my first real full game, check out
my blog post
on building Sixty4Racer.
Conclusion
I'm impressed with what Fabien has come up with here, and the
stock games he and Bertrand have done are just perfect. I think the
board and enclosure could use a little more design to make it more
compact and also more hand-friendly, but overall, I think this is
an excellent way to get into Netduino programming using something
fun and exciting. Also, because of the display technology, you are
constrained to creating games with very simple graphics (just LEDs)
so, by necessity, you avoid that common barrier to entry. Sometimes
constraint is a good thing.
Congratulations Fabien and Bertrand!
