MIDI (Musical Instrument Digital Interface) has been around
since the 80s. Initially, it was just a replacement for the CV
(Control Voltage) approach to getting different keyboards and sound
modules to play together. Later, it evolved as a way to sequence
entire productions, and to receive and transmit patch information.
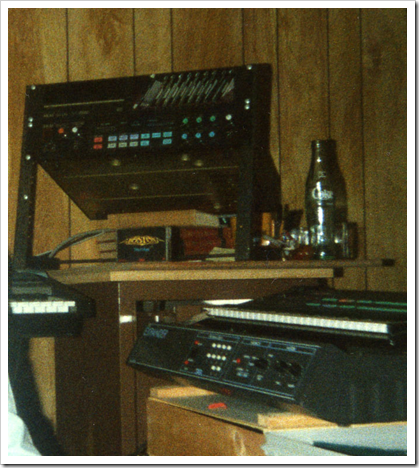
Here's a setup I had one summer, using my HS-60 (a Juno 106) to
control an old 8-bit sampler that used mini disks, and a SIEL EX-600 Expander MIDI sound module, both
borrowed from my high school.
MIDI itself is a serial protocol, easily handled with any device
that can send/receive serial signals. I even built my own little MIDI unit using a
Netduino's serial communications pins. I later expanded on that to
include some Micro Framework code to parse MIDI
messages.
MIDI Interfaces
There are three different USB MIDI interfaces in this picture.
Can you spot them?
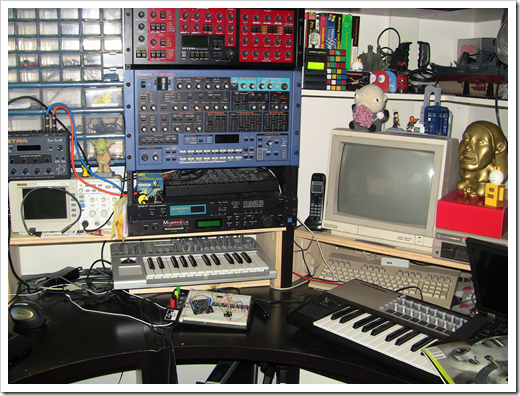
Here they are:
- The Dave Smith Tetra on the left, on top of the
oscilloscope
- The Novation X-Station under the rack and shelf
- The Novation 49SL controller keyboard on the right, in front of
the Commodore 128
Every other MIDI device in that picture is just a regular old
MIDI box, without a USB interface. Currently, the X-Station is the
main MIDI and audio interface, but I have a MOTU hybrid rack unit coming so I can use the
X-Station for its synth capabilities rather than its so-so digital
audio functions.
So, if you want to use the MIDI interface, you'll need to ask
the user which one they want to work with. In many cases, you'll
even want to work with more than one: for example, one for input
and another for output, or multiples for output to different
instruments. Having multiple interfaces is one way to get around
the MIDI limitation of 16 instrument channels.
In Windows, the way you get the list is to enumerate the MIDI
interfaces using the MM APIs. The rest of this post will show how
to use PInvoke in Silverlight 5 to get a count of the output
devices, and then loop through requesting details for each of those
devices.
Platform Invoke (PInvoke or P/Invoke) in Silverlight 5
PInvoke in Silverlight 5 enables you to call Win32 style APIs
from a trusted Silverlight application both in-browser and out. The
user must trust the application first, however. PInvoke in
Silverlight looks just like PInvoke on the desktop. You copy the
type declaration into your code, set up any dependent types
(structures, enums, constants, etc.) and then call the function
like any other .NET code. Here's an example declaration.
[DllImport("winmm.dll", SetLastError = true)]

static extern uint midiOutGetNumDevs();
The DllImport attribute is found in the
System.Runtime.InteropServices namespace.
Win32 API calls tend to be a little uglier than what you see in
normal .NET code (something that Windows 8 WinRT fixes with better
naming and .NET-style Metadata) so I recommend wrapping the calls
into a class which handles all the ugliness. Like most interop
scenarios, the ugliness and recreation of the required types and
constants, is where you'll spend most of the work. You could take
the easy route and just use the functions like you would anything
else, but then the developers on your team would slap you silly for
exposing that code.
TIP
When you want to find the signature of a method, MSDN can be a
real help. However, the site PInvoke.net has tons of great API declarations
and is usually more approachable for .NET developers.
With that background in place, let's start writing some
code.
Enumerating Interfaces
Here's what the application will look like when completed:
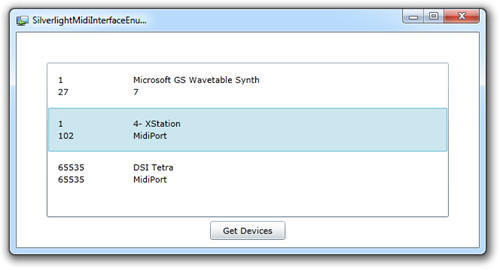
I show only the three interfaces (one internal plus two
physical) because my main MIDI controller keyboard (the Novation
SL49) is currently powered down.
The purpose of this demo is just to show using PInvoke to
enumerate the MIDI interfaces. So, I created a normal Silverlight 5
out of browser elevated trust application with very simple UI - a
ListBox and a button. We'll add a template to the ListBox later,
but for now, here it is:
<UserControl x:Class="SilverlightMidiInterfaceEnum.MainPage"

    xmlns="http://schemas.microsoft.com/winfx/2006/xaml/presentation"

    xmlns:x="http://schemas.microsoft.com/winfx/2006/xaml"

    xmlns:d="http://schemas.microsoft.com/expression/blend/2008"

    xmlns:mc="http://schemas.openxmlformats.org/markup-compatibility/2006"

    mc:Ignorable="d"

    d:DesignHeight="300" d:DesignWidth="400">


    <Grid x:Name="LayoutRoot" Background="White">

        <ListBox x:Name="InterfaceList"

                 ItemsSource="{Binding OutputDevices}"

                 Margin="40">


        </ListBox>

        <Button x:Name="GetDevices"

                Content="Get Devices"

                Click="GetDevices_Click"

                HorizontalAlignment="Center"

                VerticalAlignment="Bottom"

                Margin="10"

                Height="25"

                Width="100" />

    </Grid>

</UserControl>
Note that the ListBox is binding to a property named
OutputDevices. We'll see that on the viewmodel shortly.
I created a basic viewmodel named MainViewModel and a related
model class named MidiInterfaceInformation to hold the information
about the interfaces. Whether or not you take this approach depends
on your take on the MVVM pattern. I happen to like the pattern, and
the use of services, so I've followed that here.
The MIDI Service
The MIDI service is used by the viewmodel to handle the
interaction with the win32 API. The main point of the service, as
written, is to return a list of output devices. This is where all
the PInvoke magic is happening. Note the DLLImport statements and
the later calls to the services it defines.
using System;

using System.Runtime.InteropServices;

using SilverlightMidiInterfaceEnum.Model;

using System.Collections.Generic;


namespace SilverlightMidiInterfaceEnum.Services.Midi

{

    public class MidiService

    {

        [DllImport("winmm.dll", SetLastError = true)]

        static extern uint midiOutGetNumDevs();


        [DllImport("Winmm.dll")]

        static extern uint midiInGetNumDevs();


        [DllImport("winmm.dll", SetLastError = true)]

        static extern uint midiOutGetDevCaps(UIntPtr uDeviceID, out MIDIOUTCAPS caps, uint cbMidiOutCaps);


        public IList<MidiOutputDeviceCapabilities> GetOutputDevices()

        {

            var devices = new List<MidiOutputDeviceCapabilities>();


            uint outputDeviceCount = midiOutGetNumDevs();


            for (int x = 0; x < outputDeviceCount; x++)

            {

                MIDIOUTCAPS caps = new MIDIOUTCAPS();

                midiOutGetDevCaps((UIntPtr)x, out caps, (uint)Marshal.SizeOf(typeof(MIDIOUTCAPS)));


                var capabilities = new MidiOutputDeviceCapabilities();


                // we'll only deal with the product name and ID for now

                capabilities.ManufacturerDeviceDriverID = caps.wMid;

                capabilities.ProductIdentifier = caps.wPid;

                capabilities.DeviceType = (MidiOutTechnology)caps.wTechnology;

                capabilities.ProductName = caps.szPname;


                devices.Add(capabilities);

            }


            return devices;

        }

    }

}
Support Classes
The service uses a number of classes, structures and
enumerations. Some of these, like MIDIOUTCAPS are required by the
Win32 API. Others, such as the MidiOutputDeviceCapabilities are
model classes I wrote to hide the ugliness of the structs. All
three are in separate files, but included in a single listing
below. Note that I didn't fill out all the fields in the
MidiOutputDeviceCapabilities class; that wasn't necessary for this
particular example.
using System;

using System.Runtime.InteropServices;

using SilverlightMidiInterfaceEnum.Model;
namespace SilverlightMidiInterfaceEnum.Model

{

    public enum MidiOutTechnology

    {

        MidiPort =    1,

        Synth =      2,

        InternalSquareSynth = 3,

        InternalFMSynth = 4,

        MidiMapper = 5

    }

}


namespace SilverlightMidiInterfaceEnum.Model

{

    public class MidiOutputDeviceCapabilities

    {

        public long ManufacturerDeviceDriverID {get; set;}

        public long ProductIdentifier {get; set;}

        public int DeviceDriverVersionMajor {get; set;}

        public int DeviceDriverVersionMinor {get; set;}

        public string ProductName {get; set;}

        public MidiOutTechnology DeviceType {get; set;}

        public int NumberOfVoices {get; set;}

        public int Polyphony {get; set;}

        public short ChannelMask {get; set;}

        public bool SupportsPatchCaching {get; set;}

        public bool SupportsSeparateLeftAndRightVolume {get; set;}

        public bool SupportsMidiStreamOut {get; set;}

        public bool SupportsVolume {get; set;}


    }

}


using System.Runtime.InteropServices;


namespace SilverlightMidiInterfaceEnum.Services.Midi

{

    [StructLayout(LayoutKind.Sequential)]

    struct MIDIOUTCAPS

    {

        public ushort wMid;

        public ushort wPid;

        public uint vDriverVersion; // MMVERSION

        [MarshalAs(UnmanagedType.ByValTStr, SizeConst = 32)]

        public string szPname;

        public ushort wTechnology;

        public ushort wVoices;

        public ushort wNotes;

        public ushort wChannelMask;

        public uint dwSupport;

    }

}
The ViewModel calls the service and exposes the
MidiOutputDeviceCapabilities data to the client in the form of an
ObservableCollection. That collection is binding-friendly and can
be used directly from the UI XAML.
using System;

using System.Collections.ObjectModel;

using SilverlightMidiInterfaceEnum.Model;

using SilverlightMidiInterfaceEnum.Services.Midi;


namespace SilverlightMidiInterfaceEnum.ViewModels

{

    public class MainViewModel

    {

        private ObservableCollection<MidiOutputDeviceCapabilities> _outputDevices =

            new ObservableCollection<MidiOutputDeviceCapabilities>();

        public ObservableCollection<MidiOutputDeviceCapabilities> OutputDevices

        {

            get { return _outputDevices; }

        }


        public void LoadMidiOutputDeviceList()

        {

            var svc = new MidiService();


            var devices = svc.GetOutputDevices();


            // toss them in the Observable collection to support binding

            foreach (MidiOutputDeviceCapabilities device in devices)

            {

                _outputDevices.Add(device);

            }

        }


    }

}
Finally, there's just a little wire-up to do. If you used the
command pattern, you wouldn't have the button click event handler
here. If you used IOC, you likely wouldn't have the viewmodel
wire-up. Neither are necessary for this example.
using System.Windows;

using System.Windows.Controls;

using SilverlightMidiInterfaceEnum.ViewModels;


namespace SilverlightMidiInterfaceEnum

{

    public partial class MainPage : UserControl

    {

        private MainViewModel _vm = new MainViewModel();


        public MainPage()

        {

            InitializeComponent();


            DataContext = _vm;

        }


        private void GetDevices_Click(object sender, RoutedEventArgs e)

        {

            _vm.LoadMidiOutputDeviceList();

        }

    }

}
Run the application and click the button. What do you see?
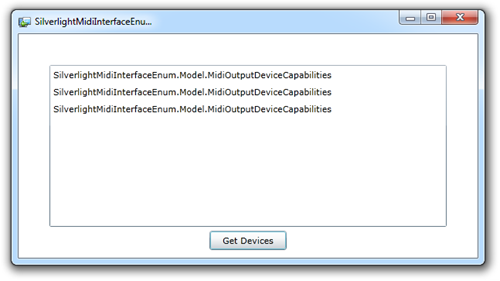
Hmm. That's not quite what we want. What's happening is that the
ListBox item template is doing the normal thing a content control
does: it renders the object as a string using the ToString()
method. In the case of a class, you'll get the class name. If you
override ToString, you can get better text, but that's no fun. So
let's add a data template to the ListBox to pretty up the output
and provide something more meaningful.
Finishing the ListBox
Data Templates are a great feature of XAML. All the XAML
technologies (Silverlight, WPF, WinRT) support data templates for
content controls and items controls. In this case, we'll use a data
template and binding to show a few of the fields on the
MidiOutputDeviceCapabilities class.
Replace the ListBox XAML with this new version
<ListBox x:Name="InterfaceList"

            ItemsSource="{Binding OutputDevices}"

            Margin="40">

    <ListBox.ItemTemplate>

        <DataTemplate>

            <Grid Margin="10">

                <Grid.ColumnDefinitions>

                    <ColumnDefinition Width="100" />

                    <ColumnDefinition Width="*" />

                </Grid.ColumnDefinitions>


                <StackPanel Grid.Column="0">

                    <TextBlock Text="{Binding ManufacturerDeviceDriverID}" />

                    <TextBlock Text="{Binding ProductIdentifier}" />

                </StackPanel>

                <StackPanel Grid.Column="1">

                    <TextBlock Text="{Binding ProductName}" />

                    <TextBlock Text="{Binding DeviceType}" />

                </StackPanel>

            </Grid>

        </DataTemplate>

    </ListBox.ItemTemplate>

</ListBox>
The XAML defines a ListBox with a data template. The template
includes a two column grid (for each row). Each column controls two
TextBlock elements stacked vertically inside a StackPanel. It's all
text, but at least it is meaningful text.
With that new ListBox in place, your UI should look just fine,
like the screenshot at the beginning of the section.
Summary
In this post, we used Silverlight 5 PInvoke support to enumerate
the MIDI Output devices on our system. We listed them in a ListBox,
using a little bit of the MVVM pattern to help with transformation,
then formatted the UI using a Data Template.
Source code is attached.