For many people, MIDI means that awful music that plays in the
background of a circa 1999 web page (yes, there are still a bunch
around), but MIDI is more than just a data file format, it's a
complete protocol for communication between musical devices. In
fact, it was a communications mechanism long before it was a file
format.
I like to play with synthesizers. I have little musical talent,
but I like manipulating sound. During high school and early in
college, I worked at a music store. At the time, I got to play with
all sorts of cool analog and digital synths. This was the late 80s
and early 90s, so I was able to mess around with analogs that came
in in trade, as well as newer digitals just arriving from Roland
and Korg.
I had a Roland Juno 106 (in its HS-60 incarnation), a Korg
DW-8000, and later the Yamaha EX-5 that is still in my office. I've
also had various rackmount and tabletop units like the MT-32 (still
in storage), my SH-32 (on my desk), some GS boxes, M-VS1 and more.
I have FL Studio 9 and a small midi controller keyboard on my desk
for tinkering with midi and softsynths.
I'm also in the process of combining one of my other passions,
Commodore computers, with my interest in sound synthesis through
the building of a Midibox SammichSID kit. (yeah, it's two
Commodore 64 SID chips and the Sammich SID electronics doing
everything but the drums in that video)
At one point, I even messed around with creating a software synthesizer using Silverlight. I've
decided to take what I learned from that, and implement a simple
synthesizer using the Netduino. For the first step, I thought I'd
try to implement simple MIDI-in functionality so I can access the
Netduino from my keyboard controller.
This is a really simple MIDI interface, but involves a number of
parts you likely don't have hanging around. If that sounds like a
pain, you can purchase a MIDI
shield with a more robust implementation.
Parts Used
- (1) 5 pin DIN Midi Port (I'm using a stray salvaged connector
from an ancient Roland MPU-IPC until my Mouser order comes
in) (buy, data sheet, alternate)
- (2) 220 ohm 1/4 watt resistor (red - red - brown - gold)
- (1) 6N138 Opto Isolator (buy, data sheet)
- (1) 1n4148 Diode (buy, data sheet)
- (1) A few pieces of hookup wire
- 1 Netduino (http://netduino.com)
- A prototyping board, or a lot of clips, or a PCB if you're
feeling adventurous
- Midi Controller Keyboard (E-MU in this case)
I order almost all my parts from Mouser. They have a nice easy
to navigate site compared to most, a huge selection, decent prices,
and fast shipping. That said, most of my generic resistors have
come from Radio Shack locally.
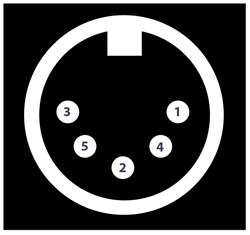
The MIDI Connector
If you're looking at the connector, in its normal use with the 5
sockets in a half moon across the bottom as though it were attached
to a PC board, the pins are:
The pins are used for different things depending on whether
you're using it for In, Out or Thru. In our case, we'll be using it
for MIDI In.
| Pin |
Midi In |
Midi Out |
Midi Thru |
| 1 |
Not used |
Not used |
Not used |
| 2 |
Not used |
Ground |
Ground |
| 3 |
Not used |
Not used |
Not used |
| 4 |
In + |
+5v |
+5v |
| 5 |
In - |
Signal |
Signal |
Understanding the MIDI connector pinout is essential. Honestly,
it can be confusing because the pins aren't numbered in order and
your point of view varies as you look at the cable and socket from
front and back. Refer back to the above information when wiring up
your connections
The Design
I used this schematic and this schematic and this schematic and this data sheet as starting points to help me
figure out how these things are normally wired up. Remember, I'm a
developer, learning electronics as I'm going here, so I really need
to build on what others have done. It took me most of the evening
to figure out how to wire this thing up. If I did
something dumb, please let me know…nicely :)
Here's the schematic I came up with to support MIDI In only.
Adding MIDI Out adds a fair bit of complexity, and since I won't
use it here, I've left it out.
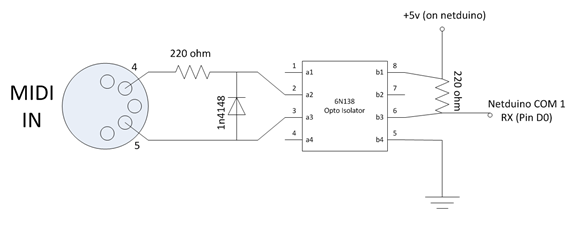
The 220 ohm resistor on MIDI pin 4 is standard in all the MIDI
diagrams I've seen. If you were to use this as a midi out instead
of a midi in, you'd also add in a ground on pin 2 (center pin) of
the connector.
The opto isolator does two key things for us
- It avoids frying equipment as there is no electrical connection
between the MIDI controller and the Netduino with the isolator in
place
- It inverts the signal for us. MIDI uses the crazy standard of a
negative signal being a 1 and positive being a 0.
About Opto-isolators
Opto-isolators (or photocouplers) are pretty interesting beasts.
Essentially they break your electrical signal path so there is no
wire connection from input to output. Instead, they use an LED that
turns on based on the input voltage, and a photosensor which picks
up whenever the LED is turned on. Using input voltage, the chip
them emits the voltage based on what the photosensor picked up.
Pretty neat if you ask me.
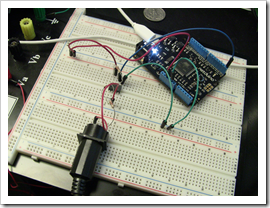
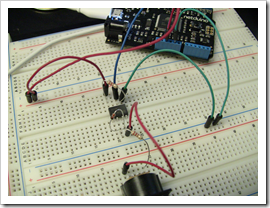
On the breadboard, without the Netduino plugged in, the circuit
looks like this:
The next step is to see if we're getting something on the serial
port. This will require a bit of code on the Netduino.
Serial Communications on the Netduino
There are two COM ports available on the Netduino. COM1 is super
simple with TX on Digital Pin 1 (D1) and RX on Digital Pin 0 (D0).
COM2 has TX on D3 and RX on D2; it also supports CTS on D8 and RTS
on D7. For this example, we'll use just COM 1 RX on D0
You'll need to create a new Netduino project in Visual Studio
2010. Once you have that set up, add a reference to
Microsoft.SPOT.Hardware.SerialPort. That includes the
System.IO.Ports namespace you'll need to use in your code.
MIDI operates at an odd 31250 bps. You can find the MIDI spec here, or just search for "MIDI
Specification"
Here's the code that simply blinks the LED whenever we get new
data through the MIDI port
using System;

using System.Threading;

using Microsoft.SPOT;

using Microsoft.SPOT.Hardware;

using SecretLabs.NETMF.Hardware;

using SecretLabs.NETMF.Hardware.Netduino;

using System.IO.Ports;


namespace PeteBrown.NetduinoMidiTest

{

    public class Program

    {

        private static OutputPort _onboardLed =

            new OutputPort(Pins.ONBOARD_LED, false);

        private static SerialPort _midiIn =

            new SerialPort("COM1", 31250, Parity.None, 8, StopBits.One);


        public static void Main()

        {

            _midiIn.DataReceived += new SerialDataReceivedEventHandler(port_DataReceived);

            _midiIn.Open();


            // wait forever

            Thread.Sleep(Timeout.Infinite);

        }


        static void port_DataReceived(object sender, SerialDataReceivedEventArgs e)

        {

            // blink LED to we can show some activity

            _onboardLed.Write(true);


            // buffer for the data

            byte[] readBuffer = new byte[_midiIn.BytesToRead];


            // Read the bytes. We discard for now, but this

            // must be done in order to continue to get events

            _midiIn.Read(readBuffer, 0, readBuffer.Length);


            // turn the LED back off

            _onboardLed.Write(false);

        }

    }

}
That's it for this installment. I'll do another on actually
parsing the MIDI messages as a next step. It's 3am now and I had
better not dig any deeper if I want sleep tonight :) Here's a video
of the whole thing in action:
