I'm in the mood to build something. What I really want to build
is a big old analog synth, but I haven't worked my skills up to
that yet. This kit from Doepfer (which this beautiful and awesome but somewhat weak-sounding synth is based on) is
definitely an option to get me started, and is now sitting in my
"to do" pile here. (Incidentally, if I started with that kit and
wanted to make a fat synth, I'd want to use two of them plus add
some additional filters and effects. I'd also want to build it in a
way that would allow me to ditch those in the future and build
something even more complex in the same case/framework. It'll let
me do some nice woodworking at the same time.) (BTW, looking for
more DIY synth inspiration, check out this DIY digital - there are three
videos to watch: video 1, video 2, video 3)
I've been looking for a relatively easy electronics project, and
just happened to have a need with my synthesizers. I have several
synths in a rack, and depending on my mood, I only have a couple of
them powered up at any given time. However, because they're all
legacy MIDI rather than USB or OSC, I have them daisy chained
together. That means that if I want to use the last synth in the
chain (my Virus), all the other ones (M-VS1, Morpheus, JP-8080)
have to be powered on in order for the MIDI signal to make it
through. Not only is that a waste of electricity, it's also
personally annoying and adds to a very small (I can't really notice
it) amount of lag in the MIDI signal.
I previously built a MIDI interface for my Netduino, so I'm
familiar with the general design. However, I stumbled
across a circuit design for a MIDI through box that does
exactly what I want (I'd prefer a couple more midi outs, but I can
definitely live with 5 as I have 4 MIDI synths in the rack. If I
wanted more outs, I would add another inverter and discrete
components as necessary. I may even do that with the final version
of this board.) To that design, I added a power LED, and once I can
figure out how, I want to add a MIDI activity LED.
Parts List
Here are the parts used to make the board, along with links to
Mouser to purchase them.
Hardware
- Rack-mount case (I'll cover this below)
- Standoffs
- Screws
For the power supply, I wussed out and used and external brick
power supply. I wasn't sure that I could build a 1U power supply
and keep it electrically quiet, so as not to interfere with the
audio equipment in the same rack. I also didn't want to deal with
power supplies on this first real project. I'll deal with building
power supplies in a future project. Note that you can get a cheap
9v power supply from your local store. It only needs to handle
around 100mA +/-.
Prototype
I assumed the schematic was correct, but figured I'd prototype
it in any case. This would also allow me to experiment with the
power LED and activity LEDs.
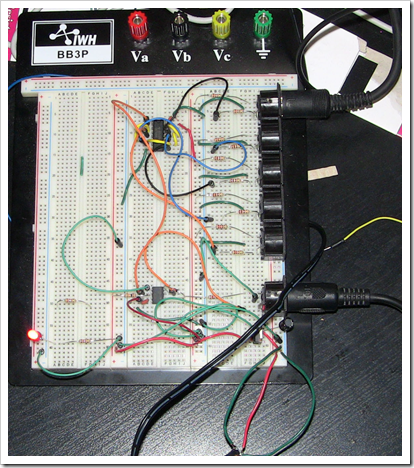
The image above shows the working MIDI Thru box circuit. I have
one input and five outputs. I tested all five outputs and they
worked on first go (amazing!). The power LED on the bottom seems to
be running a little hot, so I'll probably pop a larger resister in
there (currently it's a 220 ohm). I don't need a super bright power
LED in any case. I may even try a smaller LED. The hex inverter is
the one at the top. The opto-isolator is at the bottom, facing the
opposite direction. Slightly covered by the power cord is the 5v
regulator. There's no power switch in this prototype, but there
will be in the final version.
Rack Case
I want the final version of this to sit in my equipment rack.
Loose units banging around my desk annoy me, and get in the way of
all my projects. I tolerate them if there are no other choices (my
new DSI Tetr4, for example), but try and avoid loose modules
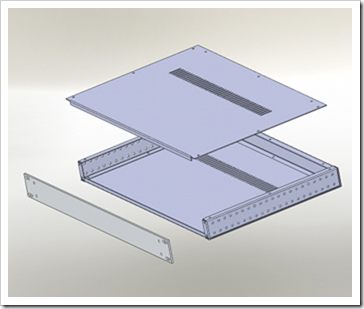
whenever possible. The 1U rack case I bought for this project is
from par-metal.com and is the 10-19082B (B is black
anodized front and painted black body). The case has aluminum front
and back, which means I can drill it with normal tools, and steel
otherwise. It's a 1U rack case 8" deep. From their description:
Front panel is 0.125" aluminum alloy (5052-H32) with brushed
finish in black or clear anodize. Other panels are 0.05" thick
steel, painted in black or gray. Rear panel is 0.06" thick aluminum
alloy (5052-H32) painted. Aluminum handles and hardware are
included.
All screw holes are installed with 6-32 steel press-nuts to
increase strength and reliability.
Standard vent holes are punched on top. Two rows of round holes
are punched on side panels for mounting channels or for use as vent
holes. Add suffix-x to indicate your choice of color or finish:
-B black anodize front & painted black
-G clear anodize front & painted gray
-E painted in beige
I have to say that I'm impressed with these guys. I
ordered the case late Tuesday night, paid by PayPal on Wednesday
afternoon, and received the case via UPS on Thursday
afternoon.
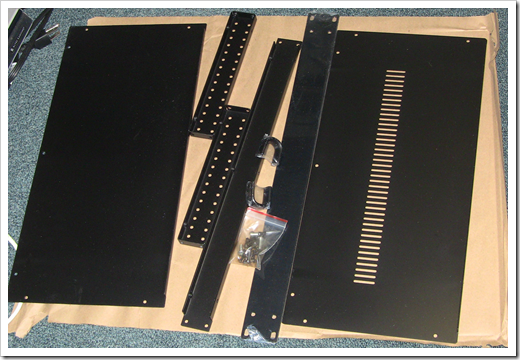
What arrived is a flat pack version of the case, complete with
hardware and those little handles. The front panel and the little
handles are all wrapped in plastic, so they're unlikely to get
scratched. The pieces were all separated by the packing paper in
any case.
For a more complex layout, like a synthesizer full of pots,
buttons, and encoders, I'd probably use something like Front Panel Express to do the panel work (or
build my own larger CNC machine. muah hahahaa!). However, in this
case, I simply have a few holes to drill in the rear of the unit
and one rectangular cutout for the power switch in the front, so no
worries. The steel pieces all have nuts attached so you don't have
to think about fitting your own, or dealing with shallow stripped
threaded holes. Perfect!
The aluminum front panel was nicely anodized (which will make it
slightly harder on my drills, but it's worth it) and the rest is
painted black. I'm not sure if the rear aluminum is anodized or
painted. The paint was nice and even, both inside and out, without
annoying drips, runs, or missed spots. There were no sharp edges.
Including shipping this case came to $57.50, which I think was an
excellent deal.
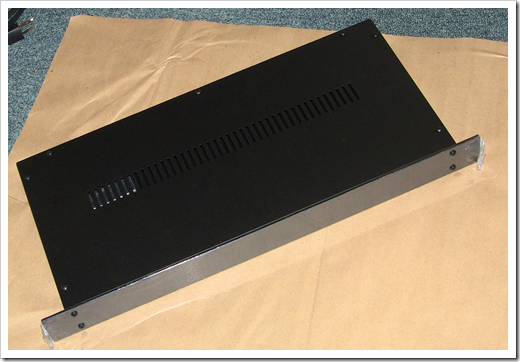
Here's a photo of it assembled, but with the plastic still on
the front panel. Note that if you want to use the little handles (I
haven't decided, but likely won't) you need to orient the sides so
the threaded end faces the back rather than the front.
Other than the front being aluminum instead of punched steel,
and this case being actually painted on the inside, there is little
to no quality difference between this case and the ones that hold
my other synthesizer rack modules. That's good. You'll want to use
aluminum fronts and backs rather than steel, if you intend to cut
the openings using normal tools.
Next Steps
Now that I have a working prototype on a breadboard, I've
started designing the circuit board in FreePCB. This is my first
time designing a board, so I fully expect to botch it somehow.
However, I'm doing this as much for the PCB experience as for the
actual utility of the project. The next blog post will go through
how I designed the board and, assuming I follow through with
getting it fabricated, I'll post a follow up with the results of
that as well (it can take several weeks to get a board depending on
how much you're willing to spend).
