During the .NET Microframework and .NET Gadgeteer code camp talk that Andrew
Duthie and I gave several weeks back, we tossed around the idea of
using the Gadgeteer and a moisture sensor to alert parents of,
ahhhh, soggy diaper issues.
Shortly before the holidays, in the mail, I got a package of
goodies from Microsoft Research. That package included one of these
moisture sensors from Seeed Studio. These are meant for checking to
see how wet soil is, but I figure one man's diaper is another man's
soil, so, I can't resist. Must…prototype…solution.
WARNING: Science in Progress. Also: diaper jokes.
First Iteration
I didn't have any of that handy inoffensive blue liquid
available (the stuff they use to represent *any* bodily fluid on
commercials; pretty sure that's how Smurfs are grown), so lacking
any actual babies (my kids are all potty trained now. Yay!) I'm
using plain old water. The real thing is a bit more conductive, so you may need to vary
some values I use. Also, I'm dealing with liquids only in this
post. You're on your own with anything more…substantial, but I
might recommend some sort of scale, or for the newborns, perhaps a
blast detector held on with this.
Hardware
I'm using the Moisture Module from Seeed Studio. (You can
also purchase it through GHI as they have a
partnership.) This module returns back an analog voltage that is
proportional to how wet the area is. As mentioned, it's is really
meant to be used in soil, to tell you if you need to water your
plants, so we'll have to finagle a few things to make it work
here.
It's wired to socket 9 on my Gadgeteer board. That's one of the
two analog sockets on the GHI Electronics Spider. I had one of the
extra long ribbon cables which was perfect for this. You don't want
the rest of your modules anywhere near what we're doing here. Also,
this probably works best with babies who are relatively sedentary,
preferably sleeping. Otherwise, you'll end up with a miniature Borg
running around the house trailing some sort of dangling box of
electronic goodies.
Warning: I'm reasonably certain that none of this is actually
baby-proof.
Yee Old Test Subject
Next, I need something to test in. No, don't go there as my wife
would not appreciate getting that kind of laundry from me, not even
in the name of science. I'm pretty sure I could get my almost-6
year old son to cooperate if I offered LEGO or something as a
reward, but that'd also get me on the naughty list. Lacking other
creative solutions, I'm just going to use a small plate and a paper
towel to see how this all works.
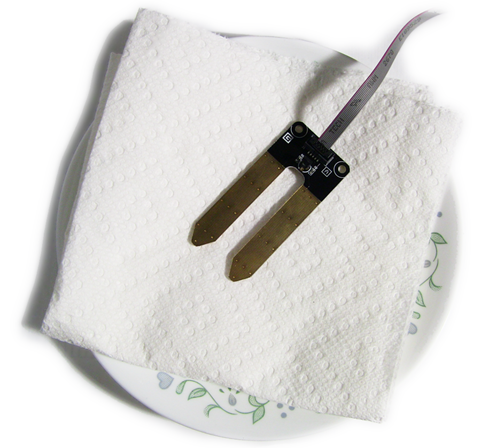
I'll wet the towel, and wait until the moisture starts to hit
the sensor. Then I can adjust for sensitivity. The idea is not to
make the sensor swim, but to get an idea of how we the towel needs
to be for this to work. Remember, the sensor is designed to be
stuck in soil, not placed down on a towel.
Software
Be sure to download the latest Gadgeteer SDK and driver
package. The latest rev (as of this month) includes support for
all the GHI and Seeed modules on the market, including this one.
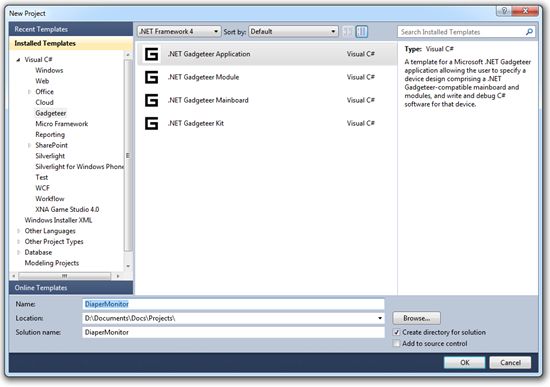
Once you'd done that, it's time to create a new project. Open up
Visual Studio and create a new .NET Gadgeteer Project. I named mine
DiaperMonitor.
Next, add the main board, if it's not already there. By default,
mine came up with the FEZ Hydra, presumably because that's the last
one I used. I simply removed that and dragged on a FEZ Spider from
the list of main boards in the toolbox.
Next, I added a Seeed.MoistureSensor module. You can either
connect it automatically, or pick the port yourself and drag the
connection to create the link. I have the moisture sensor on socket
9 as shown here. I also added one of the brand new GHI LED7R
modules just to give us something interesting to light up.
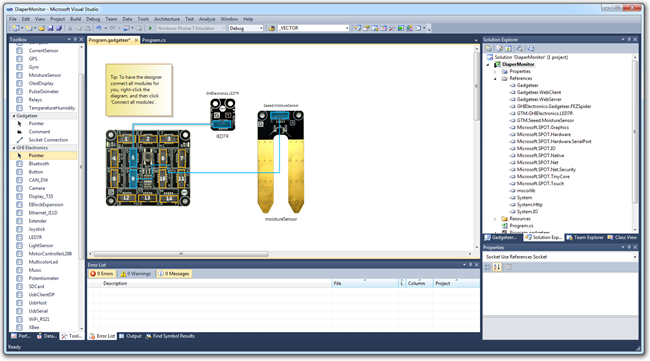
If you don't have one of the new LED7R, you can use any LED
module and simply change the code we'll use for the light up.
Le Code
The first iteration of code is simply going to check the
moisture level, and light up the LED7R when the moisture
level makes it over a certain threshold. On the Gadgeteer, you
don't want to have a tight loop running from the ProgramStarted
method - doing so would prevent other event handlers from
running.
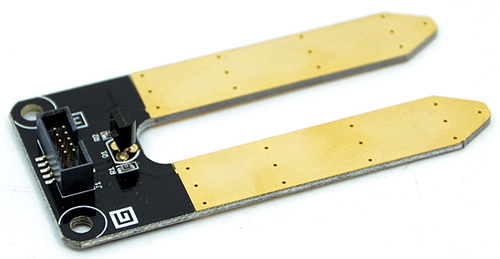
The code for the sensor is really simple. If you look at the
sensor itself, it appears to simply send a voltage down one side of
the tongs and checks for conductivity with the other side. The
driver uses a digital output for sending and an analog input for
receiving. I was actually surprised to find a through-hole NPN
transistor (it's a TO-932 package 2N2222
amplifier marked 2N2222 H331) in there, as almost everything
else gadgeteer-related uses surface mount components (including the
two resistors on the board), but I know the 2N2222 itself is
difficult (impossible?) to find in an SMT package.
I'm far from an electronics expert, but my guess is that one
side of the fork sends the regular (apx) 3.3v signal from pin 3
into the dirt/diaper. The other side will get a very faint amount
of voltage transferred through the medium which it then amplifies
with the transistor in order to make it meaningful to the
microcontroller.
So, instead of using a polling loop, I kick off a timer to
handle polling the sensor. The timer is set to poll once per second
and compare the returned value to the minimum moisture level. If
the level is passed, then the LED7R animates once and then stays
on. After changing the diaper, you reset the Gadgeteer to restart
the program. Inelegant, but simple.
using System;

using System.Threading;

using Microsoft.SPOT;

using Microsoft.SPOT.Presentation;

using Microsoft.SPOT.Presentation.Controls;

using Microsoft.SPOT.Presentation.Media;

using Microsoft.SPOT.Touch;


using Gadgeteer.Networking;

using GT = Gadgeteer;

using GTM = Gadgeteer.Modules;

using Gadgeteer.Modules.Seeed;

using Gadgeteer.Modules.GHIElectronics;


namespace DiaperMonitor

{

    public partial class Program

    {

        private GT.Timer _pollingTimer;

        private int minimumBadMoistureLevel = 200;


        void ProgramStarted()

        {

            Debug.Print("Program Started");


            _pollingTimer = new GT.Timer(1000);

            _pollingTimer.Tick += OnPollingTimerTick;


            _pollingTimer.Start();

        }


        void OnPollingTimerTick(GT.Timer timer)

        {

            int moisture = moistureSensor.GetMoistureReading();


            Debug.Print(moisture.ToString());


            if (moisture > minimumBadMoistureLevel)

            {

                AlertParents();


                timer.Stop();

            }

        }


        private void AlertParents()

        {

            lED7R.Animate(10, true, true, true);

        }

    }

}
This approach is nice, but doesn't do another loud or obvious.
You'd have to keep looking in the room and checking for the lights.
Chances are, the baby's own internal alarm would start sounding
before you noticed the lights. In addition, this doesn't allow for
any configuration of level, so on a hot summer night (thank's to
Sammy Hagar, that song is now stuck in my head), there may be a
general level of damp which doesn't quite meet the bar for a burst
dam.
So we have two problems: one is configuration, the second is for
meaningful alerts. Let's look at configuration first.
Second Iteration - Configuration
The next step is to configure that alert level. You can leave it
as a fixed value in code, or you can configure it via any number of
other external inputs. One approach would be to use a potentiometer
to set a threshold. Another would be to sample the current value
and say that value is the "normal" value and anything well above it
would be the "wet" value.
Either approach would require some input device, like a button,
to enable the timer and possibly to sample the data.
First, I need to know what the possible values are. I couldn't
find any documentation, so I simply went to the Gadgeteer codeplex
site and looked at the source code. As I suspected, the
sensor is an extremely simple wrapper around the analog input
class. It returns a value in the range of 0 to 1600, as evidenced
by this code:
/// <summary>

/// Gets the current moisture reading.

/// </summary>

/// <returns>An integer value, where 0 is fully dry and 1000 (or greater) is completely wet. </returns>

public int GetMoistureReading()

{

    return (int) (analogInput.ReadProportion() * 1600.0);

}
It also has a nice comment which isn't surfaced in the compiled
version I have, so I assume that's a somewhat later rev. (Actually,
I just looked in the Object Browser and there it is. I wonder why
intellisense wasn't showing it? Odd.) In any case, it's useful to
know you can always go and inspect the source if you have any
question about how something is working at the Gadgeteer module
driver level.
So what can we do with that information? Well, let's look at the
potentiometer approach.
Potentiometer approach
One thing most MCUs don't have is a large number of analog
inputs. In order for a MCU to enable analog input, it has to have a
digital to analog converter channel available. Most MCUs which have
on-board ADC support either 10 bit or 12 bit analog conversion. The
specs for the EMX module used by the Gadgeteer show that it has 7
10 bit analog inputs total. The FEZ Spider surfaces six of them,
but only on two sockets. So, unless you have a multi-input devices
that can use the 3 pins on a type A socket (or you create a
breakout of some sort), you really end up being able to take input
from only two analog modules. That leaves us with our diaper sensor
and a potentiometer.
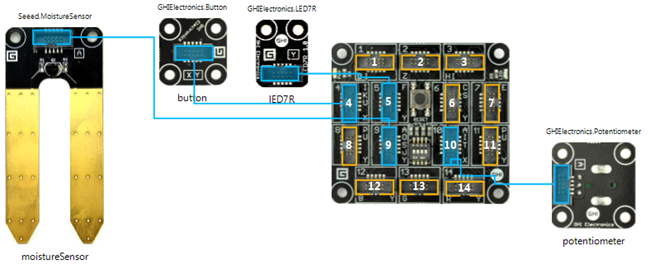
For this, I added a potentiometer module to the other analog
socket: socket 10. The pot is going to be used to configure the
minimum level at which we'll set off the diaper alarm. In addition,
I added a button module that we'll use to arm the device.
The new code refactors a few things. Explanation after the
listing.
using System;

using System.Threading;

using Microsoft.SPOT;

using Microsoft.SPOT.Presentation;

using Microsoft.SPOT.Presentation.Controls;

using Microsoft.SPOT.Presentation.Media;

using Microsoft.SPOT.Touch;


using Gadgeteer.Networking;

using GT = Gadgeteer;

using GTM = Gadgeteer.Modules;

using Gadgeteer.Modules.Seeed;

using Gadgeteer.Modules.GHIElectronics;


namespace DiaperMonitor

{

    public partial class Program

    {

        private GT.Timer _pollingTimer;


        private const int MoistureLevelRangeLow = 50;

        private const int MoistureLevelRangeHigh = 800;

        private int _minimumBadMoistureLevel = 200;


        void ProgramStarted()

        {

            Debug.Print("Program Started");


            button.ButtonPressed += button_ButtonPressed;

        }


        void button_ButtonPressed(Button sender, Button.ButtonState state)

        {

            Debug.Print("Button Pressed");


            if (_armed)

            {

                Disarm();


                // animate counter-clockwise and turn off

                lED7R.Animate(10, false, true, false);

            }

            else

            {

                Arm();

                lED7R.Animate(10, true, false, false);

            }

        }


        private void SetTriggerLevel()

        {

            // read from the pot

            double pot = potentiometer.ReadPotentiometerPercentage();


            // calculate the moisture level based on the bounds

            _minimumBadMoistureLevel = MoistureLevelRangeLow +

                (int)(pot * (MoistureLevelRangeHigh - MoistureLevelRangeLow));


            Debug.Print("Minimum trigger level: " + _minimumBadMoistureLevel);

        }


        bool _armed = false;

        private void Arm()

        {

            SetTriggerLevel();


            // start the timer

            _pollingTimer = new GT.Timer(1000);

            _pollingTimer.Tick += OnPollingTimerTick;


            _pollingTimer.Start();


            _armed = true;


            Debug.Print("Armed.");

        }


        private void Disarm()

        {

            // stop the timer

            _pollingTimer.Stop();

            _pollingTimer.Tick -= OnPollingTimerTick;


            _armed = false;


            Debug.Print("Disarmed.");

        }


        // event handler for the timer that polls the moisture sensor

        void OnPollingTimerTick(GT.Timer timer)

        {

            int moisture = moistureSensor.GetMoistureReading();


            Debug.Print(moisture.ToString());


            if (moisture > _minimumBadMoistureLevel)

            {

                AlertParents();


                Disarm();

            }

        }


        // do all the obnoxious alert stuff in here

        private void AlertParents()

        {

            Debug.Print("Diaper Alert!");


            // animate clockwise and leave on

            lED7R.Animate(10, true, true, true);

        }

    }

}
The new workflow is this:
- Set the potentiometer to some minimum trigger level. There's no
readout or anything at the moment, so you'd just have to eyeball
it.
- Once the pot is set, click the button to arm the diaper alert.
The LEDs will cycle and you know it's armed.
- Wet the diaper (not you, personally, I hope)
- Diaper alert and then the system disarms.
When disarming the alarm, to avoid leaks, I remove the event
handler. When arming, I wire it back up. In our particular example,
this doesn't buy you anything, but if you were to pull this code
out into another class, it almost certainly would save you from
eating up all the memory on the device over time.
This new workflow is pretty good, but the diaper alert leaves
something to be desired. You'd have to get in there to notice the
LEDs (in a dark room they'd be ok), but there's nothing to really
grab your attention. Clearly we can't have a piercing piezo siren
or something, as that would wake up baby before the wet does.
What other options do we have?
Well, how about an alert that is sent to a remote device?
That's the topic of the next post :)
Summary
Ok, that was fun :)
For most of us, this is probably not how we'll use the
Gadgeteer. Kids generally have pretty good built-in wet diaper alarms as it
is. However, you can use this sensor for just about anything from
plant moisture detection to water leak detection to more. More
importantly, this post shows how to use an analog sensor of any
type, including how to configure the range and some other useful
NETMF tips.