What follows is a small pre-editing excerpt from chapter 33 of
Silverlight 5 in Action (without footnotes, annotations and other
publishing stuff). The chapter as a whole goes into greater detail
on using COM Automation, the Native Extensions for Silverlight, and
PInvoke.
Help me avoid putting my family out on the street to support my
unquenchable robotics, synthesizer, CNC and other habits. Order your copy
of Silverlight 5 in Action from Manning and get chapters sent
to you as soon as they are submitted by me and my development
editor, or pre-order your print-only copy from
Amazon.com.
Helpful References for this excerpt
33.2.1 Accessing an accelerometer
An accelerometer is a device, often as small or smaller than a
shelled sunflower seed, which can report movement in some
combination of the X, Y and Z planes. Some accelerometers only do X
and Y - sufficient for joy sticks. Others will handle all three.
When you tilt your phone (or iPad or Windows slate) to play a game
that moves a marble around the screen, you are using an
accelerometer. Accelerometers are also used to quickly shut down
and park an old fashioned spinning hard drive in the event that the
device is dropped.
External USB accelerometer boards may also be purchased from the
likes of FreeScale Semiconductor. They have an external board
called the JMBADGE2008 (http://bit.ly/JMBadge) which
includes an accelerometer as well as several other Windows Sensor
API-compatible sensors.
Of course, you can't really follow this particular example
unless you have one of those sensor boards installed on your
system. I have information on setting up the Freescale sensor on
your system at my blog http://bit.ly/10RemFreescale.
Even if you do not have the sensor, however, you'll want to follow
the next steps and install and recompile the native extensions.
Install and recompile the native extensions
First, download and install NESL from the link in the
introduction to this section. You'll want to download both the
Runtime and the Source zip files. Once downloaded, unzip both files
into a known location on your machine. For example, in a subfolder
of your projects folder.
Because this is the first Silverlight 5 project we've built with
the Native Extensions, and because the Native Extensions target
Silverlight 4, we need to do a small recompile. Open up the
solution found in the Source folder. On the version I'm writing
against, it's named NESLSourcev2.sln.
The solution has two folders, one for libraries and one for the
samples. If you're using a free version of Visual Studio, those
folders may not be present. We'll be working with the Silverlight
libraries first.
For each of the Silverlight libraries projects, go to its
project properties and change the target version to Silverlight 5
as shown in figure 33.2.
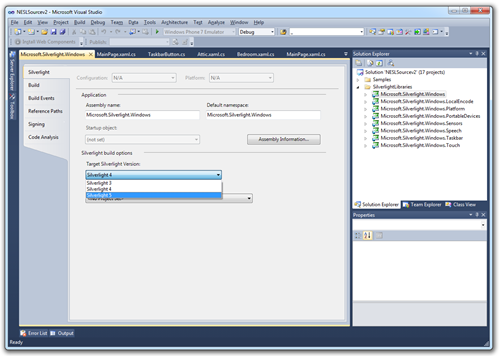
Figure 33.2 Change each of the library project's build
properties to target Silverlight 5
I admit that this isn't strictly necessary, but I personally
hate referencing DLLs from other versions of any framework,
especially Silverlight. Recompiling to Silverlight 5 guarantees
that you'll get the expected behavior and compile-time warnings or
errors, when available, due to any breaking changes.
Once you've completed that, do the same for the samples. Because
they're in the same solution, you'll need to update them to avoid a
whole mess of compile errors. Once complete, do a Rebuild All, and
you're done with that part. Take note of where the projects are
stored and compiled to.
Project setup
Now create a new Silverlight 5 project; I named mine
NeslSensorDemo. Add a reference to the
Microsoft.Silverlight.Windows.dll from the NESL bin/debug folder.
This will drag along a dependency on Microsoft.CSharp.dll for the
dynamic keyword as seen in section 33.1. Remember, NESL is just
using COM automation under the covers.
The library we'll be primarily working with is the
Microsoft.Silverlight.Windows.Sensors library. That has a
dependency on Microsoft.Silverlight.Windows.Platform, so go ahead
and add references to both of those as well.
Before we create the test user interface, we'll need to create
the AccelerometerJoystick class itself. This class interfaces with
NESL to perform the hard work of creating the accelerometer and
then translating its movement to the cardinal points of a compass.
Listing 33.6 has the code required to find the accelerometer and
initialize it.
Listing 33.6 The AccelerometerJoystick class structure and Main
Functions
using System;

using System.Linq;

using System.Windows;

using Microsoft.Silverlight.Windows.Platform;

using Microsoft.Silverlight.Windows.Sensors;


namespace NeslSensorDemo

{

  public class AccelerometerJoystick : IDisposable

  {

    private SensorManager _sensorManager = null;

    private Sensor _accelerometer = null;

    private PropertyKey _keyXGs = null;

    private PropertyKey _keyYGs = null;


    public AccelerometerJoystick()

    {

      if (Application.Current.HasElevatedPermissions)

      {

        _sensorManager = new SensorManager();


        _accelerometer = GetFirstAccelerometer();


          if (_accelerometer != null)

          {

            _keyXGs = new PropertyKey(

              MotionDataFields.Base,

              MotionDataFields.SENSOR_DATA_TYPE_ACCELERATION_X_G);

            _keyYGs = new PropertyKey(

              MotionDataFields.Base,

              MotionDataFields.SENSOR_DATA_TYPE_ACCELERATION_Y_G);


            _accelerometer.SensorDataUpdated +=

              new EventHandler<SensorDataUpdatedEventArgs>(

                Accelerometer_SensorDataUpdated);

          }

          else

          {

            throw new Exception("No accelerometers found.");

          }

        }

        else

        {

          throw new Exception(

             "Elevated permissions required to use the accelerometer.");

        }

      }


    private Sensor GetFirstAccelerometer()

    {

      var sensors = _sensorManager.GetSensorsByCategory(

              SensorCategories.SENSOR_CATEGORY_MOTION)

              .ToList();


      if (sensors.Count > 0)

        return sensors[0];

      else

        return null;

    }


    // insert other code here

  }

}
This listing includes the definition for the
AccelerometerJoystick class as well as the initialization
functions. When using the Sensor API in Windows, without a
friendlier wrapper, the data you get back is based on key/value
pairs. A good practice is to set up the property keys ahead of
time, and set them aside for use in the sensor reporting event.
That's what I did here. Note that I'm only getting the X and Y
acceleration G's. I'm ignoring the Z force.
Inside the GetFirstAccelerometer fuction, the code looks for the
first accelerometer in the system and uses it. That's hardly
robust, but typically a computer will not have more than one
accelerometer. So, for demo sake, it's good enough.
Listing 33.7 shows the code for reporting direction changes.
Listing 33.7 The AccelerometerJoystick class Reporting Code
public bool IsPointedNorth { get; private set; }

public bool IsPointedSouth { get; private set; }

public bool IsPointedEast { get; private set; }

public bool IsPointedWest { get; private set; }


private const double _sensitivity = 0.3;


public event EventHandler OrientationChanged;


private void Accelerometer_SensorDataUpdated(

            object sender, SensorDataUpdatedEventArgs args)

{

  var values = args.NewData.GetSensorValues(

          new PropertyKey[] {_keyXGs, _keyYGs}).ToList();


  double gForceX = Convert.ToDouble(values[0].Value);

  double gForceY = Convert.ToDouble(values[1].Value);


  bool north = false, south = false,

       east = false, west = false ;


  if (Math.Abs(gForceX) > _sensitivity)

  {

    if (gForceX > 0)

      east = true;

    else

      west = true;

  }


  if (Math.Abs(gForceY) > _sensitivity)

  {

    if (gForceY > 0)

      south = true;

    else

      north = true;

  }


  if (east != IsPointedEast || west != IsPointedWest ||

      north != IsPointedNorth || south != IsPointedSouth)

  {

    IsPointedNorth = north;

    IsPointedSouth = south;

    IsPointedEast = east;

    IsPointedWest = west;


    if (OrientationChanged != null)

      OrientationChanged(this, EventArgs.Empty);

  }

}
This listing contains the AccelerometerJoystick code for
reporting the g-force changes back in the form of joystick
directions represented by four bool properties, each representing a
cardinal point.
Each time the sensor reports back a new set of values, the code
uses the cached property keys to retrieve the X and Y g-forces. It
then checks to see if the value reported is greater than the
sensitivity constant. This is to allow some tilt without constantly
changing direction on you. For my accelerometer, the values
reported back are zero for center, and then negative or positive
values for the opposite directions on a given axis. Finally, it
checks to see if the new direction is different from the currently
set direction. If that's true, it sets the properties and raises an
OrientationChanged event.
The NESL SensorManager and Sensor classes both implement
IDisposable. Because I am keeping class-level references to those,
I also need to implement IDisposable. Remember, this code bridges
out to COM, so releasing those resources is extra important. The
code for the IDisposable implementation is in listing 33.8.
Listing 33.8 The AccelerometerJoystick class Cleanup Code
~AccelerometerJoystick()

{

  Dispose();

}


private bool _disposed = false;

public void Dispose()

{

  Dispose(true);

  GC.SuppressFinalize(this);

}


protected virtual void Dispose(bool disposing)

{

  if (!_disposed)

  {

    if (disposing)

    {

      if (_accelerometer != null)

        _accelerometer.Dispose();


      if (_sensorManager != null)

        _sensorManager.Dispose();

     }

     _accelerometer = null;

     _sensorManager = null;

   }

 }
This code handles the cleanup of the class and its resources, to
help ensure that the COM objects are properly released. Place it
near the end of the AccelerometerJoystick class and we're ready to
start using it.
The demo application will show how to use the X and Y axes of
the accelerometer so create something like a joystick. I'll simply
light up the appropriate location in a nine grid when the
accelerometer is tilted in that direction. The application will
look like figure 33.3.
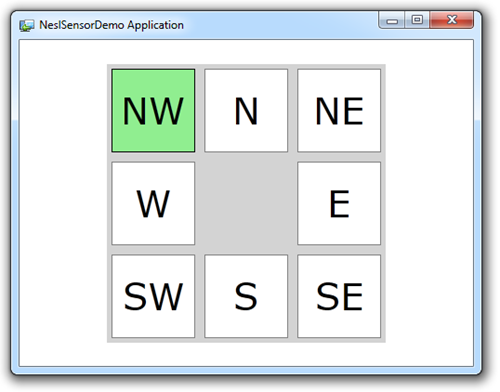
Figure 33.3 The running accelerometer demo application
The user interface consists of a nine grid, like a tic-tac-toe
board, implemented as a regular old grid. Inside each out the outer
cells, I have a rectangle and some text. The default style for the
rectangle is defined using an implicit style (see chapter 14). The
style for the TextBlocks with the compass points is also defined
using an implicit style. I'll talk some more about the styles in
use after the code. Listing 33.9 shows the full XAML for the
UI.
Listing 33.9 The UI XAML for the accelerometer demo
application
<UserControl x:Class="NeslSensorDemo.MainPage"

  xmlns="http://schemas.microsoft.com/winfx/2006/xaml/presentation"

  xmlns:x="http://schemas.microsoft.com/winfx/2006/xaml"

  xmlns:d="http://schemas.microsoft.com/expression/blend/2008"

  xmlns:mc="http://schemas.openxmlformats.org/markup-compatibility/2006"

  mc:Ignorable="d"

  d:DesignHeight="400" d:DesignWidth="400">

  <UserControl.Resources>

    <Style x:Key="BaseRectangleStyle" TargetType="Rectangle">

      <Setter Property="Fill" Value="White" />

      <Setter Property="Stroke" Value="Gray" />

      <Setter Property="Margin" Value="5" />

    </Style>


    <Style TargetType="Rectangle"

           BasedOn="{StaticResource BaseRectangleStyle}" />


    <Style x:Key="SelectedRectangle" TargetType="Rectangle"

           BasedOn="{StaticResource BaseRectangleStyle}">

      <Setter Property="Fill" Value="LightGreen" />

      <Setter Property="Stroke" Value="Black" />

    </Style>


    <Style x:Key="DeselectedRectangle" TargetType="Rectangle"

           BasedOn="{StaticResource BaseRectangleStyle}" />


    <Style TargetType="TextBlock">

      <Setter Property="FontSize" Value="40" />

      <Setter Property="HorizontalAlignment" Value="Center" />

      <Setter Property="VerticalAlignment" Value="Center" />

    </Style>

  </UserControl.Resources>


  <Grid x:Name="LayoutRoot" Background="White">

    <Grid x:Name="NineGrid" Width="300" Height="300"

          Background="LightGray">

      <Grid.ColumnDefinitions>

        <ColumnDefinition />

        <ColumnDefinition />

        <ColumnDefinition />

      </Grid.ColumnDefinitions>

      <Grid.RowDefinitions>

        <RowDefinition />

        <RowDefinition />

        <RowDefinition />

      </Grid.RowDefinitions>


      <Rectangle x:Name="NorthWest" Grid.Row="0" Grid.Column="0" />

      <Rectangle x:Name="North"     Grid.Row="0" Grid.Column="1" />

      <Rectangle x:Name="NorthEast" Grid.Row="0" Grid.Column="2" />

      <Rectangle x:Name="WestWest"  Grid.Row="1" Grid.Column="0" />

      <Rectangle x:Name="East"      Grid.Row="1" Grid.Column="2" />

      <Rectangle x:Name="SouthWest" Grid.Row="2" Grid.Column="0" />

      <Rectangle x:Name="South"     Grid.Row="2" Grid.Column="1" />

      <Rectangle x:Name="SouthEast" Grid.Row="2" Grid.Column="2" />


      <TextBlock Text="NW" Grid.Row="0" Grid.Column="0" />

      <TextBlock Text="N"  Grid.Row="0" Grid.Column="1" />

      <TextBlock Text="NE" Grid.Row="0" Grid.Column="2" />

      <TextBlock Text="W"  Grid.Row="1" Grid.Column="0" />

      <TextBlock Text="E"  Grid.Row="1" Grid.Column="2" />

      <TextBlock Text="SW" Grid.Row="2" Grid.Column="0" />

      <TextBlock Text="S"  Grid.Row="2" Grid.Column="1" />

      <TextBlock Text="SE" Grid.Row="2" Grid.Column="2" />

    </Grid>

  </Grid>

</UserControl>
In addition to the styles already mentioned, I include two
important keyed styles as resources. The first style defines what
the rectangles should look like when they are "selected". That is,
what they should look like when the joystick is pointed in their
direction. The second defines the "deselected" look. Because
deselected is the default look, the style is empty except for
referring back to the base style.
When the joystick is moved in a particular direction, the
rectangle representing that direction is "lit up" using the
appropriate style. The code for this may be found in listing
33.10.
Listing 33.10 Code-Behind for the Main Page
using System;

using System.Windows;

using System.Windows.Controls;

using System.Windows.Shapes;


namespace NeslSensorDemo

{

  public partial class MainPage : UserControl

  {

    private AccelerometerJoystick _joystick;

    private Style _selectedStyle;

    private Style _deselectedStyle;


    public MainPage()

    {

      InitializeComponent();


      Loaded +=new RoutedEventHandler(MainPage_Loaded);

    }


    private void MainPage_Loaded(object sender, RoutedEventArgs e)

    {

      try

      {

        _selectedStyle =

          Resources["SelectedRectangle"] as Style;

        _deselectedStyle =

          Resources["DeselectedRectangle"] as Style;


        _joystick = new AccelerometerJoystick();


        _joystick.OrientationChanged +=

            new EventHandler(JoystickOrientationChanged);

      }

      catch (Exception ex)

      {

        MessageBox.Show(ex.ToString());

      }

    }


    private void JoystickOrientationChanged(object sender, EventArgs e)

    {

      foreach (UIElement child in NineGrid.Children)

      {

        if (child is Rectangle)

          ((Rectangle)child).Style = _deselectedStyle;

      }


      if (_joystick.IsPointedNorth &&

          _joystick.IsPointedEast)

        NorthEast.Style = _selectedStyle;

      else if (_joystick.IsPointedNorth &&

               _joystick.IsPointedWest)

        NorthWest.Style = _selectedStyle;

      else if (_joystick.IsPointedSouth &&

               _joystick.IsPointedEast)

        SouthEast.Style = _selectedStyle;

      else if (_joystick.IsPointedSouth &&

               _joystick.IsPointedWest)

        SouthWest.Style = _selectedStyle;

      else

      {

        if (_joystick.IsPointedSouth)

          South.Style = _selectedStyle;

        else if (_joystick.IsPointedEast)

          East.Style = _selectedStyle;

        else if (_joystick.IsPointedWest)

          WestWest.Style = _selectedStyle;

        else if (_joystick.IsPointedNorth)

          North.Style = _selectedStyle;

      }

    }

  }

}
The code in this listing creates the AccelerometerJoystick class
and then wires up the OrientationChanged event. Each time the
orientation changes, it updates the UI by applying a style to the
appropriate rectangle. Note how this code translates a simultaneous
two-point value into one of the secondary compass points
(Northeast, Southwest etc.)
With this final bit of code in place, run the application. When
you tilt the accelerometer, you should see the different squares
light up on the screen. If you're using the Freescale board and
aren't seeing any results, run their test program to be sure the
board is working and the driver is installed. Don't forget to
enable the sensor in the Control panel in Windows as described in
my blog post at http://bit.ly/10RemFreescale.
It may seem like a fair bit of code to accomplish what we did
here. However, if you really think about what just happened, it's
pretty amazing. We took a web technology, had it talk to a set of
custom C++ COM automation servers which then talked to the Windows
7 Sensor and Location API and returned back g-force information
whenever a board was tilted. That's pretty awesome.
Of course, the accelerometer is interesting, and has lots of
practical uses. However, it's unlikely that most people will have
one on their work PC. Another use of NESL is to integrate with the
Windows 7 taskbar, something almost every application can take
advantage of.
[Next book section shows how to integrate with the Windows
taskbar]
Source code available via the download link below. If you
enjoyed this read, please consider picking up a copy of my book, Silverlight
5 in Action.