The Native
Extensions for Microsoft Silverlight (NESL) is a library that
helps bridge the gap between what Silverlight can do out of the
box, and what WPF and the full .NET framework can do to integrate
with Windows.
Here's the description from the code gallery page:
While Silverlight 4 supports accessing COM automation components
from elevated trust OOB applications, many Windows platform
features are currently not available through COM automation. This
makes them inaccessible to such Silverlight OOB apps. Native
Extensions for Microsoft Silverlight(NESL) is an effort to
incrementally build a library of components that expose select
Windows 7 features through COM automation, making them easily
available to Silverlight 4 OOB applications running with elevated
trust. The current version of NESL provides access to Windows 7
features like Sensors, Portable Devices, Speech, Taskbar and more.
NESL is made up of a set of COM automation based runtime libraries,
Silverlight wrapper libraries usable from Silverlight 4 OOB
applications, sample applications with source, API documentation,
and a developer's guide.
Hats off to Jit Ghosh for writing this awesome
library! He also worked with some vendors to create some
cool samples.
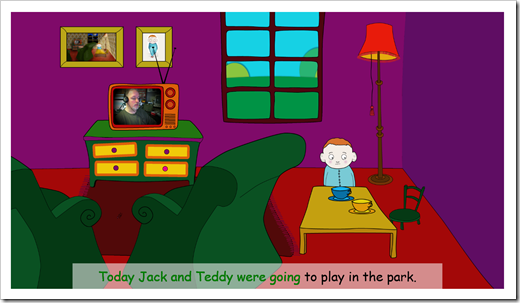
The samples included with the source code install include a cute
gem of a game that includes a number of the features. You have
built-in Silverlight features such as the TV screen showing an
image from the webcam, as well as NESL features like the
text-to-speech reading each word displayed at the bottom of the
screen.
If you have a light sensor hooked up, the game will also respond
to changes in that. (You may get errors if you don't have a light
sensor wired up at runtime)
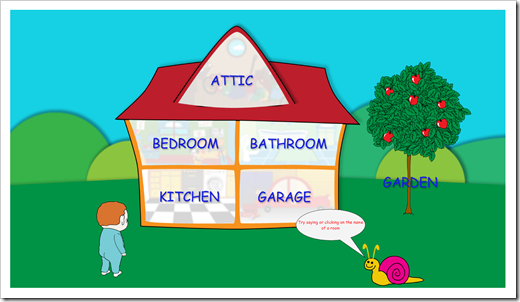
You can navigate around the rooms by either clicking on a room
name, or by saying that name. It's using the inproc version of
speech recognition, so there are no ugly on-screen speech
tools.

Hey, there's a poster of me coughing on that wall :). In this
room, you have to tell jack to go Right, then up, then right, then
down, then right, then up. The recognition works really well.
There are other demo applications included with the install
including a travel journal application, and several discrete
function examples. Definitely check them out.
Installation
The runtime download is a standard MSI that installs all the
native code COM servers that Silverlight relies on. This is
primarily a large amount of compiled C++ code that interfaces with
the Windows API.
As a developer, you'll run the installer yourself. You'll also
need to reference the Silverlight wrapper DLLs (or include the
source code) in your own project.
Behind the Scenes: How it Works
There are two main components to the NESL: the COM Automation
Servers, and the Silverlight libraries that wrap all the IDispatch
call ugliness and present a .NET-friendly interface. The COM
automation servers are made up of a very large amount of C++ code
(source currently not available, but Jit is looking into that) that
is installed either ahead of time, or as part of the application
first-run. If the latter is chosen, the user will need admin rights
to run the installer as we'll see below.
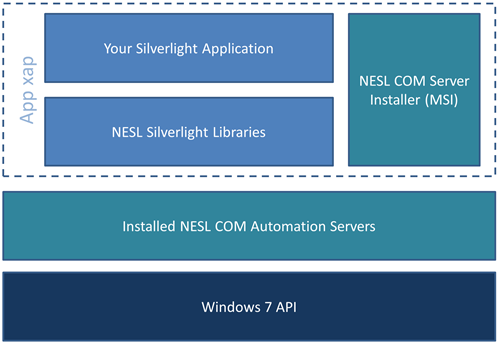
Most of the Windows APIs are available via p/invoke or native
COM. However, with a few exceptions, they are not available to
automation clients like Silverlight 4 and script. To bridge this
gap, Jit wrote a metric ton of C++ code to surface those APIs as
automation (IDispatch) servers.
At runtime, your application calls the friendly Silverlight
wrappers, which in-turn call into the COM Automation servers which
then call the native API. This is an approach you can use
to surface just about anything you want from Windows or from
applications on Windows, as long as you're willing to write the
automation server code. The installation process below can
even be adapted to your own application requirements.
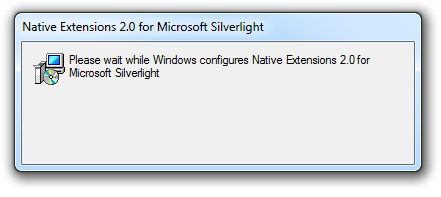
End-user Installation
The NESL Silverlight source code includes an Installer class.
This class is responsible for checking to see if the native runtime
is installed on the machine. If it isn't, it will extract the MSI
from your XAP and run it to install and register the COM
extensions. Of course, the end-user will need admin rights
to run the MSI. On the surface, that seems a little ugly,
but if you want to have access to the OS services without using
something like WPF, this is a small price to pay. The approach the
extensions take is pretty slick.
Here's the installer code, since I found it interesting.
public static void InstallNESL(Uri NESLPackageUri,

              bool Remote = true, bool ShowProgress = true)

{

    dynamic Installer = AutomationFactory.CreateObject("WindowsInstaller.Installer");

    Installer.UILevel = ShowProgress ? INSTALLUILEVEL_BASIC | INSTALLUILEVEL_HIDECANCEL : INSTALLUILEVEL_NONE;

    string PackagePath = (Remote == true) ? NESLPackageUri.ToString() : ExtractNESLPackageFromXAP(NESLPackageUri);

    try

    {

        Installer.InstallProduct(PackagePath, "ACTION=INSTALL");

    }

    catch

    {

        throw;

    }

    finally

    {

        System.IO.File.Delete(PackagePath);

    }


    return;

}

#endregion


#region NON PUBLIC API

private static readonly int INSTALLSTATE_DEFAULT = 5;

private static readonly int INSTALLUILEVEL_NONE = 2;

private static readonly int INSTALLUILEVEL_BASIC = 3;

private static readonly int INSTALLUILEVEL_HIDECANCEL = 32;

private static string ProductCode = "{D2C886C3-765D-40CA-8111-7D4D79AE2400}";


private static string ExtractNESLPackageFromXAP(Uri NESLPackageUri)

{

    string PackageTempPath = Path.Combine(Environment.GetFolderPath(Environment.SpecialFolder.MyDocuments),

                             Guid.NewGuid().ToString() + ".msi");


    StreamResourceInfo sri = Application.GetResourceStream(NESLPackageUri);

    if (sri != null)

    {

        FileStream fs = new FileStream(PackageTempPath, FileMode.Create, FileAccess.ReadWrite, FileShare.None);

        BinaryReader br = new BinaryReader(sri.Stream);

        fs.Write(br.ReadBytes((int)sri.Stream.Length), 0, (int)sri.Stream.Length);

        fs.Close();

        sri.Stream.Close();

    }

    else

        throw new Exception(string.Format(Resources.MSG_ERROR_LIBRARYNOTFOUND, NESLPackageUri));


    return PackageTempPath;

}

#endregion
Despite the all-caps for constants (Jit, your C++ is showing!)
the code is pretty interesting. Silverlight devs, even if they
don't want to use the NESL, can learn a few nice installation
tricks here for other things they may need to install along with
their apps.
When an end-user runs the app, it performs the install check
(you control this) and if not installed, displays the minimal
installer UI.
If the user has installation rights, it will proceed and install
the COM automation servers, making them available for use from
Silverlight. Again, if you want to use this in a more controlled
environment, you can push the MSI down ahead of time and eliminate
the at-runtime installation and admin requirements.
Integrating with the Task Bar
The task bar API is very simple. For many tasks, you use the
TaskbarButton class. For example, to show and hide an overlay icon,
the code looks like this:
private void ShowOverlayIcon_Click(object sender, RoutedEventArgs e)

{

    using (BinaryReader br = new BinaryReader(

        Application.GetResourceStream(

            new Uri("Cloud20x20.png", UriKind.RelativeOrAbsolute)).Stream))

    {

        TaskbarButton.Current.SetOverlayIcon(

            br.ReadBytes((int)br.BaseStream.Length), "Cloudy!",

                           ButtonImageDataType.PNG);

    }

}


private void HideOverlayIcon_Click(object sender, RoutedEventArgs e)

{

    // yes, passing null to clear it is hokey at best, but that's

    // how the windows API works as well

    TaskbarButton.Current.SetOverlayIcon(

          null, string.Empty, ButtonImageDataType.PNG);

}
Note that that is a little different from the approach taken in
.NET 4. I asked Jit about this, and he pointed out that he was
mainly familiar with the native API, and so based the code on that.
However, once the C++ Automation Servers are opened up and
documented, it should be fairly easy to create a .NET 4-compatible
version if you would like.
Another example is the taskbar progress bar. This is one of my
favorite taskbar features in Windows 7. The code here uses the
progress bar on the screen and on the taskbar button.
private void ShowTaskbarProgress_Click(object sender, RoutedEventArgs e)

{

    TaskbarButton.Current.SetProgressState(TaskbarItemProgressState.Normal);


    BackgroundWorker worker = new BackgroundWorker();

    worker.DoWork += (s, ev) =>

        {

            for (int i = 0; i < 100; i += 10)

            {

                Thread.Sleep(1000);

                ((BackgroundWorker)s).ReportProgress(i);

            }


        };


    worker.ProgressChanged += (s, ev) =>

        {

            ProgressBar.Value = ev.ProgressPercentage;

            TaskbarButton.Current.SetProgressValue((ulong)ev.ProgressPercentage, 100);

        };


    worker.RunWorkerCompleted += (s, ev) =>

        {

            ProgressBar.Value = 100;

            TaskbarButton.Current.SetProgressValue(100, 100);

        };


    worker.WorkerReportsProgress = true;

    worker.RunWorkerAsync();


}
Very cool stuff. Another cool integration point is the Windows 7
Sensor API.
Using the Sensor API
I've written some WPF tutorials for the Windows 7 Sensor API in
the past. The sensor API can be used for all sorts of inputs
including accelerometers, light sensors, temperature sensors and
much more. I've modified my 2 axis joystick example to work with
the NESL version of the accelerometer sensor API.
public class Joystick

{

    public Joystick()

    {

    }


    private double _rawXValue;

    public double RawXValue

    {

        get { return _rawXValue; }

        private set { _rawXValue = value; }

    }


    private double _rawYValue;

    public double RawYValue

    {

        get { return _rawYValue; }

        private set { _rawYValue = value; }

    }


    public bool IsJoystickPointedNorth

    {

        get { return RoundValue(_rawYValue) > 0; }

    }


    public bool IsJoystickPointedSouth

    {

        get { return RoundValue(_rawYValue) < 0; }

    }


    public bool IsJoystickPointedWest

    {

        get { return RoundValue(_rawXValue) < 0; }

    }


    public bool IsJoystickPointedEast

    {

        get { return RoundValue(_rawXValue) > 0; }

    }


    private int RoundValue(double value)

    {

        return (int)Math.Round((double)value, 0);


        // example making the joystick more sensitive

        // return Math.Abs(value) > 0.25 ? 1 * Math.Sign(value) : 0;

    }


    private SensorManager _sensorManager;

    private PropertyKey _propertyKeyAccelX = null;

    private PropertyKey _propertyKeyAccelY = null;


    public void Initialize()

    {

        try

        {

            _sensorManager = new SensorManager();


            var sensorList =

                _sensorManager.GetSensorsByType(

                        MotionSensorTypes.SENSOR_TYPE_ACCELEROMETER_3D);


            if (sensorList != null)

            {

                Sensor accel = sensorList.FirstOrDefault();


                _propertyKeyAccelX = new PropertyKey(MotionDataFields.Base,

                        MotionDataFields.SENSOR_DATA_TYPE_ACCELERATION_X_G);

                _propertyKeyAccelY = new PropertyKey(MotionDataFields.Base,

                        MotionDataFields.SENSOR_DATA_TYPE_ACCELERATION_Y_G);


                accel.SetProperties(new PropertyValue[] {

                    new PropertyValue(new PropertyKey(SensorProperties.Base,

                        SensorProperties.SENSOR_PROPERTY_CURRENT_REPORT_INTERVAL),

                        (uint)1000)});


                accel.SensorDataUpdated += (s, e) =>

                    {

                        List<PropertyValue> gValues =

                        e.NewData.GetSensorValues(

                            new PropertyKey[] { _propertyKeyAccelX, _propertyKeyAccelY })

                            .ToList();


                        RawXValue = Convert.ToDouble(gValues[0].Value);

                        RawYValue = Convert.ToDouble(gValues[1].Value);

                    };


            }

        }

        catch (Exception ex)

        {

            throw;

        }

    }

}
This simply rounds off some of the accelerometer values to treat
it like a joystick. As far as the client is concerned, this is
polling-based, so you call this from code in a timer to get updated
values.
private void StartJoystick_Click(object sender, RoutedEventArgs e)

{

    var joystick = new Joystick();


    joystick.Initialize();


    DispatcherTimer timer = new DispatcherTimer();

    timer.Interval = TimeSpan.FromMilliseconds(200);

    timer.Tick += (s, ea) =>

    {

        // show x and y positions

        xValue.Text = joystick.RawXValue.ToString();

        yValue.Text = joystick.RawYValue.ToString();


        Brush ActiveBrush = (Brush)this.Resources["ActiveDirectionBrush"];

        Brush InactiveBrush = (Brush)this.Resources["InctiveDirectionBrush"];


        if (joystick.IsJoystickPointedSouth)

            South.Fill = ActiveBrush;

        else

            South.Fill = InactiveBrush;


        if (joystick.IsJoystickPointedWest)

            West.Fill = ActiveBrush;

        else

            West.Fill = InactiveBrush;


        if (joystick.IsJoystickPointedNorth)

            North.Fill = ActiveBrush;

        else

            North.Fill = InactiveBrush;


        if (joystick.IsJoystickPointedEast)

            East.Fill = ActiveBrush;

        else

            East.Fill = InactiveBrush;

    };


    timer.Start();

}
Of course, it could be changed to be event-based as well. The UI
is a 9-square grid that lights up based on the direction of the
joystick. Note that for diagonal moves, both the side and the end
will be lit up.
<navigation:Page.Resources>

    <SolidColorBrush x:Key="ActiveDirectionBrush"

                     Color="Red" />

    <SolidColorBrush x:Key="InactiveDirectionBrush"

                     Color="Gray" />

</navigation:Page.Resources>


<Grid x:Name="LayoutRoot">


    <Grid.ColumnDefinitions>

        <ColumnDefinition Width="*" />

        <ColumnDefinition Width="*" />

        <ColumnDefinition Width="*" />

    </Grid.ColumnDefinitions>

    <Grid.RowDefinitions>

        <RowDefinition Height="*" />

        <RowDefinition Height="*" />

        <RowDefinition Height="*" />

    </Grid.RowDefinitions>


    <Rectangle x:Name="North" Grid.Row="0" Grid.Column="1"

               Margin="20" />


    <Rectangle x:Name="South" Grid.Row="2" Grid.Column="1"

               Margin="20" />


    <Rectangle x:Name="East" Grid.Row="1" Grid.Column="2"

               Margin="20" />


    <Rectangle x:Name="West" Grid.Row="1" Grid.Column="0"

               Margin="20" />


    <Grid Grid.Row="1"

            Grid.Column="1">

        <Grid.ColumnDefinitions>

            <ColumnDefinition Width="*" />

            <ColumnDefinition Width="2*" />

        </Grid.ColumnDefinitions>

        <Grid.RowDefinitions>

            <RowDefinition Height="*" />

            <RowDefinition Height="*" />

        </Grid.RowDefinitions>


        <TextBlock Text="X" Grid.Row="0" Grid.Column="0" />


        <TextBlock Text="Y" Grid.Row="1" Grid.Column="0" />


        <TextBlock x:Name="xValue" Text="0"

                    Grid.Row="0" Grid.Column="1" />


        <TextBlock x:Name="yValue" Text="0"

                    Grid.Row="1" Grid.Column="1" />


    </Grid>


    <Button Content="Start Joystick"

            Height="37"

            HorizontalAlignment="Left"

            Margin="40,31,0,0"

            Name="StartJoystick"

            VerticalAlignment="Top"

            Width="119"

            Click="StartJoystick_Click" />

</Grid>
That's it! This is a very cool library that will help you bridge
what Silverlight can do out of the box, and what you'd usually need
something like WPF to do. Now, if your application needs a ton of
this type of stuff as its normal mode of operation, I still
strongly recommend considering WPF.
Attached is the source code I'll build on at Silverlight
Connections at the end of the month. It includes both the
Silverlight NESL examples, as well as the WPF examples.
The code in this post was written using Native Extensions
2.0. Note that you'll need to download that and the Windows API
Code pack (links are in the zip) in order to compile the whole
solution. The archive was too large otherwise.
