Back in February, I wrote a primer on getting started with WPF,
using the Hello World example. Yesterday, as part of my work on the
MSDN video series, I created a very different "getting started" example using
Silverlight Out-of-Browser and a direct REST service call to search
twitter. For the WPF video in that same series,
I decided to parallel the work I did on the Silverlight side, and
recreate the "First WPF Application" video, with simpler Twitter
access, and some Windows 7 goodies thrown in for a little
spice.
In this example, we'll build a simple twitter search client,
using WPF.
The example will include a little networking, a little data
binding, and a little work with data templates. I'll also show how
to use some of the new features in Windows 7 to provide Windows
shell integration.
Project
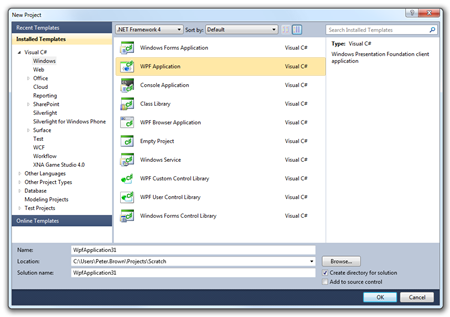
Start by creating a new WPF application:
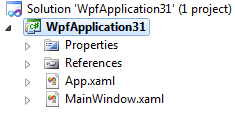
You should end up with a solution with a single project in it.
The project name is not important.
XAML
MainWindow.xaml needs to have a single "Get Tweets" button and a
ListBox. There's no data template yet for the list box, we'll get
to that shortly. The XAML should look like this:
<Window x:Class="WpfApplication31.MainWindow"
        xmlns="http://schemas.microsoft.com/winfx/2006/xaml/presentation"
        xmlns:x="http://schemas.microsoft.com/winfx/2006/xaml"
        Title="MainWindow" Height="350" Width="525">
    <Grid>
        <Button Content="Get Tweets"
                Height="23"
                HorizontalAlignment="Left"
                Margin="12,12,0,0"
                x:Name="GetTweets"
                VerticalAlignment="Top"
                Width="75" />
        <ListBox Margin="12,41,12,12"
                 x:Name="TweetList" />
    </Grid>
</Window>
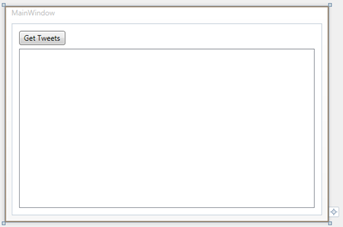
The resulting window, at design time in the Visual Studio 2010
editor, looks like this:
Next, we need to make a service call to Twitter to retrieve the
latest tweets.
Calling Twitter
We're going to call the Twitter Search API, using the URL http://search.twitter.com/search.atom?q=wpf
. That searches for anything with the word "wpf", and returns the
results back in the atompub XML format. You can also return JSON if
you prefer (I do not)
You can, of course, use a third-party library to make your
twitter integration easier. As I'm only doing a simple search, I
decided to parse the API return results myself.
Result Format
When you hit the URL, you'll get back XML that includes header
information like this:
<?xml version="1.0" encoding="UTF-8"?>
<feed xmlns:google="http://base.google.com/ns/1.0"
xml:lang="en-US"
xmlns:openSearch="http://a9.com/-/spec/opensearch/1.1/"
xmlns="http://www.w3.org/2005/Atom"
xmlns:twitter="http://api.twitter.com/">
<id>tag:search.twitter.com,2005:search/wpf</id>
<link type="text/html" href="http://search.twitter.com/search?q=wpf" rel="alternate"/>
<link type="application/atom+xml" href="http://search.twitter.com/search.atom?q=wpf" rel="self"/>
<title>wpf - Twitter Search</title>
<link type="application/opensearchdescription+xml" href="http://search.twitter.com/opensearch.xml" rel="search"/>
<link type="application/atom+xml" href="http://search.twitter.com/search.atom?q=wpf&since_id=14993101814" rel="refresh"/>
<twitter:warning>adjusted since_id to 14941362266 due to temporary errorsince_id removed for pagination.</twitter:warning>
<updated>2010-05-29T19:11:05Z</updated>
<openSearch:itemsPerPage>15</openSearch:itemsPerPage>
<openSearch:language>en</openSearch:language>
<link type="application/atom+xml" href="http://search.twitter.com/search.atom?lang=en&max_id=14993101814&page=2&q=wpf" rel="next"/>
Plus an entry for each search result:
<entry>
<id>tag:search.twitter.com,2005:14993101814</id>
<published>2010-05-29T19:11:05Z</published>
<link type="text/html" href="http://twitter.com/NewYork__Jobs/statuses/14993101814" rel="alternate"/>
<title>#jobs #employment Sr. Software (WPF) Developers: Description: Team is responsible for developing an... http://dlvr.it/1J0g5 #careers #hiring</title>
<content type="html"><a href="http://search.twitter.com/search?q=%23jobs" onclick="pageTracker._setCustomVar(2, 'result_type', 'recent', 3);pageTracker._trackPageview('/intra/hashtag/#jobs');">#jobs</a> <a href="http://search.twitter.com/search?q=%23employment" onclick="pageTracker._setCustomVar(2, 'result_type', 'recent', 3);pageTracker._trackPageview('/intra/hashtag/#employment');">#employment</a> Sr. Software (<b>WPF</b>) Developers: Description: Team is responsible for developing an... <a href="http://dlvr.it/1J0g5">http://dlvr.it/1J0g5</a> <a href="http://search.twitter.com/search?q=%23careers" onclick="pageTracker._setCustomVar(2, 'result_type', 'recent', 3);pageTracker._trackPageview('/intra/hashtag/#careers');">#careers</a> <a href="http://search.twitter.com/search?q=%23hiring" onclick="pageTracker._setCustomVar(2, 'result_type', 'recent', 3);pageTracker._trackPageview('/intra/hashtag/#hiring');">#hiring</a></content>
<updated>2010-05-29T19:11:05Z</updated>
<link type="image/png" href="http://a3.twimg.com/profile_images/775979225/ultimatejobs1_normal.JPG" rel="image"/>
<twitter:geo>
</twitter:geo>
<twitter:metadata>
<twitter:result_type>recent</twitter:result_type>
</twitter:metadata>
<twitter:source><a href="http://dlvr.it" rel="nofollow">dlvr.it</a></twitter:source>
<twitter:lang>en</twitter:lang>
<author>
<name>NewYork__Jobs (Ultimate Jobs)</name>
<uri>http://twitter.com/NewYork__Jobs</uri>
</author>
</entry>
(sorry for the ugly xml. Looks like I picked a tweet that had
some sort of embedded javascript tracking gunk in the feed.
Interesting.)
Tweet Entity
The first thing we'll want to do is add a new class called
"Tweet". Add that to your project, and populate it so it looks like
this:
class Tweet
{
    public string Title { get; set; }
    public Uri Image { get; set; }
    public Uri Link { get; set; }
}
Calling the Service
Now, in the code-behind, you can add the code to call the
service and load the results into a collection. First, make sure
you have System.Xml and System.Xml.Linq referenced in your project
(they are referenced by default, so unless you deleted a reference,
you should be good). Then, double-click the "Get Tweets" button and
add the following handler code:
using System.Collections.ObjectModel;
using System.Net;
using System.Xml.Linq;

...

private ObservableCollection<Tweet> _tweets = new ObservableCollection<Tweet>();

private void GetTweets_Click(object sender, RoutedEventArgs e)
{
    WebClient client = new WebClient();

    client.DownloadStringCompleted += (s, ea) =>
    {
        XDocument doc = XDocument.Parse(ea.Result);

        var items = from item in doc.Descendants("entry")
                    select new Tweet()
                    {
                        Title = item.Element("title").Value,

                        Image = new Uri((from XElement xe in item.Descendants("link")
                                            where xe.Attribute("type").Value == "image/png"
                                            select xe.Attribute("href").Value).First<string>()),

                        Link = new Uri((from XElement xe in item.Descendants("link")
                                        where xe.Attribute("type").Value == "text/html"
                                        select xe.Attribute("href").Value).First<string>()),
                    };

        foreach (Tweet t in items)
        {
            _tweets.Add(t);
        }
    };

    client.DownloadStringAsync(new Uri("http://search.twitter.com/search.atom?q=wpf"));
}
The Linq query above goes through the document and pulls out all
the entries. For each entry it finds, it looks for the title, a
Link of type image/png (even jpegs are listed as image/png) and the
tweet link (text/html)
If you'd rather, you could use the built-in SyndicationFeed class rather than hand-parsing
using Linq. For most types of basic feed parsing, you'll find it
much simpler.
Note that I used the async way of accessing the service. In Silverlight this
is required, but in WPF, it is optional. To help with portability
these days, however, I tend to write similar code in both WPF and
Silverlight whenever reasonable. It's also good to use async (or a
background thread) when you can, as it avoids locking up the
UI.
Binding the ListBox
We'll bind the listbox from code. You can do it from XAML as
well; both methods are equally valid. We want the ListBox to show
all the tweets returned from the network call, so we'll bind it to
the _tweets ObservableCollection.
public MainWindow()
{
    InitializeComponent();

    Loaded += new RoutedEventHandler(MainWindow_Loaded);
}

void MainWindow_Loaded(object sender, RoutedEventArgs e)
{
    TweetList.ItemsSource = _tweets;
}
Now go ahead and run the application and click the "get tweets"
button. Hmm, nothing happens. Time for a little debugging.
Debugging
Debugging within Visual Studio will normally be your first step,
but I'd like to show you another useful tool. One tool I like to
use to debug connected applications is Fiddler 2. Fiddler 2 lets you intercept network
calls and see the request and response. If you haven't used
Fiddler2 yet, stop now, and go get it. It is one of the single most
useful applications for debugging connected client apps,
Silverlight, and Ajax apps. Seriously, stop reading and head over
there now.
Here's what Fiddler looks like when debugging a session:
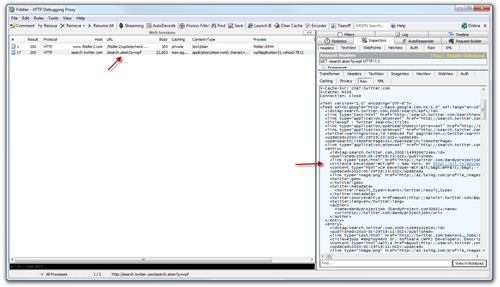
Looking in the response inspector in Fiddler2, I can see that
the search returned correct results, so the issue is not a
networking one. Next step is to see if it is perhaps a namespace
issue with XML. I don't know about you, but those always get me. In
general, if the XML document is well-formed and you aren't seeing
any results, but your query is correct, it's a namespace issue.
Luckily, with XDocument, it's really easy to add the correct
namespace code. Here's the updated method with the namespace for
AtomPub added:
private void GetTweets_Click(object sender, RoutedEventArgs e)
{
    WebClient client = new WebClient();

    client.DownloadStringCompleted += (s, ea) =>
    {
        XDocument doc = XDocument.Parse(ea.Result);

        XNamespace ns = "http://www.w3.org/2005/Atom";

        var items = from item in doc.Descendants(ns + "entry")
                    select new Tweet()
                    {
                        Title = item.Element(ns + "title").Value,

                        Image = new Uri((from XElement xe in item.Descendants(ns + "link")
                                            where xe.Attribute("type").Value == "image/png"
                                            select xe.Attribute("href").Value).First<string>()),

                        Link = new Uri((from XElement xe in item.Descendants(ns + "link")
                                        where xe.Attribute("type").Value == "text/html"
                                        select xe.Attribute("href").Value).First<string>()),
                    };

        foreach (Tweet t in items)
        {
            _tweets.Add(t);
        }
    };

    client.DownloadStringAsync(new Uri("http://search.twitter.com/search.atom?q=wpf"));
}
Note how I added the "ns" to all the elements in the linq query
as well. Namespaces are an unfortunate reality when working with
XML. 99% of the time, you'll wish they were never there, but that
other 1% when you need the differentiation, they're super
important.
See, if I had just used SyndicationFeed, we wouldn't have had
this problem :)
Run it again, and you should see something show up in the
ListBox.
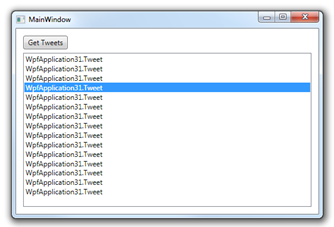
But wait, that information isn't very useful. Instead, you are
seeing the default "ToString" representation of the Tweet class. To
get a better display, we need to create a data template to format
the items in the listbox.
Creating the List Box Data Template
A DataTemplate is a bit of XAML that is used to format
information. While not exclusive to ItemsControl-derived controls
like the ListBox, it is particularly useful with them.
<ListBox x:Name="TweetList"
            HorizontalContentAlignment="Stretch"
            ScrollViewer.HorizontalScrollBarVisibility="Disabled"
            Margin="12,41,12,12">
    <ListBox.ItemTemplate>
        <DataTemplate>
            <Grid Margin="10">
                <Grid.ColumnDefinitions>
                    <ColumnDefinition Width="Auto" />
                    <ColumnDefinition Width="*" />
                </Grid.ColumnDefinitions>

                <Image Source="{Binding Image}"
                        Grid.Column="0"
                        Margin="3"
                        Width="50"
                        Height="50"
                        Stretch="UniformToFill"/>

                <TextBlock Text="{Binding Title}"
                            FontSize="14"
                            Margin="3"
                            Grid.Column="1"
                            TextWrapping="Wrap" />
            </Grid>
        </DataTemplate>
    </ListBox.ItemTemplate>
</ListBox>
The DataTemplate results in a grid for each row, with a 56x56
(50 + 3 + 3 for margins) first column with an image in it, and a
TextBlock in the second column. The second column is star-sized,
that is, it takes up the remaining space. Image and Title are both
properties of the Tweet class. I didn't use the Link property, but
you can add that in using the HyperlinkButton control if you so
desire.
When you run it now, you'll get a much nicer experience:

Now that that's working, let's add a little bit of shell
integration.
Integrating with the Windows Shell
In the Silverlight version of this post and video, I did a
little COM and Excel integration using elevated trust mode. You can
certainly do that in WPF, Windows apps have done it for ages. What
I'd like to highlight instead is some of the neat Windows 7
integration in WPF 4. Windows 7 has a rich API for shell
integration, and WPF 4 makes it really easy to use.
One of the more interesting ways to integrate with the taskbar
is to show an overlay icon.
Adding an Overlay Icon
Overlay icons can be static bitmaps or vectors set up as XAML
resources, or they can be images you create on the fly in code.
Last December, I wrote about how to use taskbar icons in your WPF 4
applications. I want to show an overlay icon that displays the
number of search results returned from the query. While you could
hard-code something that just shows "new results", I think it would
be nicer to have the actual number on there.
The first thing we need to do is create an instance of the
TaskbarItemInfo class. You can do this from code, or as I prefer,
directly in the XAML for the window.
<Window x:Class="WpfApplication31.MainWindow"
        xmlns="http://schemas.microsoft.com/winfx/2006/xaml/presentation"
        xmlns:x="http://schemas.microsoft.com/winfx/2006/xaml"
        Title="MainWindow" Height="350" Width="525">
    <Window.TaskbarItemInfo>
        <TaskbarItemInfo />
    </Window.TaskbarItemInfo>

...
The next step is to create some code and XAML that will take the
total number of tweets, and create an image with that number. The
image will be a red circle with white text. If the number of tweets
is over 99, it will just show "+".
For this, I used a data template, much like we did with the list
box. However, I included the template as a resource for the Window.
As it is a resource, we can load it pretty much anywhere we need
to. In this case, I load it via code.
Here's the template. Place it in the xaml between the ending
TaskbarItemInfo tag and the opening grid tag
<Window.Resources>
    <DataTemplate x:Key="OverlayIcon">
        <Grid Width="20" Height="20">
            <Ellipse Fill="Red"
                        Stroke="White"
                        StrokeThickness="2"/>

            <TextBlock Text="{Binding CountText}"
                        TextAlignment="Center"
                        Foreground="White"
                        FontWeight="Bold"
                        Height="16"
                        VerticalAlignment="Center"
                        FontSize="12">
                <TextBlock.Effect>
                    <DropShadowEffect ShadowDepth="0" />
                </TextBlock.Effect>
            </TextBlock>
        </Grid>
    </DataTemplate>
</Window.Resources>
Here's the code to load the template and render it to a bitmap.
There are a couple tricks here that I'll explain after the
source.
private class Context
{
    public string CountText { get; set; }
}

private void UpdateOverlayIcon()
{
    int iconWidth = 20;
    int iconHeight = 20;

    Context context = new Context();
    if (_tweets.Count > 99)
        context.CountText = "+";
    else
        context.CountText = _tweets.Count.ToString();

    RenderTargetBitmap bmp =
        new RenderTargetBitmap(iconWidth, iconHeight, 96, 96, PixelFormats.Default);

    ContentControl root = new ContentControl();

    root.ContentTemplate = ((DataTemplate)Resources["OverlayIcon"]);
    root.Content = context;

    root.Arrange(new Rect(0, 0, iconWidth, iconHeight));

    bmp.Render(root);

    TaskbarItemInfo.Overlay = (ImageSource)bmp;
}
I have a small inline class here just to hold the count. For a
simple example like this, that is completely unnecessary as I could
have just assigned the count text as the content to be rendered.
However, this is more extensible should you wish to have additional
properties that affect the presentation in the template.
In this example, I first new up the context class, then figure
out the count. If the count > 99, I just show a "+" rather than
deal with resizing the text. I then create a RenderTargetBitmap.
The RenderTargetBitmap allows you to take visuals (from code or
xaml) and render them out to a bitmap. That bitmap is what I pass
to the Overlay property of the TaskBarItemInfo as the last
step.
Before that, however, I create a ContentControl and assign the
OverlayIcon resource (from xaml) as its data template. There are
other ways to accomplish this using LoadContent and setting the
data context, but the ContentControl approach is both easy and
efficient.
I then tell the content control to render the context class as
its template. Doing this makes the binding statements in our
template work correctly.
Finally, I render the content control to the bitmap, and assign
the bitmap to the overlay icon.
You'll also need to add a call to UpdateOverlayIcon to the
GetTweets_Click button handler, right after the closing bracket of
the foreach statement:
...
    foreach (Tweet t in items)
    {
        _tweets.Add(t);
    }

    UpdateOverlayIcon();
};

client.DownloadStringAsync(new Uri("http://search.twitter.com/search.atom?q=wpf"));
...
When you run the application, and load the tweets, you'll see
the taskbar icon displays an overlay:

Looks pretty good. You can play around with the visuals, of
course, to create any type of notification you may want. In most
Windows installations, it will render at 16x16 resolution, but
you'll need to support 20x20 for higher DPI displays.
Conclusion
There you have it: your first WPF connected client application.
In this sample, we went over:
- Creating a WPF application
- Making a RESTful network service call
- Debugging connected applications using Fiddler2
- Basic data binding
- Creating Data Templates
- Integrating with the Windows 7 Shell
- Creating Dynamic Taskbar Overlay Icons
I hope you found this example helpful.
