I'm creating some "create your first" videos for MSDN, and
thought it would be useful to offer up a text version of the
Out-of-Browser one in addition to the video.
In this example, we'll build a simple Twitter
Search client, using Silverlight out-of-browser mode. I'll also show
how to use the Automation (IDispatch) API to load the search
results into Microsoft Excel.
XAML
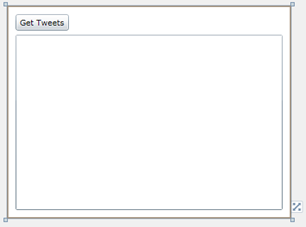
The XAML for this demo includes just a simple page with one
button and a listbox. The button is there to retrieve the tweets,
the listbox to display them. No data templates yet.
<UserControl x:Class="SilverlightApplication50.MainPage"
    xmlns="http://schemas.microsoft.com/winfx/2006/xaml/presentation"
    xmlns:x="http://schemas.microsoft.com/winfx/2006/xaml"
    xmlns:d="http://schemas.microsoft.com/expression/blend/2008"
    xmlns:mc="http://schemas.openxmlformats.org/markup-compatibility/2006"
    mc:Ignorable="d"
    d:DesignHeight="300" d:DesignWidth="400"
             xmlns:sdk="http://schemas.microsoft.com/winfx/2006/xaml/presentation/sdk">

    <Grid x:Name="LayoutRoot" Background="White">
        <Button Content="Get Tweets"
                Height="23"
                HorizontalAlignment="Left"
                Margin="12,12,0,0"
                x:Name="GetTweets"
                VerticalAlignment="Top"
                Width="75"
                Click="GetTweets_Click" />
        <ListBox x:Name="TweetList"
                 Margin="12,41,12,12"/>
    </Grid>
</UserControl>
The resulting page, at design time in the Visual Studio 2010
editor, looks like this:
Next, we need to make a service call to Twitter to retrieve the
latest tweets.
Calling Twitter
We're going to call the Twitter Search API, using the URL http://search.twitter.com/search.atom?q=silverlight
. That searches for anything with the word "silverlight", and
returns the results back in the atompub XML format. You can also
return JSON if you prefer (I do not)
You can, of course, use a third-party library to make your
twitter integration easier. As I'm only doing a simple search, I
decided to parse the API return results myself.
Result Format
When you hit that URL, you'll get back XML that includes header
information like this:
<?xml version="1.0" encoding="UTF-8"?>
<feed xmlns:google="http://base.google.com/ns/1.0" xml:lang="en-US" xmlns:openSearch="http://a9.com/-/spec/opensearch/1.1/" xmlns="http://www.w3.org/2005/Atom" xmlns:twitter="http://api.twitter.com/">
<id>tag:search.twitter.com,2005:search/silverlight</id>
<link type="text/html" href="http://search.twitter.com/search?q=silverlight" rel="alternate"/>
<link type="application/atom+xml" href="http://search.twitter.com/search.atom?q=silverlight" rel="self"/>
<title>silverlight - Twitter Search</title>
<link type="application/opensearchdescription+xml" href="http://search.twitter.com/opensearch.xml" rel="search"/>
<link type="application/atom+xml" href="http://search.twitter.com/search.atom?q=silverlight&since_id=14847443030" rel="refresh"/>
<twitter:warning>adjusted since_id to 14795621913 due to temporary errorsince_id removed for pagination.</twitter:warning>
<updated>2010-05-27T17:07:59Z</updated>
<openSearch:itemsPerPage>15</openSearch:itemsPerPage>
<openSearch:language>en</openSearch:language>
<link type="application/atom+xml" href="http://search.twitter.com/search.atom?lang=en&max_id=14847443030&page=2&q=silverlight" rel="next"/>
Plus an entry for each search result:
<entry>
<id>tag:search.twitter.com,2005:14847443030</id>
<published>2010-05-27T17:07:59Z</published>
<link type="text/html" href="http://twitter.com/onDev/statuses/14847443030" rel="alternate"/>
<title>Don Syme: F# on Silverlight 4 - http://cut.ms/UDe</title>
<content type="html">Don Syme: F# on <b>Silverlight</b> 4 - <a href="http://cut.ms/UDe">http://cut.ms/UDe</a></content>
<updated>2010-05-27T17:07:59Z</updated>
<link type="image/png" href="http://s.twimg.com/a/1274739546/images/default_profile_2_normal.png" rel="image"/>
<twitter:geo>
</twitter:geo>
<twitter:metadata>
<twitter:result_type>recent</twitter:result_type>
</twitter:metadata>
<twitter:source><a href="http://twittsync.com/default.aspx" rel="nofollow">TwittSync</a></twitter:source>
<twitter:lang>en</twitter:lang>
<author>
<name>onDev (Aggregated blogs)</name>
<uri>http://twitter.com/onDev</uri>
</author>
</entry>
Tweet Entity
The first thing we'll want to do is add a new class called
"Tweet". Add that to your project, and populate it so it looks like
this:
public class Tweet
{
    public string Title { get; set; }
    public Uri Image { get; set; }
    public Uri Link { get; set; }
}
Calling the Service
Now, in the code-behind, you can add the code to call the
service and load the results into a collection. First, make sure
you have System.Xml and System.Xml.Linq referenced in your
Silverlight project. Then, double-click the "Get Tweets" button and
add the following handler code:
private ObservableCollection<Tweet> _tweets = new ObservableCollection<Tweet>();

private void GetTweets_Click(object sender, RoutedEventArgs e)
{
    WebClient client = new WebClient();

    client.DownloadStringCompleted += (s,ea) =>
        {
            XDocument doc = XDocument.Parse(ea.Result);

            var items = from item in doc.Descendants("entry")
                        select new Tweet()
                        {
                            Title = item.Element("title").Value,

                            Image = new Uri((from XElement xe in item.Descendants("link")
                                             where xe.Attribute("type").Value == "image/png"
                                             select xe.Attribute("href").Value).First<string>()),

                            Link = new Uri((from XElement xe in item.Descendants("link")
                                            where xe.Attribute("type").Value == "text/html"
                                            select xe.Attribute("href").Value).First<string>()),
                        };

            foreach (Tweet t in items)
            {
                _tweets.Add(t);
            }
        };

    client.DownloadStringAsync(new Uri("http://search.twitter.com/search.atom?q=silverlight"));
}
The Linq query above goes through the document and pulls out all
the entries. For each entry it finds, it looks for the title, a
Link of type image/png (even jpegs are listed as image/png) and the
tweet link (text/html)
If you'd rather, you could use the built-in SyndicationFeed class rather than hand-parsing
using Linq. For most types of basic feed parsing, you'll find it
much simpler.
Binding the ListBox
We'll bind the listbox from code. You can do it from XAML as
well; both methods are equally valid. We want the ListBox to show
all the tweets returned from the network call, so we'll bind it to
the _tweets ObservableCollection.
public MainPage()
{
    InitializeComponent();

    Loaded += new RoutedEventHandler(MainPage_Loaded);
}

void MainPage_Loaded(object sender, RoutedEventArgs e)
{
    TweetList.ItemsSource = _tweets;
}
All good there. The next step is to make the application
actually work in out-of-browser mode.
Making it Out-of-Browser
Making an application run out-of-browser is pretty simple. If
the app is new, all you need to do is set the properties on the
property page. If the app is something you've worked on for a
while, you'll also want to make sure you aren't using any HTML
interop, or anything else which relies on the browser.
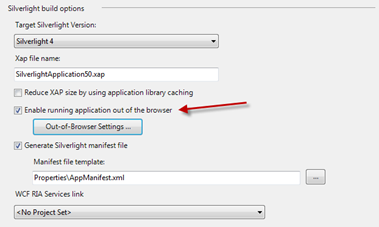
Right-click the Silverlight application project, and select
properties. On the Silverlight tab in properties, check the "Enable
running application out of the browser." This will enable the
right-click menu option to take the app out of the browser, as well
as provide access to the OOB APIs from within code.
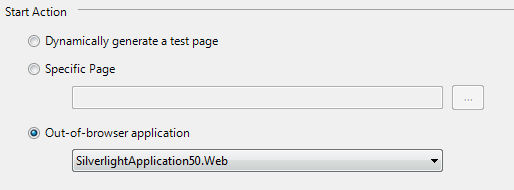
Starting up in Out-of-Browser Mode
Finally, we want the application to start up in out-of-browser
mode, so we need to tell that to Visual Studio. In
Project->Properties for the Silverlight app, click the "Debug"
tab and change the start action to "Out-of-Browser application".
Note that it will list the web project where the xap resides, not
the Silverlight project; that's correct.
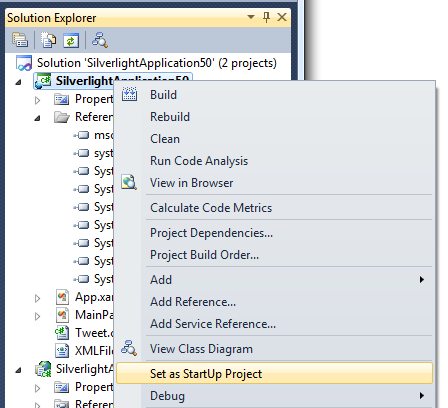
Next, right-click your Silverlight project, and set it as
startup:
Now run the project and click the button. Hmm. As is often the
case with a first run of a new application (especially one without
any unit tests) nothing happened. Let's try a little debugging.
Debugging Out-of-Browser Applications
With the out-of-browser application set to start in that mode,
it's easy to insert some breakpoints. I set a breakpoint inside the
DownloadStringCompleted handler and saw that there are no items in
the XDocument. Hmm. Let's fire up Fiddler2 and see what's going on. If you
haven't used Fiddler2 yet, stop now, and go get it. It is one of
the single most useful applications for debugging Silverlight and
Ajax apps. Seriously, stop reading and head over there now.
Well, I see the failed clientaccesspolicy check followed by a
crossdomain.xml check. Since crossdomain.xml is there and is
permissive, Silverlight makes the networking request. Note that in
elevated permissions mode, the checks are not required.

Looking in the response inspector in Fiddler2, I can see that
the search returned correct results, so the issue is not a
networking one. Next step is to see if it is perhaps a namespace
issue with XML. I don't know about you, but those
always get me. In general, if the XML document is
well-formed and you aren't seeing any results, but your query is
correct, it's a namespace issue. Luckily, with XDocument, it's
really easy to add the correct namespace code. Here's the updated
method with the namespaces added.
private void GetTweets_Click(object sender, RoutedEventArgs e)
{
    WebClient client = new WebClient();

    client.DownloadStringCompleted += (s,ea) =>
        {
            XDocument doc = XDocument.Parse(ea.Result);

            XNamespace ns = "http://www.w3.org/2005/Atom";

            var items = from item in doc.Descendants(ns + "entry")
                        select new Tweet()
                        {
                            Title = item.Element(ns + "title").Value,

                            Image = new Uri((from XElement xe in item.Descendants(ns + "link")
                                                where xe.Attribute("type").Value == "image/png"
                                                select xe.Attribute("href").Value).First<string>()),

                            Link = new Uri((from XElement xe in item.Descendants(ns + "link")
                                            where xe.Attribute("type").Value == "text/html"
                                            select xe.Attribute("href").Value).First<string>()),
                        };

            foreach (Tweet t in items)
            {
                _tweets.Add(t);
            }
        };

    client.DownloadStringAsync(new Uri("http://search.twitter.com/search.atom?q=silverlight"));
}
Note how I added the "ns" to all the elements in the linq query
as well. Namespaces are an unfortunate reality when working with
XML. 99% of the time, you'll wish they were never there, but that
other 1% when you need the differentiation, they're super
important.
Run it again, and you should see something show up in the
ListBox.
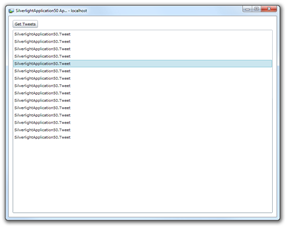
But wait, that information isn't very useful. Instead, you are
seeing the default "ToString" representation of the Tweet class. To
get a better display, we need to create a data template to format
the items in the listbox.
Creating the List Box Data Template
A DataTemplate is a bit of XAML that is used to format
information. While not exclusive to ItemsControl-derived controls
like the ListBox, it is particularly useful with them.
<ListBox x:Name="TweetList"
            HorizontalContentAlignment="Stretch"
            ScrollViewer.HorizontalScrollBarVisibility="Disabled"
            Margin="12,41,12,12">
    <ListBox.ItemTemplate>
        <DataTemplate>
            <Grid Margin="10">
                <Grid.ColumnDefinitions>
                    <ColumnDefinition Width="Auto" />
                    <ColumnDefinition Width="*" />
                </Grid.ColumnDefinitions>

                <Image Source="{Binding Image}"
                        Grid.Column="0"
                        Margin="3"
                        Width="50"
                        Height="50"
                        Stretch="UniformToFill"/>

                <TextBlock Text="{Binding Title}"
                            FontSize="14"
                            Margin="3"
                            Grid.Column="1"
                            TextWrapping="Wrap" />
            </Grid>
        </DataTemplate>
    </ListBox.ItemTemplate>
</ListBox>
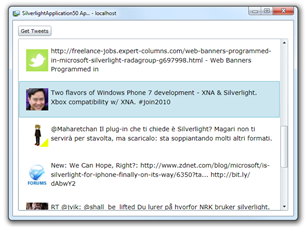
The DataTemplate results in a grid for each row, with a 56x56
(50 + 3 + 3 for margins) first column with an image in it, and a
TextBlock in the second column. The second column is star-sized,
that is, it takes up the remaining space. Image and Title are both
properties of the Tweet class. I didn't use the Link property, but
you can add that in using the HyperlinkButton control if you so
desire.
When you run it now, you'll get a much nicer experience:
Now that that is working, let's add a little bit of elevated
trust functionality.
Making it Elevated Trust
So far, everything we've done works 100% cross-browser,
cross-platform. Elevated Trust also works cross-platform, but we're
going to use a feature that lights up only on windows: COM
Automation.
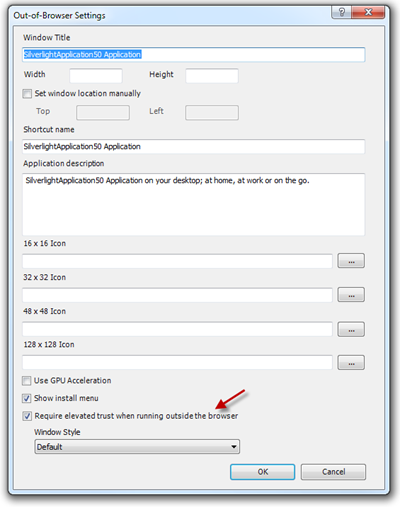
First, we need to tell Silverlight that this is an elevated
trust application. Back to the property pages, open up the
Out-of-Browser settings dialog.
The next thing you should do is sign your XAP. We won't do that
here, but there is a great walkthrough on XAP signing for elevated trust
apps here. The walkthrough also shows what the various install
dialogs look like.
In production, you always want to sign your elevated trust
applications using a trusted root certificate authority. If you
fail to sign your app, the install dialog the user gets is a pretty
scary one. Signed applications have a much nicer dialog.
Now that we have an elevated trust app, let's do a little local
light-up.
Automating Microsoft Excel
Elevated trust applications have a number of ways they can
integrate with the local system: they have increased access to
files, custom chrome, and can (on Windows) use the IDispatch COM
Automation API to call automation servers such as Microsoft Office,
and even the Location API.
To support automating excel, add a second button to the
page:
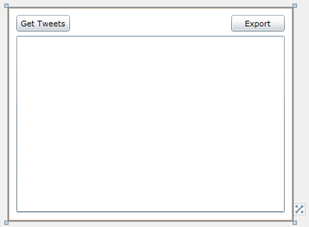
Add the button using the designer, or via XAML. Ideally, place
it after the "GetTweets" button and before the "TweetList" ListBox.
The XAML for the button looks like this:
<Button Content="Export"
        Height="23"
        Margin="0,12,12,0"
        x:Name="ExportToExcel"
        VerticalAlignment="Top"
        HorizontalAlignment="Right"
        Width="75" />
Because the Automation API is available only on Windows, you'll
want to first check to see if it is present and available.
Checking for the Presence of the Automation API
The first check we need to do is to ensure the automation API is
available. If it is not available, we need to disable the
functionality. First, in the code-behind, add the following using
statement to gain access to the automation classes.
using System.Runtime.InteropServices.Automation;
Next, modify the MainPage_Loaded event to include a check for
the COM Automation API:
void MainPage_Loaded(object sender, RoutedEventArgs e)
{
    TweetList.ItemsSource = _tweets;

    ExportToExcel.IsEnabled = AutomationFactory.IsAvailable;
}
That will enable or disable the button based upon the
availability of the automation API. You can test this by unchecking
the "requries elevated permissions" option and running the
application.
Now we'll get down to the actual Excel export code.
Exporting Tweets to Excel
The event handler code for the "Export" button is going to
contain the export functionality. Since the COM Automation API is
based on IDispatch, and is therefore bound at runtime, there's no
intellisense or other help for you when coding. One trick you can
use is to write your code in a full .NET framework application
using the early-bound version of the API (assuming it is
compatible) and then paste the code into Silverlight, making
adjustments as required. When looking to see what APIs you can use,
one good source is scripting documentation. Anything which is
available on Windows to scripting via Automation is also available
to Silverlight via Automation.
An aside on patterns
This is your first Silverlight OOB application, so I don't want
to muddy the waters with patterns just yet. However, keep in mind
that the code-behind approach we're using here is not the only way
to provide functionality in your application. One very popular
pattern is MVVM or ViewModel. Once you progress beyond the basics,
learn about that pattern so you can write applications that have
better structure and are more easily tested.
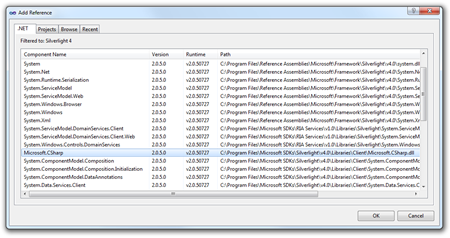
Using Automation in Silverlight means you'll be using the
dynamic keyword. Support for that keyword is
included in the Microsoft.CSharp.dll, so you'll need to add a
reference to that from your Silverlight project.
Next, double-click the export button on the design surface to
create an event handler. We'll put our export code inside the
handler.
private void ExportToExcel_Click(object sender, RoutedEventArgs e)
{
    if (_tweets.Count == 0)
    {
        MessageBox.Show("No tweets to export. Please get latest tweets first.");
        return;
    }

    try
    {
        dynamic excel = AutomationFactory.CreateObject("Excel.Application");

        excel.workbooks.Add();

        dynamic sheet = excel.ActiveSheet;

        int row = 1;

        // headers
        dynamic linkHeaderCell = sheet.Cells[row, 1];
        dynamic textHeaderCell = sheet.Cells[row, 2];

        linkHeaderCell.Value = "Url";
        textHeaderCell.Value = "Message Text";

        // rows
        foreach (Tweet t in _tweets)
        {
            row++;

            dynamic linkCell = sheet.Cells[row, 1];
            dynamic textCell = sheet.Cells[row, 2];

            linkCell.Value = t.Link.ToString();
            textCell.Value = t.Title;
        }

        excel.Visible = true;

    }
    catch (Exception ex)
    {
        MessageBox.Show("Error automating Excel: " + ex.Message);
    }
}
That's all there is to it. Example code to automate Excel, Word,
Outlook and other applications can be found all over the internet.
You could easily expand upon this example, or create your own
automation code to produce a Word document, or even email the
search results using Outlook.
This particular machine still has Office 2007 installed. The
Automation API works with 2007, 2010 and likely versions below
that. The resulting spreadsheet, once you open up the columns a
little, looks like this:

Conclusion
There you have it: your first Silverlight out-of-browser
application. In this sample, we went over:
- Creating a Silverlight application
- Making a RESTful network service call
- Making an application work in out-of-browser mode
- Debugging out-of-browser applications
- Debugging Silverlight applications using Fiddler2
- Basic data binding
- Creating Data Templates
- Making applications require elevated trust
- Using COM Automation from Silverlight to automate Excel
I hope you found this example helpful.
