In a sample application I'm working on, Shoebox Scan, I need to
be able to work with a rotated crop and save the resulting image
off to a file. The image is much larger than what is shown
on-screen.
For example, this rotated selection from a much larger
image:
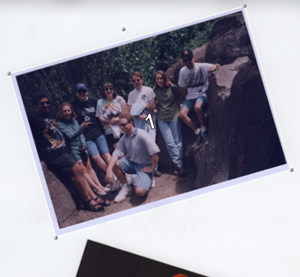
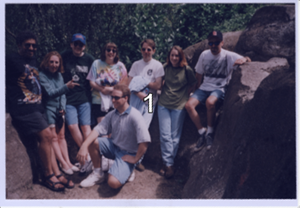
Should result in an image that looks something like this:
The Problem
There are a couple operations we have to perform on this image.
First, we must rotate it opposite the rotation of the adorners.
Second, we need to crop to the bounds of the adorner. There's math
that does this, and there are great algorithms that keep the image
nice and smooth after the rotation. I don't know the math, and
can't find the algorithms.
The Solution
Step one is to have the crop area keep track of center point,
rotation, width, and height rather than just a set of 4 points.
From there, we need to come up with a solution for doing the actual
crop and rotate.
I'll be the first to admit that I pay daily for my inattention
and minimal effort in higher math classes. So, I needed to find a
solution that was either:
- Canned algorithm someone posted
- Free third-party code or control with a compatible license
- Pumping it through the WPF UI layer
Having found nothing from the first two, I decided to go the
third route.
DISCLAIMER: Gah! I'm using UI layer elements from back
in service code on the client. This is not a best practice by any
stretch, and has some limitations, especially around threading. I'm
posting it here just because I know you are all cool to the
occasional ugly hack, and won't beat me up too much over it. Use it
in your own code only if you attribute it to your slow cousin or
something.
The Magic
The unicorns and rainbows all come about from the
RenderTargetBitmap class in WPF. This class allows you to render to a
bitmap anything which could normally be rendered to screen.
In order to use RenderTargetBitmap without actually having the
visual on-screen, you need to create a container, put your image
(or other visuals in it) and then tell the container to arrange
itself and its children. I used a canvas since canvas makes no
attempt to scale children.
// more ui cruft. This is just for layout
Canvas container = new Canvas();
container.Children.Add(image);
container.Arrange(new Rect(0, 0, source.PixelWidth, source.PixelHeight));

// render the result to a new bitmap.
RenderTargetBitmap target = new RenderTargetBitmap(targetWidth, targetHeight, sourceDpiX, sourceDpiY, PixelFormats.Default);
target.Render(container);
You can then take the RenderTargetBitmap and use it in place of
a BitmapSource in any control.
An Aside on DPI
The key thing to remember is that you're dealing with a number
of DPI conversions. The image from the scanner is typically at 300,
600 or 1200 dpi. WPF (and Silverlight) use device-independent pixels, so
you have to convert to those. The formula is:
screen width = scanned image width / scanned image dpi *
96
Whenever you do any manipulation with a transform or other UI
element and target your scanned image, you'll need to do this
conversion.
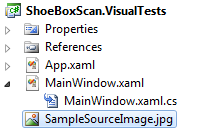
Test Application
This was a bit of a hairy problem, so I built a little test app
that had a pre-scanned image. Debugging while waiting for the
scanner each run was not going to be productive.
The application calls into a library shared by this test app,
and the main scanner app. The library contains the model,
viewmodels, services etc. - everything but the UI. The test app
contains the sample image and the code to call the crop and rotate
code.
The xaml for the test app window is really simple:
<Window x:Class="ShoeBoxScan.VisualTests.MainWindow"
        xmlns="http://schemas.microsoft.com/winfx/2006/xaml/presentation"
        xmlns:x="http://schemas.microsoft.com/winfx/2006/xaml"
        Title="MainWindow" Height="550" Width="925">
    <Window.Background>
        <LinearGradientBrush StartPoint="0,0" EndPoint="0,1">
            <GradientStop Color="#FF000000"
                          Offset="0" />
            <GradientStop Color="#FF503030"
                          Offset="1" />
        </LinearGradientBrush>
    </Window.Background>
    <Grid>
        <Grid.ColumnDefinitions>
            <ColumnDefinition Width="*" />
            <ColumnDefinition Width="*" />
        </Grid.ColumnDefinitions>
        <Grid.RowDefinitions>
            <RowDefinition Height="*" />
            <RowDefinition Height="50" />
        </Grid.RowDefinitions>

        <Image Grid.Column="0"
               Stretch="Uniform"
               x:Name="SourceImage" />

        <Image Grid.Column="1"
               Stretch="Uniform"
               x:Name="ManipulatedImage" />

        <StackPanel Grid.Row="1"
                    Grid.ColumnSpan="2"
                    Orientation="Horizontal"
                    HorizontalAlignment="Right">
            <Button x:Name="RotateAndCrop"
                    Content="Rotate and Crop"
                    Click="RotateAndCrop_Click"/>
        </StackPanel>

    </Grid>
</Window>
For the test code, I measured the approximate center points of
each image using photoshop (Window -> Info or F8), figured out
the angle and actual size by doing a rotate and crop in the same. I
then plugged those numbers into the test application, as I wanted
it isolated from the adorner code.
private void RotateAndCrop_Click(object sender, RoutedEventArgs e)
{
    var service = new ImageManipulationService();

    BitmapSource source = new BitmapImage(new Uri("SampleSourceImage.jpg", UriKind.Relative));
    SourceImage.Source = source;

    // test center point and height/width obtained by looking at the image in photoshop
    BitmapSource cropped = service.GenerateCroppedImage(source, new Point(1278, 908), 1850, 1250, -16);
    //BitmapSource cropped = service.GenerateCroppedImage(source, new Point(1510, 2648), 1830, 1230, 17.3);
    ManipulatedImage.Source = cropped;
}
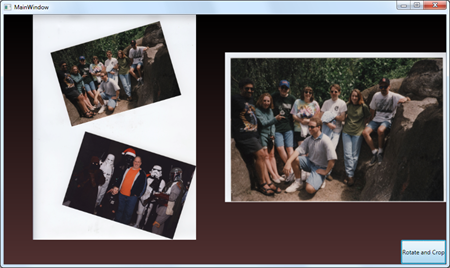
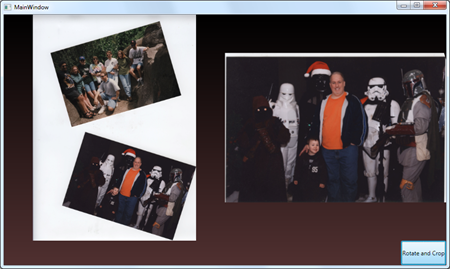
Here's the test app running with the pre-scanned image.
And here's the entire rotate and crop function. Disclaimer above
applies, so don't just skip to this code and paste it into your
production app :) The code rotates the image around the center of
the small image we want to crop out, then moves the whole image up
so only the part we want is in the uncropped area - effectively
cropping the image.
public BitmapSource GenerateCroppedImage(BitmapSource source, Point centerPoint, double width, double height, double rotationAngle)
{
    // TODO: get bounding box for the rotation, as the total image could be really huge

    double sourceDpiX = source.DpiX;
    double sourceDpiY = source.DpiY;

    double wpfUnitsX = 96;
    double wpfUnitsY = 96;

    double centerPointXInScreenUnits = centerPoint.X / sourceDpiX * wpfUnitsX;
    double centerPointYInScreenUnits = centerPoint.Y / sourceDpiY * wpfUnitsY;

    int targetWidth = (int)Math.Round(width, 0);
    int targetHeight = (int)Math.Round(height, 0);

    double targetWidthInScreenUnits = targetWidth / sourceDpiX * wpfUnitsX;
    double targetHeightInScreenUnits = targetHeight / sourceDpiY * wpfUnitsY;

    double sourceWidthInScreenUnits = source.PixelWidth / sourceDpiX * wpfUnitsX;
    double sourceHeightInScreenUnits = source.PixelHeight / sourceDpiY * wpfUnitsY;

    // rotate the master image around the point
    RotateTransform rotateTransform = new RotateTransform();
    rotateTransform.CenterX = centerPointXInScreenUnits;
    rotateTransform.CenterY = centerPointYInScreenUnits;
    rotateTransform.Angle = rotationAngle * -1;

    // move the point up to the top left
    TranslateTransform translateTransform = new TranslateTransform();
    translateTransform.X = -1 * (centerPointXInScreenUnits - targetWidthInScreenUnits / 2);
    translateTransform.Y = -1 * (centerPointYInScreenUnits - targetHeightInScreenUnits / 2);

    TransformGroup transformGroup = new TransformGroup();
    transformGroup.Children.Add(rotateTransform);
    transformGroup.Children.Add(translateTransform);

    // create an image element to do all the manipulation. This is a cheap way of
    // getting around doing the math myself.
    Image image = new Image();
    image.Stretch = Stretch.None;
    image.Source = source;
    image.RenderTransform = transformGroup;

    // more ui cruft. This is just for layout
    Canvas container = new Canvas();
    container.Children.Add(image);
    container.Arrange(new Rect(0, 0, source.PixelWidth, source.PixelHeight));

    // render the result to a new bitmap.
    RenderTargetBitmap target = new RenderTargetBitmap(targetWidth, targetHeight, sourceDpiX, sourceDpiY, PixelFormats.Default);
    target.Render(container);

    return target;
}
The disadvantage of this approach is it is really tied closely
to WPF UI. The advantage is...it's tied closely to WPF UI, so you
get smooth rotation and resizing and all that other goodness
without having to write that code yourself.
Optimizations
One optimization that I'll probably need to do is to pre-crop
the image to the bounding box of the adorner before I go and rotate
it. Rotation can be an expensive operation, especially on a 1200+
DPI scan. I'll test actual performance and memory use before doing
that, however.
