 Computer voice synthesis has come a very long way since the old
robotic voices like we heard on Wargames ("Shall we play a game?" in what sounded like
slightly British overtones) and other voice synths of the time.
From automated voice response to the little GPS receivers in our
cars, we expect to hear pretty decent human-sounding words, with
gender tones and even accents.
Computer voice synthesis has come a very long way since the old
robotic voices like we heard on Wargames ("Shall we play a game?" in what sounded like
slightly British overtones) and other voice synths of the time.
From automated voice response to the little GPS receivers in our
cars, we expect to hear pretty decent human-sounding words, with
gender tones and even accents.
Many of us never consider adding voice synthesis or voice
recognition to our own programs. However, in certain applications,
it can make a huge difference in usability. Consider a computer
located in your kitchen, used to store recipes and numerous other
domestic "things". Being able to have a computer recognize your
verbal request to read the next step in the recipe, and respond in
kind means no crumb-topping fingerprints on the screen and no cake
batter in a keyboard.
A little History
Not going all the way back to the Commodore 64 speech
synthesizer program I typed in from a magazine in seventh grade
(yes, some of the first things we made the computer say were pretty
rude <g>), modern speech synthesis on Windows started with
SAPI. I was interested in this way back, and had this huge tome
"MAPI, TAPI, SAPI." I never got too far with it, as many of the
APIs weren't overly friendly to Visual Basic back in earlier
versions of SAPI, and their exploration at the time wasn't worth me
delving back into C++ on Windows.
While there were third-party programs that did voice synthesis
on earlier versions of Windows, the first version of SAPI came with
Windows 95 and Windows NT 3.51.
Speech Synthesis Today
SAPI 5.3 added a ton of new functionality and also became part
of the core operating system (Windows Vista and Windows 7, in this
case). You can use this API natively or via COM interop. A version
of SAPI is also available on Windows Mobile devices.
In .NET, it couldn't be easier to make your computer talk.
Starting with .NET 3.0 on Windows XP and higher, you can use the
managed speech API System.Speech.Synthesis to identify voices and
speak. I briefly wrote about this a couple years ago, but felt
it deserved some revisiting with the new Microsoft Anna voice
(Introduced with Vista), Windows 7 and .NET 4.
Trying out the installed voices
From control panel, search for "speech" and pull up the Speech
Recognition applet
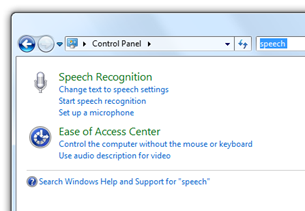
On the text to speech tab, see what voices you have installed.
In my case, I have only Microsoft Anna. Depending upon your locale
and what other products you have, your installed voices may be
different. For example, you may have Microsoft Lili which is
intended for Chinese versions of Windows. You can also download
some older speech voices with their associated engines here.
(Older Mike and Mary voices also available as part of the 5.1 SDK
download here.) The old voices are interesting for
historical purposes, but Anna sounds much better. If you're really
hankering to try out some other voices, this site is the mother lode of all voice
sites, with mp3 and wave samples for most.

You can try out the voice by clicking the Preview Voice button
after optionally changing the text in the textbox. Make sure this
works before proceeding on through the rest of this example.
If you go to that nextup.com site linked above, scroll down to
the Cepstral Character Voices section. Amusing :) (however, having
your computer whisper to you is super creepy)
Using System.Speech.Synthesis
Let's get into programming against the speech synthesizer using
the .NET speech API.
Project Setup
As is usual in these demos, create a new Windows Application (WPF) in Visual
Studio 2010. We'll also add a folder called "ViewModels" and a
single class named "SpeechDemoViewModel". We're going to do a
little binding and I want to make sure you're set up with a
reasonable architecture to build on should you decide to extend the
demo.
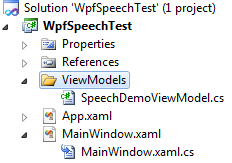
You'll also need to add a reference to System.Speech.dll
(v4)
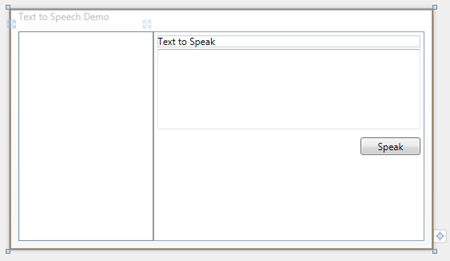
Main Window
Our Main Window is pretty simple. We'll have a listbox to list
all the available voices, a textbox you can type into, and a button
that causes the typed text to be read aloud by the speech
engine.
<Window x:Class="WpfSpeechTest.MainWindow"
        xmlns="http://schemas.microsoft.com/winfx/2006/xaml/presentation"
        xmlns:x="http://schemas.microsoft.com/winfx/2006/xaml"
        Title="Text to Speech Demo"
        Height="300"
        Width="530">
    <Grid>
        <Grid>
            <Grid.ColumnDefinitions>
                <ColumnDefinition Width="*" />
                <ColumnDefinition Width="2*" />
            </Grid.ColumnDefinitions>

            <ListBox x:Name="AvailableVoicesList"
                     Grid.Column="0" />

            <StackPanel Orientation="Vertical"
                        Grid.Column="1">
                <TextBlock Text="Text to Speak"
                           Margin="5 5 5 1" />
                <TextBox x:Name="TextToSpeak"
                         Margin="5 1 5 5"
                         Height="100"
                         TextWrapping="Wrap" />
                <Button x:Name="Speak"
                        Margin="5"
                        Width="75"
                        HorizontalAlignment="Right"
                        Content="Speak" />
            </StackPanel>
        </Grid>
    </Grid>
</Window>
Enumerating Available Voices via our ViewModel
The Speech API supports a pluggable voice model. You can
download voices from third parties, or use one of the built-in
voices. That means the set of voices is can vary from system to
system - you'll probably want to allow the user to select the voice
they want to hear.
In our SpeechDemoViewModel class, let's add what we need to
enumerate the voices. We'll be using the
System.Speech.Synthesis.SpeechSynthesizer class to get a collection
of all installed voices. The code for that is in the LoadVoices
function below. There's also an exposed collection of voices, which
we'll use in the listbox, and a SelectedVoice property which will
also be bound to the listbox.
using System;
using System.Collections.ObjectModel;
using System.ComponentModel;
using System.Linq;
using System.Speech.Synthesis;

namespace WpfSpeechTest.ViewModels
{
    class SpeechDemoViewModel : INotifyPropertyChanged
    {
        SpeechSynthesizer _synth = new SpeechSynthesizer();

        // collection of all installed and enabled voices on this computer
        ObservableCollection<InstalledVoice> _availableVoices = new ObservableCollection<InstalledVoice>();
        public ObservableCollection<InstalledVoice> AvailableVoices
        {
            get { return _availableVoices; }
        }

        // the currently selected voice
        private InstalledVoice _selectedVoice;
        public InstalledVoice SelectedVoice
        {
            get { return _selectedVoice; }
            set { _selectedVoice = value; NotifyPropertyChanged("SelectedVoice"); }
        }

        // function to load up all available voices
        public void LoadVoices()
        {
            var voices = _synth.GetInstalledVoices();

            foreach (InstalledVoice v in voices)
            {
                if (v.Enabled)
                    _availableVoices.Add(v);
            }

        }


        // ViewModel change notification goo
        public event PropertyChangedEventHandler PropertyChanged;
        protected void NotifyPropertyChanged(string propertyName)
        {
            if (PropertyChanged != null)
                PropertyChanged(this, new PropertyChangedEventArgs(propertyName));
        }
    }
}
Next, we need to wire this up to the view. The first thing is to
hook the ViewModel into our xaml. As I've mentioned in previous
posts, there are a number of different ways to do this, some more
robust than others. The way I use here is for simplicity. I set up
a viewModels xml namespace and then assign the viewmodel directly
to the data context of this Window.
<Window x:Class="WpfSpeechTest.MainWindow"
        xmlns="http://schemas.microsoft.com/winfx/2006/xaml/presentation"
        xmlns:x="http://schemas.microsoft.com/winfx/2006/xaml"
        xmlns:viewModels="clr-namespace:WpfSpeechTest.ViewModels"
        Title="Text to Speech Demo"
        Height="300"
        Width="530">
    <Window.DataContext>
        <viewModels:SpeechDemoViewModel />
    </Window.DataContext>
Now we need a way to call the LoadVoices method in our
viewmodel. You could simply call that from the viewmodel's
constructor, but since this is a non-trivial method and could
possibly throw an exception, I recommend against it. Instead, we'll
call the vm's method in the main window's loaded event handler.
public partial class MainWindow : Window
{
    public MainWindow()
    {
        InitializeComponent();

        Loaded += new RoutedEventHandler(MainWindow_Loaded);
    }

    void MainWindow_Loaded(object sender, RoutedEventArgs e)
    {
        ((SpeechDemoViewModel)this.DataContext).LoadVoices();
    }
}
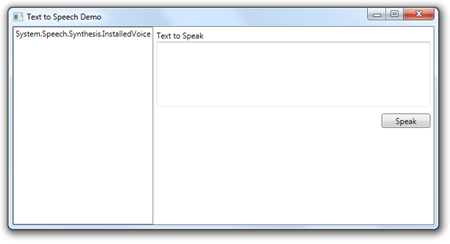
If you run it now, you'll see that we have one voice (in my
case) installed, but the listbox doesn't show us anything useful.
It simply does a ToString() on the class which in turn just returns
the name of the type.
Let's remedy that by creating an item template. The
AvailableVoice class, in its VoiceInfo property has a number of
interesting properties that we can tap into.
<ListBox x:Name="AvailableVoicesList"
         ItemsSource="{Binding AvailableVoices}"
         Grid.Column="0">
    <ListBox.ItemTemplate>
        <DataTemplate>
            <Grid Margin="5">
                <Grid.RowDefinitions>
                    <RowDefinition Height="Auto" />
                    <RowDefinition Height="Auto" />
                    <RowDefinition Height="Auto" />
                    <RowDefinition Height="Auto" />
                </Grid.RowDefinitions>


                <TextBlock Grid.Row="0"
                           Text="{Binding VoiceInfo.Id}" />

                <TextBlock Grid.Row="1"
                           Text="{Binding VoiceInfo.Name}" />

                <TextBlock Grid.Row="2"
                           Text="{Binding VoiceInfo.Description}"
                           TextWrapping="Wrap" />

                <TextBlock Grid.Row="3"
                           Text="{Binding VoiceInfo.Gender}" />
            </Grid>
        </DataTemplate>
    </ListBox.ItemTemplate>

</ListBox>
When run on my machine, this is what I see
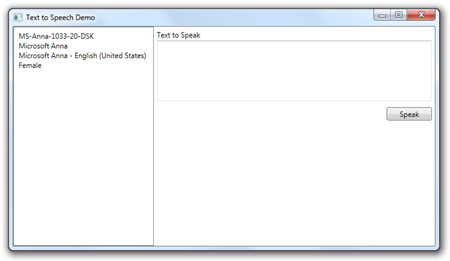
Not beautiful, but at least it tells us more information about
what voices are available. Two final things I'd like to do with the
listbox: have it update the SelectedVoice property of the viewmodel
and make it automatically select the first item automatically.
The first is handled via finding the SelectedItem to the
SelectedVoice property of our viewmodel.
<ListBox x:Name="AvailableVoicesList"
         ItemsSource="{Binding AvailableVoices}"
         SelectedItem="{Binding SelectedVoice, Mode=TwoWay}"
         Grid.Column="0">
The second is handled in the viewmodel itself. Update the
LoadVoices method to set the SelectedItem automatically:
// function to load up all available voices
public void LoadVoices()
{
    var voices = _synth.GetInstalledVoices();

    foreach (InstalledVoice v in voices)
    {
        if (v.Enabled)
            _availableVoices.Add(v);
    }

    if (_availableVoices.Count > 0)
        SelectedVoice = _availableVoices[0];
    else
        SelectedVoice = null;

}
Now when you run it, you'll see the ListBox has the first item
selected by default. That's one pattern I really like to follow
when using the vm: set selected items via binding on the UI and
explicit assignment within the viewmodel.
Making it Talk
We have most of the wiring in place. One thing we'll need to
revisit, though, is our SelectedVoice property. The property works
great for handling the listbox, but it should also select the voice
on the SpeechSynthesizer in our viewmodel. We could do this in the
Speak method we create below, but then we'd be calling it every
time, when in fact we only need to call this method when a new
voice is selected.
// the currently selected voice
private InstalledVoice _selectedVoice;
public InstalledVoice SelectedVoice
{
    get { return _selectedVoice; }
    set
    {
        _selectedVoice = value;
        _synth.SelectVoice(value.VoiceInfo.Name);
        NotifyPropertyChanged("SelectedVoice");
    }
}
The next step is to wire up the Text to Speak textbox and the
Speak button. First, we'll need to add some code to our viewmodel.
Specifically, we'll need a property that holds the text to speak,
and we'll need a method that will be invoked when the user clicks
the speak button.
In the viewmodel, add a TextToSpeak property. I also gave it
some default text so we don't have to type every time we run the
application.
// this is the text the engine will speak
private string _textToSpeak = "Hello, this is a test of text to speech in Microsoft Windows.";
public string TextToSpeak
{
    get { return _textToSpeak; }
    set { _textToSpeak = value; NotifyPropertyChanged("TextToSpeak"); }
}
Now we need a Speak method. Also in the viewmodel, add a new
function named Speak that looks like this:
public void Speak()
{
    if (_selectedVoice != null && !string.IsNullOrEmpty(_textToSpeak))
    {
        _synth.Speak(TextToSpeak);
    }
    else
    {
        // no voice or no text. do nothing
    }
}
All this function does is verify we have a selected voice and
some selected text, and then uses the speech engine to say it. The
code couldn't be simpler for basic text to speech.
Wiring to our View
Two more steps and we'll be ready to talk. The first is to bind
the text in the viewmodel to the textbox in the view. The second is
to wire the Speak button to our viewmodel.
We'll use simple two-way binding to get the text back and forth
between the view and the viewmodel.
<TextBox x:Name="TextToSpeak"
         Text="{Binding TextToSpeak, Mode=TwoWay}"
         Margin="5 1 5 5"
         Height="100"
         TextWrapping="Wrap" />
For the Button, we have a couple choices. We can do an event
handler, or we can use commands. First, let's do it with an event
handler so you can get to the speech part. We'll revisit with a
command afterwards.
Using Events
In the xaml for the view, add a new event handler for the
button, letting Visual Studio create the stub in the
code-behind.
<Button x:Name="Speak"
        Margin="5"
        Width="75"
        HorizontalAlignment="Right"
        Click="Speak_Click"
        Content="Speak" />
And in the code-behind add this one-liner to the handler:
private void Speak_Click(object sender, RoutedEventArgs e)
{
    ((SpeechDemoViewModel)this.DataContext).Speak();
}
When you run the app, and click the "Speak" button, you should
hear the text spoken using the selected voice.
Wiring to our View using a Command - Extra Credit
The event was dirt-simple to put together. Unfortunately it
introduces more code in the code-behind, which can get more and
more complex as you have more events to handle. It also doesn't
take care of any nice things like automatically disabling the
button when the command is not in a state where it can be executed
(for example, no voice selected or no text entered)
Let's use the WPF commanding system to take care of that. The
first thing we'll need to do is create a RelayCommand class. I
snagged the code for this from Josh Smith's WPF MVVM MSDN article.
Create a new class named RelayCommand in the root of the
project.
public class RelayCommand : ICommand
{
    readonly Action<object> _execute;
    readonly Predicate<object> _canExecute;

    public RelayCommand(Action<object> execute)
        : this(execute, null)
    {
    }

    public RelayCommand(Action<object> execute, Predicate<object> canExecute)
    {
        if (execute == null)
            throw new ArgumentNullException("execute");

        _execute = execute;
        _canExecute = canExecute;
    }

    public bool CanExecute(object parameter)
    {
        return _canExecute == null ? true : _canExecute(parameter);
    }

    public event EventHandler CanExecuteChanged
    {
        add { CommandManager.RequerySuggested += value; }
        remove { CommandManager.RequerySuggested -= value; }
    }

    public void Execute(object parameter)
    {
        _execute(parameter);
    }
}
Once you have that set up (the class is reusable for any number
of commands you expose) you can use it in the viewmodel like
this:
private RelayCommand _speakCommand;
public ICommand SpeakCommand
{
    get
    {
        if (_speakCommand == null)
        {
            _speakCommand = new RelayCommand(param => this.Speak(),
                param => this.CanSpeak);
        }
        return _speakCommand;
    }
}

public bool CanSpeak
{
    get { return _selectedVoice != null && !string.IsNullOrEmpty(_textToSpeak); }
}

public void Speak()
{
    if (CanSpeak)
    {
        _synth.Speak(TextToSpeak);
    }
    else
    {
        // no voice or no text. do nothing
    }
}
Note that in the Speak() method, I changed the guard code to
call CanSpeak.
Now we just need to wire it up inside the xaml. If you tried the
event version earlier, remove the click event handler from both the
xaml and the code-behind; you won't need that any longer.
The way you'll wire this up is to bind to the SpeakCommand
property exposed by our viewmodel.
<Button x:Name="Speak"
        Margin="5"
        Width="75"
        HorizontalAlignment="Right"
        Command="{Binding SpeakCommand}"
        Content="Speak" />
Now go ahead and run it and verify it works as expected. While
you're at it, try removing all the text from the textbox and tab
off and see what happens. You'll notice that the button is only
disabled once you tab off of the textbox. The reason is the
TextToSpeak property of the viewmodel is only being updated when
the user tabs off the textbox. If you want the validation to happen
as they type, you'll need to change the binding just a little
<TextBox x:Name="TextToSpeak"
         Text="{Binding TextToSpeak, Mode=TwoWay, UpdateSourceTrigger=PropertyChanged}"
         Margin="5 1 5 5"
         Height="100"
         TextWrapping="Wrap" />
Setting the binding to update on PropertyChanged causes a lot
more assignments in your code (each time the user changes the text,
a character or selection at a time) the property in your viewmodel
is updated. So use this when you need to, but understand that's
potentially a lot of assignments happening behind the scenes.
Conclusion
I hope you enjoyed our first foray into speech synthesis with
.NET 4 and Windows 7. In a future installment, we'll check out speech recognition, the counterpart to
synthesis.
A walkthrough video and full source code will be available on windowsclient.net soon. I'll post the links
here when the files are up.
Update: Source code and video may be found
here.