Some of the questions that came out of the Silverlight for Business Applications webcast I did on Wednesday centered around how to handle "global variables" and how to handle state. I'll address both of those here as they are very common requirements in business applications.
When I built Windows client applications (which doesn't happen that much any more, much to my disappointment!), I would often include a singleton class to handle transaction state. By the nature of a singleton class, it was able to be accessed from all the forms and controls in the project, and I didn't have to mess around with passing in instances of individual properties. This pattern may or may not apply in your particular situation, but I have found it quite helpful and easy to understand. I also followed a similar model in ASP.NET, but had the state class act simply as a strongly-typed facade to HttpContext.Current.Session.
[ You can download the source code for this posting from here. ]
Stateful Client
In a typical application, you'll have a number of classes used to capture transactional data that is entered into forms or otherwise set by the user. This can include straight data-entry information of course, but it can also keep things like which logical page a user is on, whether they have visited certain key areas, etc.
In the case of this sample, we're going to keep track of some contact information the user has entered in the form, so we have a Contact class:
public class Contact : INotifyPropertyChanged
{
    private string _lastName;
    private string _firstName;
    private DateTime _dateOfBirth;
    private Address _address = new Address();

    public event PropertyChangedEventHandler PropertyChanged;

    public string LastName
    {
        get { return _lastName; }
        set { _lastName = value; NotifyPropertyChanged("LastName"); }
    }

    public string FirstName
    {
        get { return _firstName; }
        set { _firstName = value; NotifyPropertyChanged("FirstName"); }
    }

    public DateTime DateOfBirth
    {
        get { return _dateOfBirth; }
        set { _dateOfBirth = value; NotifyPropertyChanged("DateOfBirth"); }
    }

    public Address Address
    {
        get { return _address; }
        set { _address = value; }
    }


    private void NotifyPropertyChanged(string propertyName)
    {
        if (PropertyChanged != null)
        {
            PropertyChanged(this, new PropertyChangedEventArgs(propertyName));
        }
    }
}
You may wonder why Address has a "Set" mutator in there. That's for serialization/deserialization which we'll use when we back our state up. Normally I wouldn't include the "set" in there.
Here's the Address class
public class Address : INotifyPropertyChanged
{
    private string _address1;
    private string _address2;
    private string _city;
    private string _state;
    private string _zip;

    public event PropertyChangedEventHandler PropertyChanged;


    public string Address1
    {
        get { return _address1; }
        set { _address1 = value; NotifyPropertyChanged("Address1"); }
    }

    public string Address2
    {
        get { return _address2; }
        set { _address2 = value; NotifyPropertyChanged("Address2"); }
    }

    public string City
    {
        get { return _city; }
        set { _city = value; NotifyPropertyChanged("City"); }
    }

    public string State
    {
        get { return _state; }
        set { _state = value; NotifyPropertyChanged("State"); }
    }

    public string Zip
    {
        get { return _zip; }
        set { _zip = value; NotifyPropertyChanged("Zip"); }
    }


    private void NotifyPropertyChanged(string propertyName)
    {
        if (PropertyChanged != null)
        {
            PropertyChanged(this, new PropertyChangedEventArgs(propertyName));
        }
    }
}
Now that we have classes to capture the data entered into the user interface, we can easily keep local instances in the form and manipulate them as-needed. However, often times one needs to share the data between forms/pages. There are a variety of ways to do that, but the cleanest way I've found is to use a singleton State (or StateManager, if you prefer) class which houses all of the state data on the client.
Singleton Pattern Application State Management Class
To make state accessible to all the pages and logical forms in my Silverlight application, I implemented state as a singleton class with strongly-typed properties :
public sealed class ApplicationState
{
    #region Singleton Behavior

    // this variable and property implement the singleton
    // pattern for this class. The reason we don't just
    // use a big old static class for everything is that
    // certain things (like binding and referencing) tend
    // to work better with instance classes. It also makes
    // the class easier to develop
    private static ApplicationState _current;

    public static ApplicationState Current
    {
        get
        {
            if (_current == null)
                _current = new ApplicationState();

            return _current;
        }
        internal set
        {
            _current = value;
        }
    }

    #endregion

    // the variable(s) below represent the state for the application
    // you can include model information here, state like what
    // screen the user is on etc. Keep anything that you would want
    // to retain between sessions, or if the user accidentally closes
    // their browser or gets a popup blocker-related page reload

    private Contact _currentContact = new Contact();

    public Contact Contact
    {
        get { return _currentContact; }
        set
        {
            lock (_currentContact)
            {
                _currentContact = value;
            }
        }
    }
}
Once you do that, the way you access state information is by using a construct like this:
ApplicationState.Current.Contact.FirstName = "Pete";
Data Binding and the User Interface
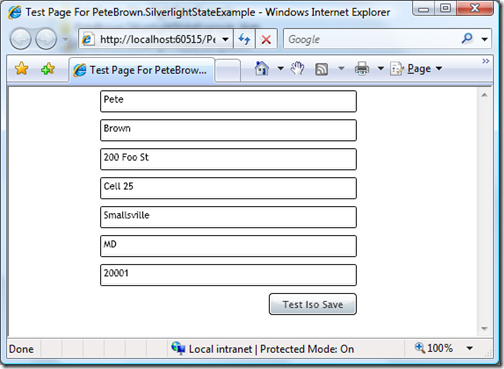
The Xaml for a quick and dirty test UI follows. Notice that I used two-way data binding to bind the textboxes to the values stored in state. Notice also that for the Address properties, you can dot-down in your binding path to get to things like Address.State.
<UserControl x:Class="PeteBrown.SilverlightStateExample.Page"
    xmlns="http://schemas.microsoft.com/client/2007"
    xmlns:x="http://schemas.microsoft.com/winfx/2006/xaml"
    Width="400" Height="300">
    <Grid x:Name="LayoutRoot" Background="White">
        <Grid.RowDefinitions>
            <RowDefinition Height="33" />
            <RowDefinition Height="33" />
            <RowDefinition Height="33" />
            <RowDefinition Height="33" />
            <RowDefinition Height="33" />
            <RowDefinition Height="33" />
            <RowDefinition Height="33" />
            <RowDefinition Height="33" />
        </Grid.RowDefinitions>
        <Grid.ColumnDefinitions>
            <ColumnDefinition Width="100" />
            <ColumnDefinition Width="*" />
        </Grid.ColumnDefinitions>

        <WatermarkedTextBox x:Name="FirstName" Watermark="First Name"
                            Grid.Row="0" Grid.Column="1" Margin="4"
                            Text="{Binding FirstName, Mode=TwoWay}"/>
        <WatermarkedTextBox x:Name="LastName" Watermark="Last Name"
                            Grid.Row="1"  Grid.Column="1"  Margin="4"
                            Text="{Binding LastName, Mode=TwoWay}" />
        <WatermarkedTextBox x:Name="Address1" Watermark="Address 1"
                            Grid.Row="2"  Grid.Column="1" Margin="4"
                            Text="{Binding Address.Address1, Mode=TwoWay}"  />
        <WatermarkedTextBox x:Name="Address2" Watermark="Address 2"
                            Grid.Row="3"  Grid.Column="1" Margin="4"
                            Text="{Binding Address.Address2, Mode=TwoWay}"  />
        <WatermarkedTextBox x:Name="City" Watermark="City"
                            Grid.Row="4"  Grid.Column="1" Margin="4"
                            Text="{Binding Address.City, Mode=TwoWay}"  />
        <WatermarkedTextBox x:Name="State" Watermark="State"
                            Grid.Row="5"  Grid.Column="1"
                            Margin="4" Text="{Binding Address.State, Mode=TwoWay}" />
        <WatermarkedTextBox x:Name="Zip" Watermark="Zip"
                            Grid.Row="6"  Grid.Column="1"
                            Margin="4" Text="{Binding Address.Zip, Mode=TwoWay}"  />

        <Button x:Name="Submit" Content="Test Iso Save"
                Grid.Column="1" Grid.Row="7" HorizontalAlignment="Right"
                Width="100" Margin="4" />
    </Grid>
</UserControl>
The user interface looks like this:
The Page constructor is where the DataContext is set, telling the Grid that it, and all its contained children, should use our State's "Contact" property for data binding.
public Page()
{
    InitializeComponent();

    LayoutRoot.DataContext = ApplicationState.Current.Contact;

    Submit.Click += new RoutedEventHandler(Submit_Click);

}
State Backup Using Isolated Storage
Once we have our state in a set of discrete objects, it's easy to add a method to back it up to Isolated Storage. In your State.cs file, simply add methods to save everything off to isolated storage. Now, if you want to be more selective about what you back up, you can send individual classes out to specific application settings. In this case, I just assume that if it's in state, it's worth backing up.
I posted about the scenarios where this could be useful previously. Below is a concrete implementation of those ideas.
For simplicity, I use the ApplicationSettings class. That class is a dictionary of items that are to be stored in Isolated Storage. It loads from Isolated Storage the first time you access an item in your application. It saves to isolated storage automatically when your app shuts down (although this isn't working in Beta 1, it should be fixed in Beta 2, so call the save explicitly right now).
private const string _stateKey = "state";

public static void SaveToIsolatedStorage()
{
    ApplicationSettings.Default[_stateKey] = State.Current;

    // Save is available and required in Beta 1. In later version
    // save will likely happen automatically when the app closes.

    ApplicationSettings.Default.Save();

}

public static void LoadFromIsolatedStorage()
{
    // ApplicationSettings load from isostore on first access

    if (ApplicationSettings.Default.Contains(_stateKey))
    {
        State.Current = (State)ApplicationSettings.Default[_stateKey];
    }
}
You can hook the Save method up to waypoints in your application, or perhaps to a timer. I call the Load method from the main page's constructor, just before binding. In a real application, you'll likely want to call it from your application load event before you set your root element.
public Page()
{
    InitializeComponent();

    ApplicationState.LoadFromIsolatedStorage();

    LayoutRoot.DataContext = ApplicationState.Current.Contact;

    Submit.Click += new RoutedEventHandler(Submit_Click);

}
Serialization
Thanks to Wilco Bauwer for helping me figure out the Serialization options here.
It turns out that the ApplicationSettings class does a great job of handling serialization for you. Behind the scenes, it uses the DataContractSerializer to serialize your classes to XML before saving them to IsolatedStorage. You don't need to markup your class or add any attributes to take advantage of this. Nice!
Where and What is Isolated Storage Anyway?
I poked around on my machine and found the files that make up Isolated Storage for Silverlight 2. The location is broken up into two separate sections. Section 1 contains administrative information, such as the quota. The second section contains the application-specific data.
On my machine, the administrative data was located in:
C:\Users\Peter.Brown\AppData\LocalLow\Microsoft\Silverlight\is\ydypht14.mut\2nu3z4zb.azc\g\h5xwynlgtxurhuhejunkcjndlnyyzy5e
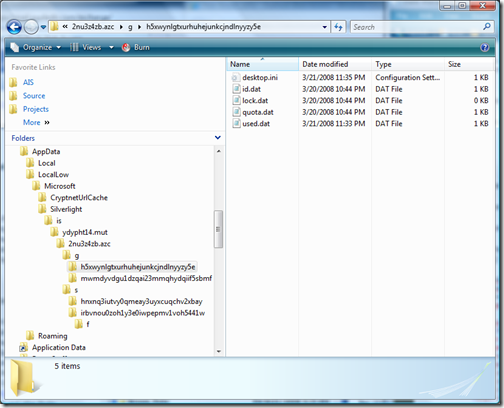
If I crack open id.dat, I see the URL for my demo site: HTTP://LOCALHOST:60515
lock.dat is presumably a semaphore, and quota and used contain binary information about spaces allocated and used for this site.
The second part is the storage of application data for the applications themselves. On my machine, the Isolated Storage folder for this application is located here:
C:\Users\Peter.Brown\AppData\LocalLow\Microsoft\Silverlight\is\ydypht14.mut\2nu3z4zb.azc\s\irbvnou0zoh1y3e0iwpepmv1voh5441w\f
In that folder, I found a file called "_LocalSettings"
If you crack open that _LocalSettings file, you'll find this (formatting / line breaks added by me for this posting)
PeteBrown.SilverlightStateExample.Model.ApplicationState,
    PeteBrown.SilverlightStateExample, Version=1.0.0.0,
    Culture=neutral, PublicKeyToken=null
<ArrayOfKeyValueOfstringanyType xmlns:i="http://www.w3.org/2001/XMLSchema-instance"
                                xmlns="http://schemas.microsoft.com/2003/10/Serialization/Arrays">
  <KeyValueOfstringanyType>
    <Key>state</Key>
    <Value xmlns:d3p1="http://schemas.datacontract.org/2004/07/PeteBrown.SilverlightStateExample.Model"
           i:type="d3p1:ApplicationState">
      <d3p1:Contact>
        <d3p1:Address>
          <d3p1:Address1>200 Foo St</d3p1:Address1>
          <d3p1:Address2>Cell 25</d3p1:Address2>
          <d3p1:City>Smallsville</d3p1:City>
          <d3p1:State>MD</d3p1:State>
          <d3p1:Zip>20001</d3p1:Zip>
        </d3p1:Address>
        <d3p1:DateOfBirth>0001-01-01T00:00:00</d3p1:DateOfBirth>
        <d3p1:FirstName>Pete</d3p1:FirstName>
        <d3p1:LastName>Brown</d3p1:LastName>
      </d3p1:Contact>
    </Value>
  </KeyValueOfstringanyType>
</ArrayOfKeyValueOfstringanyType>
As you can see, that is the result of serializing the classes out using the default behavior of the ApplicationSettings class.
Additional Benefits
Once you start centralizing your state management in your applications, you'll be able to extend the functionality to handle things like undo and automated submit to the server, should you so desire.
I invite you to take the ideas presented here and use them in whatever way best suits the needs of your specific application. If you run into an interesting scenario or use, please post it here.