I just took a "vacation" <g> for a week, and managed to
get a bunch of cabinetry done. Below are some photos of the current
state. I have another two weeks coming up in September, so I should
be able to get a bunch more completed at that time. Also keep in
mind that the open spaces you see in the photos will be covered
with door and drawer fronts.
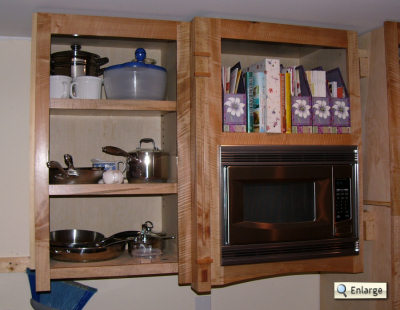
Upper Cabinet Legs
The wall cabinets along the interior wall all step out at
different depths. The oven cabinet comes out furthest, with the
microwave coming in a close second, followed by the general cabinet
to its left. This is done to fit the appliances, provide visual
interest, and in the case of the general cabinet, make sure I clear
the cooktop so as not to create any overhang over steaming pots and
pans.
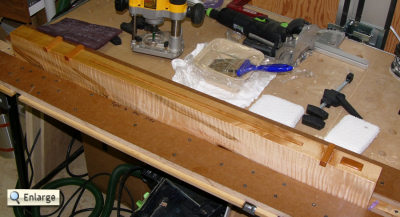
To accomodate the different depths, I had to adjust my leg
pattern a bit to allow for side panels. Here is one of them after
receiving a second or third coat of poly, but prior to any final
rub down:
And here it is installed:
I built a jig to lay out all the mortises and dados in there,
and cleaned up with a chisel. The inlay pieces are all cherry and
are set in 1/4" of an inch. The leg itself projects 1/4" in front
of the microwave cabinet. Having seen how similar the cherry and
maple look (most maple is much whiter than the tree I bought, so
there is more contrast in those cases), I think I would have done
the inlays in something darker like walnut or perhaps even ebony or
mahogony if I had to do it over. The cherry doesn't look bad, but
it doesn't pop out enough for me in this setting. The intent was to
tame all the wild grain with some Arts & Crafts-inspired detail
work.
You can download the plans for the leg and the jig from my site
here.
Peninsula and Interior Wall Base
Cabinets
I also built a new cabinet (still needs the legs and curved
stretcher underneath) and the front of the cooktop peninsula
cabinet (needs the same bits). On the peninsula cabinet, I
installed the false drawer fronts much like I would install a
normal drawer front, allowing for wood movement. Note also that I
cut both of those from one piece of wood and let the grain and
ghosting flow up from one to the other. I like the way that turned
out.
Once I install the legs, these will be joined in the corner by a
narrow filler piece. Here's a shot of the two cabinets. The
peninsula is semi-fixed in place due to the vent duct running into
the floor. The wall-side cabinet is not yet attached to anything,
as I'll need to fiddle with positions once I get the legs in
place.
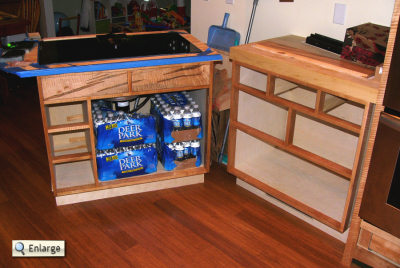
(the flash made the colors rather unnatural. They are less red
than that. Also, the platforms on top of both cabinets are both
temporary.) Sitting on top of B8 you can also just see the finished
drawer front that will go under the wall oven when the drawer pulls
arrive this Thursday.
The cabinet along the wall (B8 is its ID in my plans) sits right
on top of a HVAC floor vent. To still allow that to function, I
built a small bit of duct (not really, but close enough) in
the base of the cabinet. Once the dark green toe kick is in place,
I'll put a black 2 1/2" x 14" louvered vent cover in there. Here's
a shot of the underside of the cabinet:
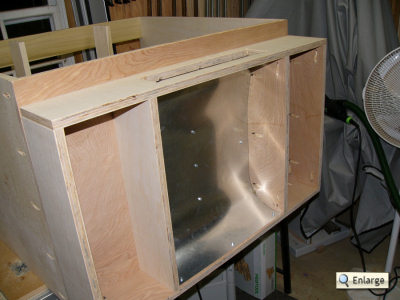
I'll put some similar sheet metal on the floor and around the
duct to direct the flow out through this vent rather than into the
flooring or up between the cabinets. Overkill perhaps, but since
it's open, I might as well do something decent with it.
The face frame for B8 was assembled using 40x6mm Dominos
(see the Festool Domino) and glue. The cabinet box
itself was assembled using pocket screws. The face frame is
attached to the cabinet box using both dominos and a couple pocket
screws. The screws aren't needed for strength, but they cut way
down on clamping requirements.
You can download the plans for cabinet B8
here.
Finishing Schedule
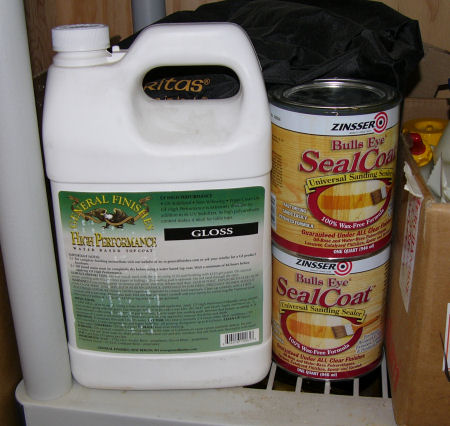
These are the products I use for finishing the cabinets. The
schedule is three or so coats of the poly for any plywood
interiors, unless the cabinet contains only drawers, in which case
I don't bother with any interior finishing. For face frames,
panels, etc. I use three or four coats of Zinsser Seal Coat (a
superblonde dewaxed shellac) wiped on with a clean soft cotton rag,
rubbed down between coats with a maroon scotch brite and/or 400
grit sandpaper, followed up with three or more coats of the
water-based poly, also rubbed down on the same schedule. (The
sandpaper on a block does a better job of leveling the finish, but
it also constantly clogs. I've tried several brands and waited
different durations for curing, but the shellac always causes
problems with it. The worst is if you don't catch it, you end up
with bad sanding lines in your work).
The final coat is rubbed down using the maroon "very fine" pad
followed by the gray "super fine" pad, and then a light buffing
with the white pad. That does a decent job of cutting down the
glare while bringing out the figure and still hiding any finishing
mistakes :)
The shellac is what provides the color and depth. The poly
provides protection. The two combined make for a pretty easy and
durable finish. I special order the poly. The shellac may be found
at your local Lowes or woodworking shop.
That's it for now. I can't wait to get back into this on my next
vacation. I'll get some smaller things done between now and then,
but the big work is best left for times when I have several days in
a row that I can block off.
