Over the weekend, I assembled the carcass and face frame for the
double oven cabinet for our Thermador C302BS.
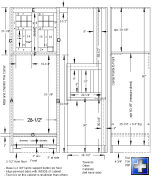
This was a bit of a one-off cabinet as I had to adhere to
manufacturer specs for support and spacing. The cabinet is sized
exactly for that oven. You can see from some of the photos below
that I used a sandwich of plywood to hold the weight of the oven. A
similar support structure exists in the separately-assembled base.
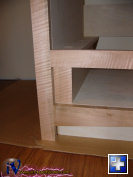
All that support structure meant that I had to have a narrow drawer
down below. Rather than have a really wide face frame at that
point, I decided that I'll let the drawer face be full width, but
the box will be narrow. To hide the ugly plywood, I cut a couple
small pieces which will be attached once finished. Perhaps the
drawer front will be a bit weak or prone to warp because of that.
TBD.
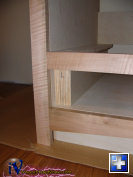
The base and oven supports are tongue and groove attached to the face frame.
The face frame is assembled using pocket screws. The carcass is
assembled using tongue and groove as well as pocket screws. The
bottom face frame is attached to the carcass using biscuits - the
boards were too unwieldy to route a tongue; the top is attached
using tongue and groove. I really prefer the T&G when I can, as
it is more precise and holds much better when dry.
The cabinet is currently in five main pieces - the bottom face
frame, the top face frame, the bottom carcass, the top carcass and
the bottom support (plus the two plywood sandwiches and the trim).
Those pieces will all be attached after finishing and installation.
The reasoning for the sizing is because I can't work with wood
longer than about 6' 5" in my tiny workshop, and because handling a full 8'
cabinet is a bit more than I care to take on by myself :-) Ideally,
a single flowing face frame would have been preferred, even if the
carcass was split in two.


Besides the obvious drawer and doors, I have some side trim
pieces to build. In addition, the face frames still need to be hand
planed, sanded, and finished. Right now, I plan to finish the face
frames using oil with several coats of General Finishes Gloss High Performance Poly.
The gloss will bring out some of the figure in a way satin just
can't. The interiors and plywood will only be finished with the
poly. The inside and outside of the oven cabinet may not have any
poly put on it, as there is no real reason to do so, except perhaps
to protect from errant moisture.
It has been a lot of work to get this far, but it is very
rewarding to see a pile of 2 1/2" thick rough lumber cut down to this, end up as what you see on this page and
in the future installments.
Oh, the plywood I ended up using is this crappy Maple / Birch
plywood from Lowes. It has Maple on one side and Birch on the
other. I bought a whole pallet (20 sheets) worth for about
$40/sheet. That is significantly cheaper than good maple plywood
(which is upwards of $100/sheet + shipping as no one stocks it
locally). What you trade for price and easy of purchase, is
quality and consistency. The number of plies is different from
board to board, as is the thickness (minor variances, but there).
Some of the maple faces have the most hideous patches (not
footballs, but just a couple splinters stuck into a low spot). The
plywood works, but you wouldn't want to use it for anything where
you look at the plywood day in and day out. All the plywood on my
cabinets will be visible only from the inside of the cabinets.
I have decided to keep the face frames relatively plain, and
keep the highly wormy and colorful bits for the panels, doors and,
to a lesser extent, the doors. Things will really liven
up once I start putting those in there.
