This is one way to install box newels. The Newels I am using are solid box newels by Coffman Stairs. The procedure can be similar for hollow newels if you block them up inside. However, if you have hollow box newels, you might want to instead look at the cleats that screw to the sides and to the floor.
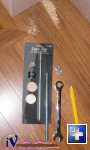
I'm using the L. J. Smith Sure-Tite Newel Fastening System, picked up from either Lowes or The Home Depot; I forget which. The system consists of a large screw/bolt, a plastic curved washer, a nut, and a wood plug.
The first thing to do is to cut the newel post to length. I used a CAD program to figure out the heights. The controlling height was the rake rail height (the height of the railing on the staircase itself). Once I had that figured out, I could calculate the other heights. I went back and forth with a little adjustment to optimize both og those.
The next step is to locate the newel posts. Once you get them in place, mark the centers. I did this by tracing the newel post and then connecting the corners.
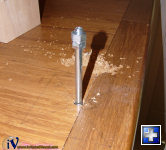
Once I had the center marked, following the instructions on the Sure-Title package, I bored a 5/8 hole through the finished floor, and then drilled a 3/8 hole approximately 6 inches into the joists / blocking below. I was lucky in that I had solid wood all the way down. If you drill through the subfloor and do not hit framing lumber, you will need to get under the floor and install blocking, or use another type of fastening system. You can't screw the lag end into just the subfloor; it will never hold.
To drive the lag end into the floor, double up nuts on the bolt end and then use a ratchet to drive it in. The wrench I use has a built-in ratchet.
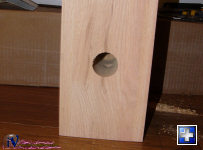
Either now, or some point previously, you will need to drill the two holes in the newel post as indicated by the directions. Make sure you drill the access hole in a side which will have less visibility in your installation.That is likely the "ugly side" on the box newel.
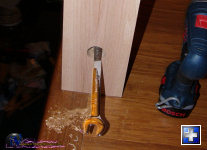
Next, put the newel post over the bolt and check the height. If the bolt is too low, you'll have nothing to lock the nut on. If the bolt is too high, you either won't be able to get the nut over the bolt, or even worse, you'll trap your wrench over the bolt in the hole. That happened to me (photo below), and I had to use a chisel to free the wrench. Keep in mind that as you tighten the newel to the floor, the bolt is going to get higher up in the hole. The clearance is really tight to begin with. This is a fiddly operation no matter what way you do it, as the box newel is thick and the hole is deep. My ratcheting wrench could only get one click out.
Trapped!
The most fiddly part was getting the washer and nut on to the bolt head. They would fall behind the bolt, which would require lifting the newel post up, shaking them out of the hole, and then reinstalling the newel post. Once I got them started, though, it was pretty easy, but a bit tedious.
Once you tighten the newel post down (ensuring it is square while you're doing it), rock the post with some force in all directions and then tighten it down even more. Once you've done that, it should be really solid.
At this point, since it is fully tigthtened down (or close to it), you can scribe level lines across the bottom, remove the newel post and then either saw or belt sand the bottom to level it out. Finish that and then tighten it back down again. Just be sure to torque everything down tight.