Welcome to Pete Brown's 10rem.net

First time here? If you are a developer or are interested in Microsoft tools and technology, please consider subscribing to the latest posts.

You may also be interested in my blog archives, the articles section, or some of my lab projects such as the C64 emulator written in Silverlight.

(hide this)

Installing Strand Bamboo Flooring

Pete Brown - 08 January 2006

The flooring I'm installing in this house is a type of man-made flooring called Bamboo Strand. The flooring is made up of lots of bamboo fibers compressed together with an adhesive to form solid planks. These planks are harder than just about any other type of wood.

Starting Out

Since this is a split-entry style of home, we have an open stairwell leading up into the living room and hallway. As this is a very visible point, and as the floor is pre-finished, I had to use the stairwell as my starting point. If I had drawn a line anyplace else, and it was even the slightest bit askew of the stair nosing, it would have been very noticeable.

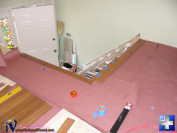
The nosing is installed with screws (to be plugged and spot finished) at the top of the stairs, and face-nailed elsewhere. I left the long leg unattached as I want to ensure it is exactly 90 degrees to the flooring. The two legs are mitered and joined together with a biscuit. (I use the porter-cable biscuit joiner). I am still not quite happy with the nosing right at the top of the stairs, as there was very little solid material to screw it to due to the space between the top riser and the header joist (which, by the way, is not even remotely square to the room or the opening - you have to love rough framing). For the nosing adjacent to the stairs (but not the stuff 90 degrees to it), I nailed a 2x6 to the header joist to provide some more nailing surface. I'll finish that out later with a frame and panel treatment like the rest of the stairwell.

One I had the nosing installed (that took an evening and a morning of measurements, double-checking, cutting, mitering, assembly etc.) I racked out several rows of flooring, cutting the starting pieces to odd lengths

The paper I'm using is plain old red rosin paper for flooring. Since the basement is finished, I don't have to worry a lot about mosture transfer. We also didn't like the idea of having tar-impregnated felt on the floor when we went through all the trouble to get flooring that had very little noxious gas outgassing (far less than normal wood flooring or carpet) and a very good/low VOC rating. I doubled-up the paper just in case. I shimmed the low spots around the stairs with cuttings from manilla file folders.

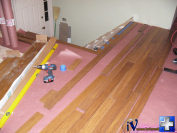
When extending the line out from the stairs, I screwed a backer block into the flooring to provide some support for the board when nailing. The nailer will slam the board back enough that unless you have solid backing, the nail will stand proud and the board will have moved. This way I saved myself that grief.

Here you can see the flooring run fairly solid. The two short pieces near the wall are there just for me to figure out how many boards I'll need there. The nailed run they are butted up against is as close to the wall as you can get with the power nailer. The next row I can nail by hand through the tongue, the final row and a third or so must be face nailed and filled. If I had used a nailer from bostitch or others, I wouldn't even be able to get that close with the nailer, and would have to hand nail two rows before the face nailing.


Problems 

You have to expect problems with any flooring. Even though this material is man-made, it bowed just like wood, as you can see from this photo. Luckily, the flooring would nail down tight without any problems. I set aside the most severly bowed boards anyway, and always made sure they were used in places where there would be good nailing and plenty of other boards around them for support. One good thing is that I ended up (so far) with no boards with any noticeable bend along their length (at 90 degrees to the warp below). Those are more difficult to deal with, and are pretty common with solid wood floors.

Ine thing I didn't expect was the difficulty face-nailing. It is almost impossible to face nail this stuff with a pneumatic nailer, even at 110psi. in about 3/5 of the nailings I tried, I ended up with something similar to this photo. After a run of that near the wall in the hall and a similar run near a wall in the baby's room, I decided to ditch the pneumatic nailer and instead pre-drill and hand nail. That is time consuming, but not as time consuming as patching the problems left by these smushed pneumatic trim nails.


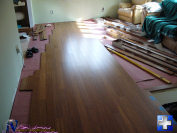
First Room Almost Complete 

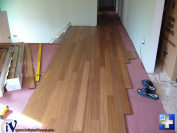
I promised Melissa that the first room I would finish would be the baby room. In order to do that, I had to extend the run from the stairs into the hall and down to the door of this room. That helped established a consistent line and made sure everything in the house lined up properly. If I didn't do that, I would have to use ugly T molding or an unslightly tapered rip (not good on pre-finished flooring) to make the rooms line up.

The Primatech nailer made quick work of most of the flooring in here. Since the room is about 10' wide, every row required cutting at least one (usually two or three) boards. To ensure I didn't end up with very short pieces on one end (two of which are in there, which is why I did this later), I marked the 6' mark from the ending wall as a line down the middle of the room. If I was going to end up just short of that, I used a different board to start the row.

 
posted by Pete Brown on Sunday, January 8, 2006
filed under:  

18 comments for “Installing Strand Bamboo Flooring”

  1. Chrissays:
    Pete,

    What brand of Bamboo flooring did you settle on (and why)? And where did you purchase it?

    I am thinking about installing bamboo flooring on my second floor and the choices are overwhelming...

    Thanks,
    Chris
  2. Pete Brownsays:
    Hi Chris

    I standardized on Sustainable Flooring's Strand bamboo. I'm at work, and don't recall the brand that ends up being (but it is posted in another entry in the renovation section of this blog)

    I chose it based on my own tests of tons of different types of bamboo flooring. I tested water damage, denting, scratching, and overall look and durability. Also, the sales person at SustainableFlooring.com was very helpful, professional and nice.

    Pete
  3. Pete Brownsays:
    @Henning I just used a cheap carbide miter saw blade. The strand bamboo will really dull any blade you have, and the cut ends will be under trim along the walls, so you don't need to have a great cutting blade.

    For rips on my table saw I used an inexpensive carbide rip blade for the same reason. The ripped edge would be under trim against the wall.

    For cutouts (like around floor vents) I used my bosch jigsaw. It minimized wobble and makes pretty clean cuts. The bottom side of the bamboo board will be roughed up, but the top will be clean.

    Pete
  4. T. Erwinsays:
    I was curious if you might be able to email me some insight on installing stairs. We are installing strand bamboo & taking it one room at a time. I feel awful because we were planning on using one of the ugly T moldings. If not, we must start with the stairs as well. Our stairs lead to a game room which then leads to all the rooms/hallways we will be installing. Our stairs I believe are known as box stairs. By this I mean there are encased in a sheet rock ½ wall railing. It seems this would make it easier than the open stairs like you had. Just curious if you have any pointers for us. I would greatly appreciate any input. axemjack@earthlink.net
  5. Pete Brownsays:
    @T Erwin

    I'm not a professional carpenter, so I wouldn't want to give you advice that might further complicate your project. If you are thinking about putting bamboo on your stairs, however, you have to make sure you raise the lower landing up by the same amount, as all the stairs need to have the same rise in order to avoid tripping and to meet code.

    In my case, I do bamboo up to the top of the stairs, and use a bamboo bullnose stair tread just like you would if the stairs themselves were bamboo.

    Pete
  6. Bertsays:
    We just went shopping for hardwood for our kitchen, family room, laundry room, and have settled on Morning Star Carbonized Strand from Lumber Liquidators. Did you use the darker cabonized? One thing that unsettles me is the variation of darker and lighter boards. Did you find that? The salesman said to open several boxes and intermix them in order to minimize that.
    When you predrilled and nailed - what nails did you use? You also mention nailing some rows through the tongue - what did you use there? Woul you recommebd predrilling and hand-nailing there? How far apart did you nail? Any thought given to using glue on those boards? The instructions say nail down or glue.
    One room is a large open 17 x 27 room - no stairs, just a fireplace hearth at one end. How long do you think it would take to floor that sized area?
    My wife thinks this will take much, much longer than
    I do. I've installed nailed floors and laminates previously.
  7. Pete Brownsays:
    @Bert you'll get variation with any pre-finished material. I always make sure to pull from several boxes when doing any room. When I did our living room, I had around 6-10 boxes open at any point.

    I nailed every 6-8". I have a few squeaky spots where I couldn't get the ends nailed to a joist (in room doorways), but otherwise is has done well. Note that I also put down a second layer of subflooring to bring it up to the required thickness. Make sure you check your subfloor before doing this. When I took the time to do the subfloor, I always addressed the sqeaky spots in the current floor, screwing down the first layer in spots, and then gluing and screwing the second layer. That's what will take the most time. After that, I put down red rosin paper, overlapped. Some folks like to use roofing felt.

    Don't skip on the floor prep.

    I forget the gauge I used, but I used galvanized finish nails so I had something with a little friction to them : the holes you drill in strand bamboo will be smooth as glass inside. Probably not necessary, but I did it anyway. They were long enough to make it through both layers of subfloor and into the joists. When you predrill, make sure the nail can slip into the bamboo without nailing. If you have too tight a fit, you'll just bend the nail: strand bamboo doesn't give at all.

    When I hand-nailed the tongues, I used much smaller nails, but still around 2+ inches long. Too thick and you'll either split the tongue or make it so you can't slip the next piece over. Be sure to use a nail set to get the heads flush. On those, I also glued the tongues to the next row, which was typically face-nailed as it was near the wall.

    The primatech nailer I used was excellent. I wouldn't have done it with anything else. It let me get a full row or more closer to the wall without face nailing. It also had good consistent action and was easy to use. Buying a nailer makes a ton of sense as you can either sell it afterwards, or keep it for the next project. There's no pressure to rush to return it by 8:00pm on Sunday or anything like that.

    No idea on how long it will take you. Too many variables. Give yourself a couple weekends at least, including room prep.

    In your case, the fireplace will take you a bit, as you'll want to frame it nicely, not just slap boards up to it and cover it with shoe molding.

    One final note: bamboo scratches white. Be extra careful when you put rows down. If you drag the nailer across them, or get something caught under the nailer, you can leave really nasty scratches across the row. Don't wear hard knee protection and clear away dust and chips regularly, especially any tiny bits of metal from the rows of nails or from inside the boxes. Get some furniture repair markers (the set with 4 colors is good) and use it when you get a scratch you can't stand to see. If you live in the house, the floor *will* scratch, no matter what you do to protect it.

    Hope that helps.

    Pete
  8. Bertsays:
    Thanks for the comments Pete! I had a flooring book that I looked over after posting my questions, and that help expand my knowledge as well.
    A friend has a power-assisted nailer - uses an air compressor. The last time I did a floor it was with the nailer that you drive completely by brute force - I'm hoping this is much easier, since there is about 1,000 sf going in. I checked out the pre-drilling and hand-nailing and I've got the right tools and bits for that. I'll also have a good supply of glue on hand.
    I'm actually doing this as part of the prep for putting our house on the market (if and when it ever recovers) so I'm just going with the subfloor that was under the carpet. I do have a fireplace, and was going to frame it with thresholding, since I assume I need to leave a 1/2" gap around that, just like a wall. I'm also putting in flush-mount grilles - I think they'll look sharp.
    We're ordering the flooring tomorrow, so it'll be a little bit before I start putting it in. I'll post an update once we get started. Thanks for the blog - it's a big help!
  9. Pete Brownsays:
    @Bert, please check your subflooring. Mine was only 5/8 and had too much flex, and a number of areas where the floor had some real dip.

    You'll make a huge mess if your flooring is that thin and you stick the 5/8" bamboo over it. The subfloor will flex too much and you'll end up with a bamboo floor that has so many squeaks, the buyers will ask you to pay to remove it as part of the closing. :)

    Pete
  10. Tiggertoysays:
    Which Primatech nailer did you use? I am researching the right nailer for my next bamboo project and I have heard horror stories about nailers/staplers that either go only halfway in or damages the tongue if the pressure is up.

  11. Burrissays:
    Hello,

    My question to you is how do i secure the nose (Carbonized Bamboo flooring) to the existing stair threads, each thread takes two Carbonized Bamboo floor planks plus a nose plank. the measurement are all correct. can i secure the the nose with screws?, and if so what type of screws should i use. or maybe i can drill and use a screw locking mechanism. On each existing thread, i am using two Carbonized Bamboo flooring threads plus the nose...i can secure the first two with the hammer stapler...but not the nose. Gluing is not an option....i am in a jam.

  12. Petesays:
    @Burris

    The stairs are oak pre-fab, stained to look about the same color as the bamboo flooring. I wasn't comfortable building stars out of pre-finished planks.

    On the top edge, I secured the bamboo nose with stainless screws, long enough to go into the floor joists. I countersunk and plugged the holes with oak plugs. I dabbed a little stain and finish on the plugs afterwards.

    Pete
  13. Carl Neatherysays:
    I am really learning a lot with this Bamboo Strand flooring. I have a chop saw that did a good cut on top finish but when I lined up the cut piece at a 45 degree angle with the angled piece on the floor there was a gap. Checked the internet they all said not to use a chop saw. Bought a new sliding saw at Menards made by Bosch (not a Bosch brand saw) that Menards carry. Bought 2, 80t blades carbon to make the cut. My first cut was done ok with the new saw except it tore up the top finish. Next I taped the wood and the saw just ripped the tape off and still messed up the top finish. I have the board really clamped down hard did not look like it moved.

    Should I be using a higher number of teeth saw blade or what do you suggest.


    Carl
  14. Carl Neatherysays:
    Since I last sent an message about cutting Bamboo Strand board where it was splitting the top finish with my new sliding miter saw. After taking the board out of saw I examined the bottom of my cut side it was perfect. Took a piece of the packing that the bamboo comes in and put on my saw top so the top side of panel could rest on the packing paper. Made my cut upside down and it came out perfect. Not saying that is the correct way but that is the way I'll be cutting rest of panels is upside down. Remember you have to change the 45 degree angle to the opposite side than the top side cut.

    On my table saw I can cut with top side up with no problems. I am going with whatever works is fine with me.

    Carl
  15. Petesays:
    @Carl

    Glad that worked for you.

    I'm not sure how many of these 45 degree cuts you plan to make (hopefully it's just for nosing on stairs or something), but keep in mind that fresh cuts like that, if in traffic areas, are going to end up splintering over time.

    If these are in visible and/or traffic locations, I suggest very slightly beveling the cut edge with a sanding block, then using a stain marker that matches the color of the board (test on a offcut from the same board), and finally sealing it with a couple layers of some water-based poly applied with an artist brush or similar.

    The only exposed fresh-cut end in my installation is one 45 degree cut on the stairwell opening. All other cut ends are under trim, with only factory ends in the visible floor.

    The strand bamboo leaves NASTY splinters when it does splinter.

    Pete
  16. Willsays:
    Great info! I could have saved myself much grief, anger, frustration if I had seen this just a week ago!

    You are spot on regarding the use of air nailers on the board faces. I will add that it is doubly true if you try one on quarter round trim. I had several 16 gauge nails that curled in the trim and one shot right back at me, hitting me in my cheek. (Thank you safety glasses!) I am going to finish any face work with drill/nail by hand and I just ordered a 23 gauge pin nailer which I read should be work for the trim. If not, I will drill and hand nail those too!

    By the way, I have been using a Powernail 50P flex on my Morning Star strand bamboo. It's a fantastic tool!

    Thanks for posting this.

Comment on this Post

Remember me