It has been quite a while since I last posted, and a lot has happened since then. (click on any image for a larger version)
Interior
Since I last posted, we had the drywallers (two guys, a finisher with 17 years experience, and his helper) here to drywall the kitchen, livingroom, and one spot in the hallway. The guys also helped to fix some really bad drywall patching done by the previous owners. It took them four days of work, but the results look so good, it puts the original drywall (in the hallway, a couple walls in the living room, and all the bedrooms) to shame. You can't find a seam in the new work; the finisher was a real professional. There's one little bump in the arch, but you can't expect perfection in drywall :) Email me if you're in the NE DC/Maryland area (they are from Silver Spring) and would like a referral for the finisher and his helper.


After the drywall was completed, I put up a couple coats of primer, and then Melissa did all the finish painting. She's much better at painting than I am; I always leave lines where I used too much paint on the roller and didn't smooth it out well.
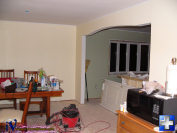

Knowing that it will be a while before I can have the electricians in (the cabinets will take me a bit to complete - sorry Eric!), I went ahead and installed the dining room light and the hallway light.


The hallway light is one we picked up from one of the big box stores for relatively little. The dining room light is by Arroyo Craftsman and was ordered from Lighting Universe. Both nicely fit our Craftsman & nature-inspired theme.
Previously I went to Home Depot and bought an 8' section of counter top (with a 15% discount due to a large scratch), some cheapie knock-down cabinets and the absolute cheapest stainless sink and faucet I could find. The storage stand, cabinets, sink, faucet, strainer, countertop and clips totalled under $500. We both agreed this would be the best thing to do, as the cabinets will take me a bit to finish. We also looked into purchasing cabinets, just to save time, but were very disappointed in the lack of quality in even the expensive ($15K or more for our kitchen, just in cabinets) cabinets. Unless we went custom (which would be a ton of money), there's no way we were going to have someone else build them. As far as saving time goes, despite what they tell you at Home Depot, Lowes and other stores, the typical Kraft-Maid cabinet delivery takes 6-8 weeks or more, which is not really much of a timesaver.

Earlier this week, we went to Hearne Hardwoods up in Pennsylvania. They had some really beautiful woods that we plan to use for our cabinets. The one that really caught our eye was a slightly figured and rustic looking soft tiger maple with ghost streaks (spalting caused by worms in the wood). You can see a photo of the ghost streaks on Hearne's site (the photo labeled "tavern grade"). As an aside, the folks at Hearne's were wonderful. Not only have I never seen a site with that much wood (3 or more buildings full), but they let me have full run of the place, even rooms where there were employees cutting boards on large panel saws. They also gave us a tour including a look at their huge 67" vertical bandmill. I highly recommend them not only for their excellent prices and unparalleled selection, but also for their willingness to work with you and their overall friendliness.
I picked up a few pieces of lumber from them just to mess around. I'll place the larger order once I get the flooring done.
Yesterday (12/29) we had a plumber in from USA Plumbing (in Annapolis, MD) to install the temporary sink in our kitchen. The plumber, who was much nicer and more professional than either of the past two companies we dealt with, did a great job of hooking everything up and telling me what I would need to do for the final install of the final sink and faucet. He also hooked up the dishwasher and repaired a leak in it at the same time. I had hooked up the electrical on the dishwasher earlier. When going through it to do that, I realized just how poor a shape our dishwasher is in, and after conferring with Melissa, decided we'll get a new one. Once I pick it out, I'll post here.
Exterior
The windows were installed earlier in the month, as you can see from the previous entries. Yesterday the siding folks came by and dropped off all of the siding and equipment needed to install it. Today they worked from 8:30 until after dark installing the siding. They made quite a bit of progress, and likely will be done (weather permitting) in the next day or two. Here are some photos (click for larger versions):


They finished the master bedroom side of the house, the lower overhang on the back and front, , most of the rear soffit, half of the back siding, and half of the side with the new bow window. They still have a good amount of trim work to do around the deck and on the bow window side, but they got a lot done. All the trim work on the house is going to be wrapped in aluminum and vinyl, with no exposed wood.
The siding I specified is Tuscan Clay Shake from Alside. I also specified white corner and edge trim as I really like the cape cod-like contrast. I think the colors go really well with the house. I've always loved the look of real shakes, but out here in the humid mid-atlantic, in the woods, the real thing is not something you want to deal with. These provide a similar look without the maintenance.
One bonus is the 1/4" insulation that they put around the house. Most new construction I see these days has nothing under the siding, not even house wrap half of the time (our original builder-installed aluminum siding had nothing under it other than the crummy "Georgia Board" that makes up our outside wall). Another bonus is the flashing that they put underneath the first course of siding. With the old siding, which did not have any such flashing, we had problems with yellow jackets and other pests getting under the siding and into the floor/ceiling. When I first moved into this house, I found a basketball-sized (dead, luckily!) yellow jacket nest in the insulation in the basement ceiling. They came in under the old siding and between the floor joists and foundation wall. I caulked to try and prevent that from happening again, but that was an ugly job. We still find dead yellow jackets in the walls when we pull out an outlet or do work in them.
Interior Flooring
Just before Christmas, my father in law and I installed the new staircase. We had hoped to have it done a few weeks earlier, but the guy who specified the staircase messed up and specified 6 risers, (5 treads) when it should have been 6 treads (7 risers). Johnson Lumber made good on getting the old stairs out and the new staircase in in just a couple weeks. As part of the staircase install, I removed half a wall in our basement. That change really opened up the area under the stairs and the entrance to the shop/utility room. I'll post photos of that in the future.
I start laying down the bamboo flooring tomorrow. The stairs needed to be installed before I could lay the pre-finished flooring, as everything keys off the open stair well and the nosing there. Last night I hooked up and tested the Primatech nailer (it required a 3/8" to 1/4" NPT adapter), and found it needed about 100 PSI to nail into that strand bamboo. The bamboo tongue did show some slight splitting, but held fast and still fit together quite nicely.
Tonight I ripped the splines I will need for installing that flooring. The splines are ripped from 1/4" poplar, and are 1/4" wide by 3/16" thick by 4' long. I could have made longer splines, but to save time, I purchased 1/4" x 6" poplar from Lowes, and that only came in lengths up to 4'. Here's a photo of a rip in progress (my Excalibur saw guard arrives at the end of January, but the Grr-ripper does a good job of keeping my hands clear of the blade). You can also see the MJ-Splitter installed in a zero clearance insert on the Frankensaw. The MJ Splitter does an excellent job of preventing kickback, as well as provides a slight feather board effect. It is a huge improvement over the old stock splitter. (Yes, that's a cross-cut blade, not a ripping blade. It's a sacrificial blade that will be chucked once the flooring is done, as the flooring is very hard and will ruin any good blade)
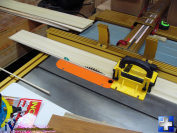
Note that the 3/16" rip is to the left of the blade, on the free side. The Incra system made ripping equal-sized splines simple and safe.
The splines are needed because the stair nosing is a groove, and I need to start laying the floor from there, so the first course of regular flooring must be installed groove-to-groove with the nosing. The plan is to lay the flooring for the hallway and baby room, then the living room. The kitchen will wait until I have the cabinet plan 100%.
That's it for now. I'll post some more photos once the flooring is down :)
