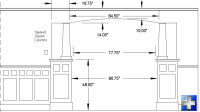
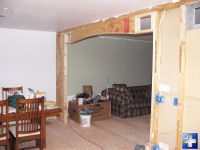
Over the weekend, I built and installed the framing for the kitchen arch. This is the current plan for the arch:
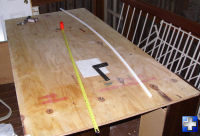
First I screwed together (clamps would have worked, but not as well) two pieces of 1/2" plywood. Then I used a piece of flexible 5/8" square PVC window trim in order to lay out the curve.
I first measured both end points and the center point. I then nailed the PVC to the center point, making sure I was in the center of the PVC to eliminate any distortion, and then nailed both ends. Finally, I used my Bosch jigsaw to cut along the curve line.
Of course, after I measured and cut, I realized I forgot to take into account the existing 2x4s in the partition wall. To fix that, I put the fence on the circular saw and cut 3" off the long straight side.
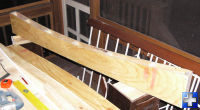
Once the curve was cut out, and the long edge trimmed, I used 2x3s to frame up the interior. There is one long 2x3 along the straight edge, one in the center and the rest 16" from the center until you get near the edge. In retrospect, I really needed more 2x3 framing members in here as the curved plywood bottom (not visible here) is not quite as smooth as it could be. All framing was glued and screwed using deck screws. I prefer those over drywall screws as they have a plain shank near the head which helps cinch the plywood down to the framing.
I marked the center line on the partition wall and on the arch. I then I nailed a 2x4 cleat to the back edge of the 2x4s on the upper edge of the partition wall (to keep the arch from flying into the living room when I tried to position it) and then used 8' 2x4s to prop up the arch while I screwed it to the partition wall framing.
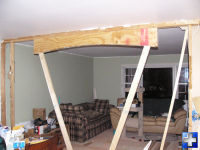
Once that was complete, I framed both ends using a simple box of 2x4s, and then screwed and glued a 3 3/8" wide piece of plywood to the bottom in order to smooth the arch out and provide something for the drywall to stick to. I went slightly less than 3 1/2" to help keep the bottom from standing proud of the sides.
I need to plane off a couple proud points along the edge, but otherwise it is ready for drywall.