In this post, I show how to create a simple talk countdown timer
using a Netduino GO and the komodex Seven Segment Display
Module.
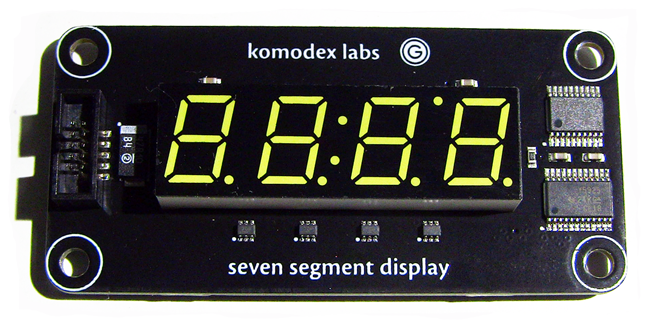
Yesterday, I received the
Seven Segment Display Module I pre-ordered from komodex
systems. Matt Isenhower did a great job with designing this board
and making it an attractive piece of kit. It has a lovely shiny
black silkscreen, professionally installed surface mount
components, and lovely white silkscreen with graphics and lovely
proportional lettering (likely done as a graphic). The display
itself uses white LEDs, and supports four digits (or custom
characters), a colon, and an apostrophe.
There are two ICs on board: an STM8 processor for gobus and a TI
TLC5925 16 channel constant current LED driver. In the spirit of
open source hardware (which this is), the
full schematic is available here. (Also in the spirit of open
source, Matt answered all my questions about how he had the board
manufactured - information I plan to use when manufacturing my own
GO and Gadgeteer modules.)
The LED display, like most white displays, has a yellow tint
when off.

It's dead simple stuff, but it comes together quite nicely.
I already had all the Netduino GO and .NET Micro Framework 4.2
stuff installed, so all I had to download was the Seven Segment Display
Module driver from komodex systems. The driver installed fine,
although I had to bypass the annoying nanny prompt "this file is
not commonly downloaded and could harm your computer". Bring it on,
baby :)
The Project
Call me unimaginative, when when I saw this display, my first
thought was "clock". Well, I have several events coming up,
including a few that showcase NETMF projects (
VSLive, thatConference, and
the Heartland Developer
Conference). What better than a simple talk timer.
I won't go into detail on creating a new Netduino GO project, as
the Netduino site has plenty
of information on that. Just install the SDKs, create a new
Netduino GO project (in VS 2010) and you're ready to go.
The source for this is dead simple, so here it is all in one
shot:
using System;

using System.Threading;

using Microsoft.SPOT;

using Microsoft.SPOT.Hardware;

using SecretLabs.NETMF.Hardware.NetduinoGo;

using Komodex.NETMF;


namespace NetduinoGoTalkTimer

{

    public class Program

    {

        private static SevenSegmentDisplay _display = new SevenSegmentDisplay();


        public static void Main()

        {

            // hard code time to 5 minutes for now, just to test

            TimeSpan duration = new TimeSpan(0,5,0);


            // standard decrement

            TimeSpan decrement = new TimeSpan(0, 0, 1);

            int sleepDuration = (int)(decrement.Ticks / TimeSpan.TicksPerMillisecond);


            // show the colon

            _display.SetColon(true);


            bool moreTime = true;


            while (moreTime)

            {

                // show the current countdown

                _display.SetValue(duration);


                //sleep for duration of decrement

                Thread.Sleep(sleepDuration);


                // check to see if we should continue

                moreTime = duration.Ticks > 0;


                if (moreTime)

                {

                    // decrement time

                    duration = duration.Subtract(decrement);

                }

            }


            // flash when done

            while (true)

            {

                _display.SetBrightness(0);

                Thread.Sleep(250);

                _display.SetBrightness(1);

                Thread.Sleep(250);

            }


        }


    }

}
Like I said, very simple. If you run the app at this point, it
will count down for five minutes, then obnoxiously flash the
display in a way that reminds me of the VCR my parents had.

Project Version 2
Ok, so that was interesting, but it doesn't let you set the time
yourself, start the timer with a button, or do any other normal
things. The hard-coded 5 minutes is just to test.
Next, I wanted to add the ability to set the time, as well as to
start and stop the timer at will. Explanation after the code.
using System;

using System.Threading;

using Komodex.NETMF;

using Microsoft.SPOT;

using Microsoft.SPOT.Hardware;

using SecretLabs.NETMF.Hardware.NetduinoGo;


namespace NetduinoGoTalkTimer

{

    enum State

    {

        SettingTime,

        Countdown,

        Flashing

    }


    public class Program

    {

        private static SevenSegmentDisplay _display = new SevenSegmentDisplay();

        private static NetduinoGo.Potentiometer _pot = new NetduinoGo.Potentiometer();

        private static NetduinoGo.Button _startStopButton = new NetduinoGo.Button();

        private static TimeSpan _duration = new TimeSpan(0);


        public static void Main()

        {

            // wire up button event handler

            _startStopButton.ButtonReleased += OnStartStopButtonReleased;


            // show the colon

            _display.SetColon(true);


            _currentState = State.SettingTime;

            MainLoop();

        }


        // main repeating loop for the app

        private static void MainLoop()

        {

            while (true)

            {

                switch (_currentState)

                {

                    case State.SettingTime:

                        SetTime();

                        break;


                    case State.Countdown:

                        CountDown();

                        break;


                    case State.Flashing:

                        Flash();

                        break;

                }

            }

        }


        private static TimeSpan decrement = new TimeSpan(0, 0, 1);

        private static int sleepDuration = (int)(decrement.Ticks / TimeSpan.TicksPerMillisecond);


        // called in a loop for the countdown. This does have a

        // cumulative error because it just sleeps for one second

        // as opposed to checking to see how much time has elapsed

        private static void CountDown()

        {

            if (_duration.Ticks > 0)

            {

                // show the current countdown

                ShowTime();


                //sleep for duration of decrement

                Thread.Sleep(sleepDuration);


                // decrement time

                _duration = _duration.Subtract(decrement);

            }

            else

            {

                // set current state to flashing

                _currentState = State.Flashing;

                _duration = new TimeSpan(0);

                ShowTime();

            }

        }


        // flash the display once. Called in a loop

        private static void Flash()

        {

            _display.SetBrightness(0);

            Thread.Sleep(250);

            _display.SetBrightness(1);

            Thread.Sleep(250);

        }


        // displays the current (countdown or setting) time

        private static void ShowTime()

        {

            // when setting time, always show in hours/minutes. When

            // counting down, switch to minutes/seconds when under 1 hour


            if (_currentState == State.SettingTime)

                _display.SetValue(_duration, TimeSpanDisplayMode.HourMinute);

            else

                _display.SetValue(_duration, TimeSpanDisplayMode.Automatic);

        }


        // this would be better with an infinite rotary encoder, but

        // I don't have an encoder with my Netduino

        private static void SetTime()

        {

            var val = _pot.GetValue();


            // two hour max timespan, scaled to potentiometer value

            long maxTimespan = 120 * TimeSpan.TicksPerMinute;

            long span = (long)(maxTimespan * val);


            // round to nearest 5 minutes

            span = (long)(System.Math.Round(span / (5.0 * TimeSpan.TicksPerMinute)) *

                (5.0 * TimeSpan.TicksPerMinute));


            // set the duration and display the time

            _duration = new TimeSpan(span);

            ShowTime();


            // sleeping inside a tight loop is a good idea, as it gives

            // the processor time to debug, reset, and other stuff

            Thread.Sleep(100);

        }


        private static State _currentState = State.SettingTime;


        static void OnStartStopButtonReleased(object sender, bool buttonState)

        {

            switch (_currentState)

            {

                case State.SettingTime:

                    _currentState = State.Countdown;

                    break;


                case State.Countdown:

                    _currentState = State.SettingTime;

                    break;


                case State.Flashing:

                    _currentState = State.SettingTime;

                    break;

            }

        }


    }

}
You can see that the code got a bit more complex. In order to
support the three different modes (setting time, timer counting
down, and time's up), I refactored the code into a simple state
machine. There's now a centralized loop which is always running.
What happens in the loop depends upon the state:
| State |
What happens for each loop
iteration |
| SettingTime |
Poll the potentiometer and update the
display and duration based on value |
| Countdown |
Subtract one second from the current
duration and display the value |
| Flashing |
Blink once |
Note also that the individual actions control the loop
delay.
One problem you may have noticed in this is that this code
delays for 1 second, but that delay is in addition to anything
caused by a garbage collection, or just the overhead of function
calling. I haven't measured the drift here, but it does drift a bit
over time. I suspect that the drift will only result in a second or
so over the course of an hour, but I haven't measured.
A way to fix that would be to find the current time/ticks and
only delay for the remainder of the second. This is an approach I
used when writing the delay loop in my Commodore 64 emulator.

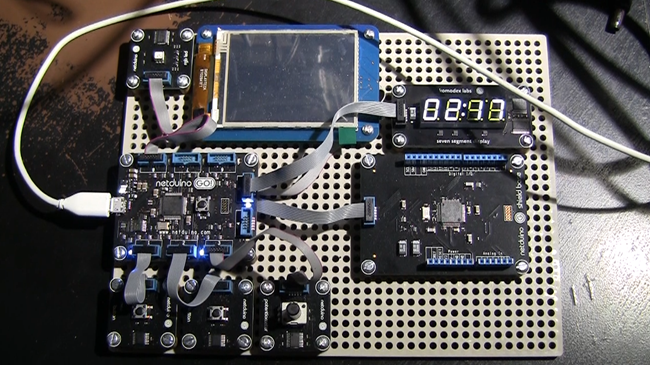
(I'm not using half the stuff in that photo; it's just my dev
board. Only the left-most button, the potentiometer, the Komodex
display, and (of course) the Netduino GO itself are used. The
second button, LED, touch display, and shield modules are all
unused.
Video
You can see a quick video of the talk timer in action here:
Direct link to the video on YouTube: http://youtu.be/wOMamTXEWHY
Summary
The new Komodex labs seven segment display module for the
Netduino GO is really quite nice. The white display can be super
bright if you want it to be and, because the API is well thought
out, you can control the brightness right from NETMF. Making
something useful like a talk timer took less time than it did to
write this up.