Last September, I introduced the idea of Tasks in Silverlight.
One of the things I really like about .NET 4.5, and the C# compiler
that comes with it, is the ability to simplify asynchronous code by
using the async modifier and await operator. Just yesterday, I posted a bit on how these two keywords are used by
the compiler to take care of all the heavy lifting of asynchronous
code.
The key thing to note here is that the work is done by
the compiler, not the runtime. That means that if you can
use the latest C# compiler, you can take advantage of this new
feature. A grasp of the async pattern and these two keywords will
also help prepare you for Windows Metro development. Note
that Silverlight doesn't have the same "asynchronous everywhere"
set of APIs that you'll find in WinRT or .NET 4.5 so async and
await won't be quite as useful here as they are there, but there's
some help for that too (read on). You can still create
your own async methods, however, which is especially useful if you
plan to share code with a WinRT XAML application.
I'll focus on Silverlight 5 here, but understand that this works
with .NET 4 in VS11 as well. Note also that I'm using Visual Studio
11 beta for this post, so final details may change when VS11 is
released. Also, Visual Studio 11 and the compiler which supports
async/await requires Windows 7 or Windows 8. This will not work on
Windows XP or a Commodore 128.
In Visual Studio, create a new Silverlight application.
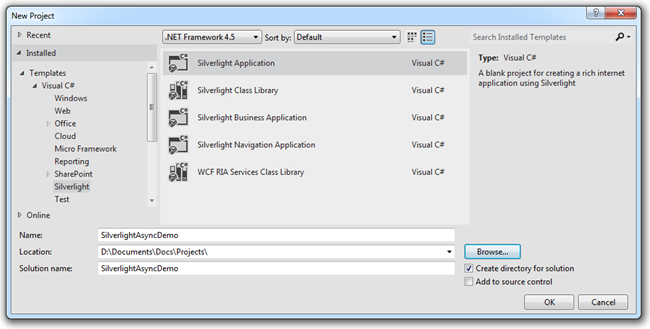
Choose all the normal options in the project creation dialog
(yes, create a new site, no on RIA)
For the MainPage.xaml, add a single button and wire up an event
handler.
<UserControl x:Class="SilverlightAsyncDemo.MainPage"

    xmlns="http://schemas.microsoft.com/winfx/2006/xaml/presentation"

    xmlns:x="http://schemas.microsoft.com/winfx/2006/xaml"

    xmlns:d="http://schemas.microsoft.com/expression/blend/2008"

    xmlns:mc="http://schemas.openxmlformats.org/markup-compatibility/2006"

    mc:Ignorable="d"

    d:DesignHeight="300" d:DesignWidth="400">


    <Grid x:Name="LayoutRoot" Background="White">

        <Button x:Name="TestAsync"

                Content="Press Me!"

                FontSize="25"

                Width="200"

                Height="75"

                Click="TestAsync_Click" />

    </Grid>

</UserControl>
The next step is to add the Async Targeting Pack. I'll use NuGet to grab
it.
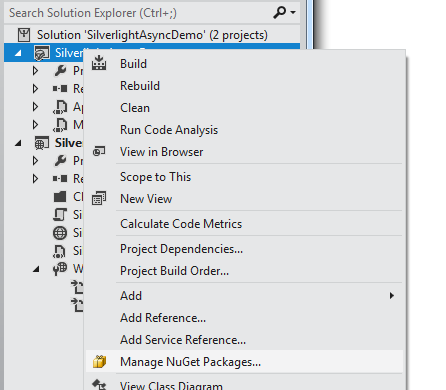
Pick your favorite way to use NuGet. Some prefer the console.
I'm going to use the project's context menu and select "Manage
NuGet Packages". From there, I'll search for
AsyncTargetingPack.
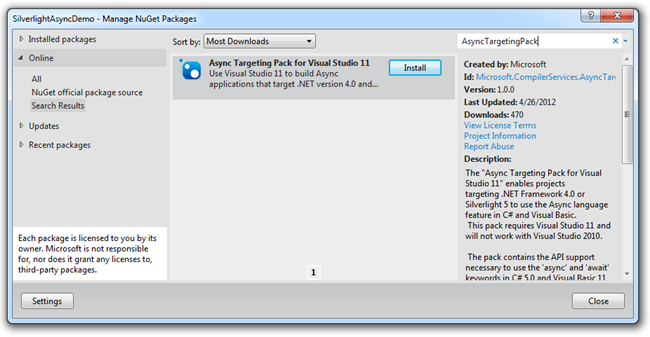
Once you see it, click "Install", accept the terms (maybe even
read them first), then close the NuGet package manager. You'll
notice that the Silverlight project now includes a reference to the
Microsoft.CompilerServices.AsyncTargetingPack Silverlight 5
library.
A simple example using await
If you have a call which uses the async callback pattern, such
as with a WebClient in Silverlight, using await is pretty easy, due
to the built-in extension methods:
private async void TestAsync_Click(object sender, RoutedEventArgs e)

{

    var uri = new Uri("http://localhost:10697/SilverlightAsyncDemoTestPage.html");


    var client = new WebClient();


    var results = await client.DownloadStringTaskAsync(uri);


    Debug.WriteLine(results);

}
Note that the event handler must be marked as async in order to
use the await keyword.
These extension methods, DownloadStringTaskAsync in this
example, are included in the AsyncCompatLibExtensions installed
with the async targeting pack.
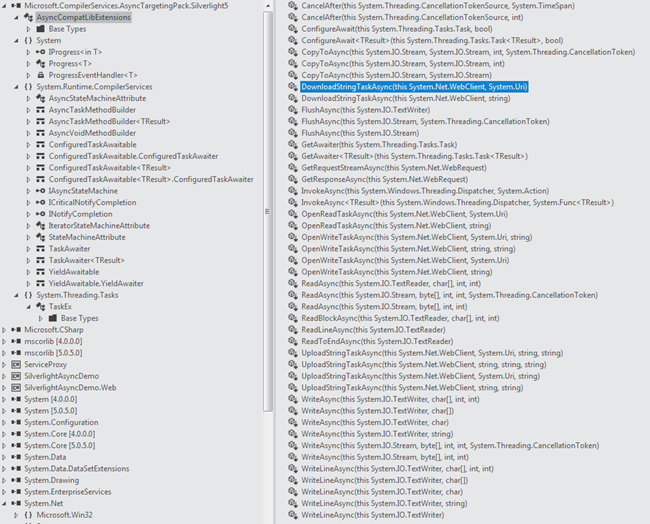
The extension methods mimic many of the same async functions
already available in .NET 4.5. That's great for compatibility and
to help reduce how many different approaches you need to learn.
Give me something to wait on
"Hey teacher! I've got my pencil! Now give me something to write
on." - Pre-geriatric David Lee Roth
Let's do something a little more typical. In this case, I'm
going to create a web service that we'll use asynchronously.
In the web project, create a "Services" folder and in that,
create a new Silverlight-Enabled Web Service named
CustomerService.
using System;

using System.Collections.Generic;

using System.Linq;

using System.Runtime.Serialization;

using System.ServiceModel;

using System.ServiceModel.Activation;


namespace SilverlightAsyncDemo.Web.Services

{

    [ServiceContract(Namespace = "uri:demo.silverlight.async")]

    [AspNetCompatibilityRequirements(RequirementsMode = AspNetCompatibilityRequirementsMode.Allowed)]

    public class CustomerService

    {

        [OperationContract]

        public List<Customer> GetCustomers()

        {

            string[] firstNames = new string [] {"Pete", "Joe", "Ima", "John", "Jim", "Scott", "George", "Frank", "Al", "Jeremy", "Jason", "Alex", "Bob", "Bill", "William", "Severus", "Johnny", "Albus", "Han", "Harry", "Chris", "Christine", "Kristen", "Amy", "Leia", "Erin", "Heather", "Melissa", "Abby", "Ben", "Alice", "Morgan", "Chip"};

            string[] lastNames = new string [] {"Brown", "Jones", "Braxton", "Huxley", "Solo", "Organa", "Vader", "Skywalker", "Potter", "Dumbledore", "Snape", "Avatar", "Cranks", "Bravo", "Grime", "Gee", "A.", "B.", "C.", "D.", "E.", "Z.", "X.", "Walker", "Franklin", "Moore", "Less"};


            Random rnd = new Random();

            const int CustomerCount = 200;


            var customers = new List<Customer>();


            // generate a bunch of dummy customer data

            for (int i = 0; i < CustomerCount; i ++)

            {

                int firstIndex = rnd.Next(0, firstNames.Length-1);

                int lastIndex = rnd.Next(0, lastNames.Length-1);


                customers.Add(

                    new Customer()

                        {

                            FirstName = firstNames[firstIndex],

                            LastName = lastNames[lastIndex]

                        });

            }


            return customers;


        }

    }


    public class Customer

    {

        public string LastName { get; set; }

        public string FirstName { get; set; }

    }

}
Build the solution, and then add a service reference from the
Silverlight client. When creating the service reference, name the
namespace "Services". But before you leave this dialog, we have one
VERY important thing to check. Click the "Advanced" button
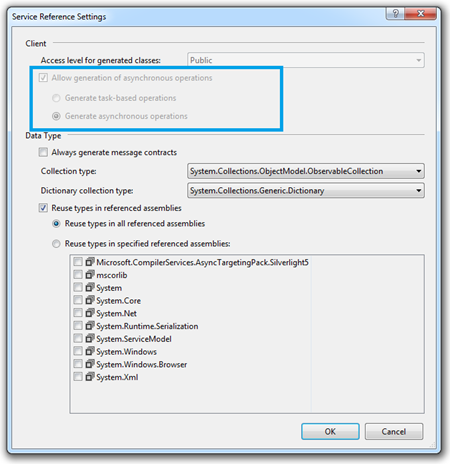
Foiled! We can't generate task-based service references. Why?
Well, Silverlight didn't have the necessary support until the async
targeting pack. So, we'll have to do this manually. If you were
using .NET 4, you could simply generate Task-based operations and
be done with it.
NOTE
If we were using RESTful calls, the "add service reference"
stuff doesn't come into play at all - it's all just
POST/GET/DELETE/PUT/PATCH with a URL. SOAP, which is what many
folks use behind the firewall, is more difficult to work with, so
the service reference helps. I'm a big fan of the ASP.NET Web API
and RESTful services. You should check them out.
Creating an async-friendly wrapper for the service
reference
Making your service method awaitable certainly makes it easier
to consume by other developers, and easier to work into your own
application workflow (especially if you have service calls that
rely on the results of other service calls). The code to make it
awaitable is not very complicated at all. However, I like to put
this type of code into a separate service proxy or client class in
the Silverlight project.
I created a new project folder named "Services" in the
Silverlight project. In that, I added a new class named
"CustomerServiceProxy". The code for the proxy is as follows:
using System.Collections.ObjectModel;

using System.Threading.Tasks;


namespace SilverlightAsyncDemo.Services

{

    public class CustomerServiceProxy

    {

        public static Task<ObservableCollection<Customer>> GetCustomers()

        {

            var tcs = new TaskCompletionSource<ObservableCollection<Customer>>();


            var client = new CustomerServiceClient();


            client.GetCustomersCompleted += (s,e) =>

                {

                    if (e.Error != null)

                        tcs.TrySetException(e.Error);

                    else if (e.Cancelled)

                        tcs.TrySetCanceled();

                    else

                        tcs.TrySetResult(e.Result);

                };


            client.GetCustomersAsync();


            return tcs.Task;

        }

    }

}
The code for this was adapted from the Task-based Asynchronous
Pattern whitepaper listed under "Additional Information" below. The
task is set up to return an ObservableCollection of Customers,
which is (by default) what the service reference code generation
created for me in the CustomerServiceClient class. (I also love how
we managed to get both spellings of Canceled into the same method
O_o.)
Once you have the proxy created, it may be used from the
ViewModel, or any other code. Here it is in the button-click code
on MainPage. As before, the event handler has been marked with the
async modifier in order to support using the await operator.
private async void TestAsync_Click(object sender, RoutedEventArgs e)

{

    var customers = await CustomerServiceProxy.GetCustomers();


    foreach (Customer c in customers)

    {

        Debug.WriteLine(c.FirstName + " " + c.LastName);

    }

}
This can serve as a good starting point for your own code. Not
only will it make your async code easier to work with when using
Visual Studio 11, but it will also help you bridge towards
and share code with .NET 4.5 WPF, and to Metro style XAML
applications.
Additional Information
