Happy 11/11/11!
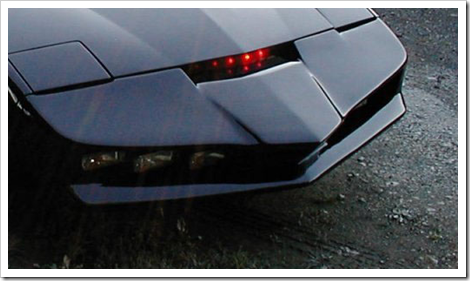
For those of us who grew up in the 80s, the back-and-forth red
lights on the front of KITT and the Cylons was considered a really
awesome effect. It's still popular today, and is even named after
Gary Larson, the person responsible for those shows.
Now, a good Larson scanner uses some PWM to modify the intensity
of the LEDs trailing the leading light. With the understanding that
this is a beginner-focused article, I'm going to pass on that and
simply have an LED that moves back and forth, more like the Cylon
scanner, less like the Knight Rider scanner.
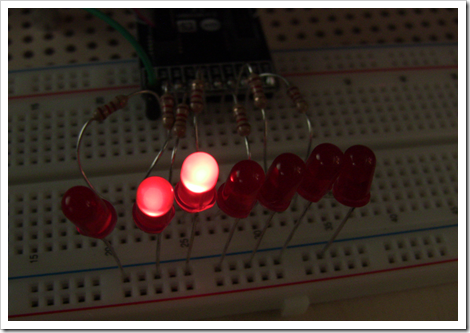
The Circuit
The circuit is a simple pin-hogging parallel approach. I use
pins 3 through 9 on an extender module, each with a resistor and an
LED.
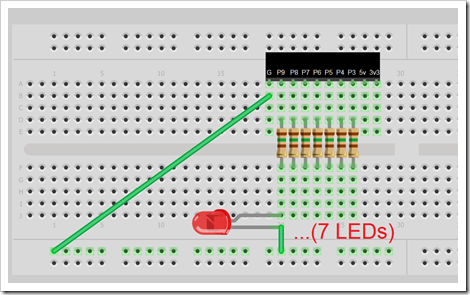
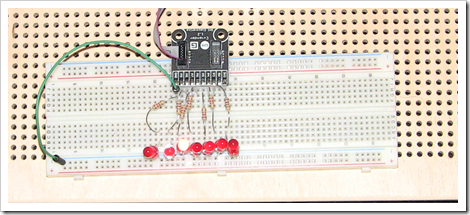
Here's a photo of the actual circuit. Note that I used 120R
resistors here because that's what I had handy. Use the correct
resistors for your particular LEDs.
Gadgeteer Program
Here's the source code for the first version. When you run the
program, it immediately starts scanning back and forth at a set
speed.
using System;

using Microsoft.SPOT;

using Microsoft.SPOT.Presentation;

using Microsoft.SPOT.Presentation.Controls;

using Microsoft.SPOT.Presentation.Media;


using GT = Gadgeteer;

using GTM = Gadgeteer.Modules;

using Gadgeteer.Modules.GHIElectronics;

using Gadgeteer.Interfaces;


namespace GadgeteerLarsonScanner

{

    public partial class Program

    {

        private GT.Timer _ledTimer;


        private DigitalOutput[] _scannerOutput;

        private int _currentOutput = 0;


        void ProgramStarted()

        {

            const int lowPin = 3;

            const int highPin = 9;


            _scannerOutput = new DigitalOutput[highPin - lowPin + 1];


            for (int pin = lowPin, i=0; pin <= highPin; pin++,i++)

            {

                _scannerOutput[i] = ScannerLedExtender.SetupDigitalOutput((GT.Socket.Pin)pin, false);

            }


            _ledTimer = new GT.Timer(100, GT.Timer.BehaviorType.RunContinuously);

            _ledTimer.Tick += new GT.Timer.TickEventHandler(OnTimerTick);

            _ledTimer.Start();


        }


        private bool _movingLowToHigh = true;


        private void OnTimerTick(GT.Timer timer)

        {

            // turn off old LED

            _scannerOutput[_currentOutput].Write(false);


            if (_movingLowToHigh)

            {

                _currentOutput += 1;

                if (_currentOutput > _scannerOutput.Length - 1)

                {

                    // we were at the end, switch direction

                    _currentOutput = _scannerOutput.Length - 1;

                    _movingLowToHigh = false;

                }

            }

            else

            {

                _currentOutput -= 1;

                if (_currentOutput < 0)

                {

                    // we were at the end, switch direction

                    _currentOutput = 0;

                    _movingLowToHigh = true;

                }

            }


            // turn on new LED

            _scannerOutput[_currentOutput].Write(true);

        }

    }

}
Difference in Brightness
You may have noticed a difference in brightness between some of
the LEDs. In some cases, this is because of different types of LEDs
or values of resistors. You can easily test this by swapping them
around and seeing if the brightness level follows the resistor or
LED.
You may also see some brightness values that are the same no
matter what you swap around. I think the different pins on some of
the ports can source different levels of voltage or current, but I
haven't metered them to be sure. It seems, for example, that Pin 6
on a few ports is relatively high voltage or current, while pin 9
in some cases was very low.
The next step is to do a little modification to allow us to
control the speed.
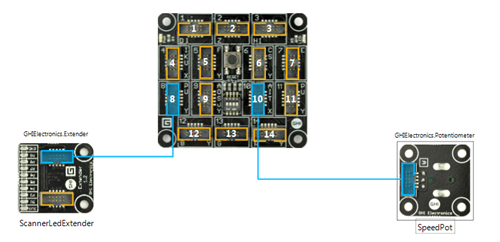
Adding in a Potentiometer to Control Speed
When I ordered my Gadgeteer kit, I ordered a potentiometer
module at the same time. These have been out of stock for a bit,
but should be back soon. I connected it to one of the "A" ports,
port 10 in this case, and named it "SpeedPot"
Then add the following code to the program. This polls the
potentiometer value every time the timer ticks. Because the
potentiometer is an analog device, you won't get an event when the
value changes; voltage changes are just too fiddly for something
like that. Instead, when call ReadPotentiometerPercentage, you get
back a double value between 0.0 and 1.0 which represents where the
pot is positioned.
private void OnTimerTick(GT.Timer timer)

{

    ...


    // turn on new LED (this is existing code)

    _scannerOutput[_currentOutput].Write(true);


    // adjust the interval based on the potentiometer

    timer.Interval = new TimeSpan(0, 0, 0, 0, GetAdjustedSpeed());


}


private const int _minTimer = 10;

private const int _maxTimer = 210;

private int GetAdjustedSpeed()

{

    double percentage = SpeedPot.ReadPotentiometerPercentage();


    return (int)(percentage * (_maxTimer - _minTimer) + _minTimer);

}
Now run it. Cool!
Adding a Button
Here's one last cool thing you can add. The pot was an example
of polling for a value. In this next bit, we're going to use an
event to get a value. Add a button module and connect it up to
Socket 5. Name it StartStopButton. As the name suggests, we'll use
this to start and stop the scanner.

First, we need to wire up the event handler, so in the
ProgramStarted method, add this code to the bottom. Note that I
removed the _ledTimer.Start() code.
void ProgramStarted()

{

    ...

    // Be sure to comment out the Start() as shown here

    //_ledTimer.Start();


    StartStopButton.ButtonPressed += StartStopButton_ButtonPressed;

}
Did you know (or is it "The More than you
Know"?)
Did you know that you can leave out the explicit delegate
creation when wiring up an event handler? The IDE automatically
puts it in there for you so it's not a time-saver, but it does save
space when listing out code in blog posts and books. These two
lines of code are equivalent:
StartStopButton.ButtonPressed +=
StartStopButton_ButtonPressed;
StartStopButton.ButtonPressed += new
Button.ButtonEventHandler(StartStopButton_ButtonPressed);
There are, of course lots of other ways to define event
handlers. I'll have another post on that soon.
Next, we need the event handler code itself. This is a simple
toggle of the timer when you press the button.
private void StartStopButton_ButtonPressed(Button sender, Button.ButtonState state)

{

    if (_ledTimer.IsRunning)

        _ledTimer.Stop();

    else

        _ledTimer.Start();

}
Now when you run the program, the scanner doesn't automatically
start. Instead, you need to press the button to get it to start.
Once it is running, you can press the button again to pause it,
leaving the last LED lit.
The button example is a great case of event-driven programming
on the gadgeteer. Rather than having to poll the value of a pin
every X milliseconds, you simple wait for the event handler to be
fired off.
Adding in the Screen
Ok, if you have the Gadgeteer starter kit, you have this
ginormous touch screen just begging you to play with it. Let's use
it to display a little information. First thing you need to do is
connect up the screen. Also, if you don't already have one
attached, plug a 9v adapter into the power supply port on your dual
power module. Chances are, USB is not going to keep up with
powering the LEDs, the potentiometer, and the LCD screen. You are
welcome to try, of course, especially if you're plugged into a
powered hub.
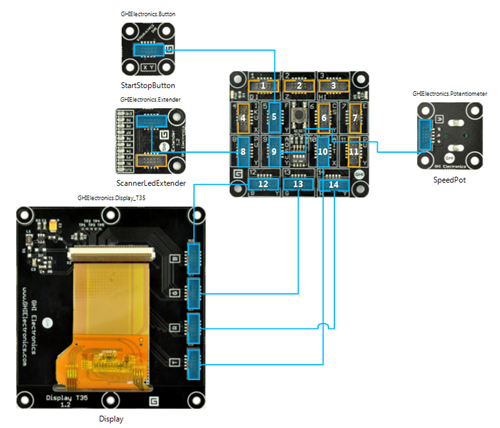
Note that I had to move the potentiometer to socket 9, as it was
using the only "T" socket on the board. None of the code has to
change, the designer takes care of passing the appropriate socket
number into the constructor for the pot. Why did I need to connect
the touch screen? I've seen reports that the touch screen sometimes
acts up if you don't wire up the T port, even if you're not using
touch. In this case, simply better safe than sorry.
There are a few ways to program for the screen. The first is a
subset of WPF. The second, in the case of GHI hardware, is a
library known as Glide. The third is to use the SimpleGraphics API.
As that is the shortest and meets what I want to do here, I'll do
that. WPF and Glide will come in a future post.
Embedding the Font
The Gadgeteer doesn't include any fonts loaded in the firmware.
This makes sense from a space-saving perspective, but means a
little more work on your part. If you've done Silverlight
development, you'll likely already be familiar with having to embed
fonts. Whatever font you embed, make sure you have an appropriate
license. Don't assume I've done that check myself, here. One nice
thing is that the default project template comes with two fonts
already embedded, so you can use those directly.
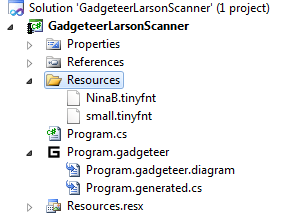
We'll use the NinaB font here. To use that, we need to load the
resource. Add a new function named SetupDisplay which will be
called from the ProgramStarted method.
private Font _largeFont;

private Font _smallFont;


private void SetupDisplay()

{

    _largeFont = Resources.GetFont(Resources.FontResources.NinaB);

    _smallFont = Resources.GetFont(Resources.FontResources.small);


    Display.SimpleGraphics.BackgroundColor = GT.Color.Black;

    Display.SimpleGraphics.DisplayText("My Gadgeteer Demo", _smallFont, GT.Color.White, 10, 10);

}
Make sure you add a call to that to the ProgramStarted method.
It doesn't really matter where, but I added it as the last
line.
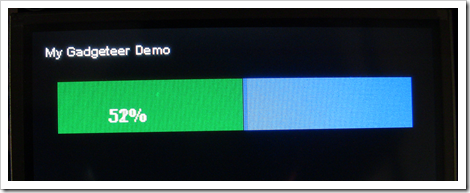
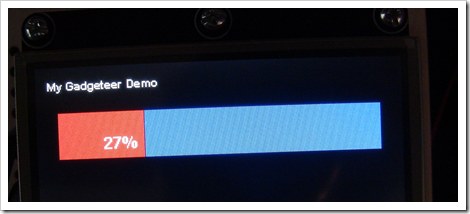
Displaying Text and Graphics
There are two lines of text to display for this application. The
top line just says "My Gadgeteer Demo". The second line is the
current speed of the scanner. In addition to the text, there are
two rectangles which make up a progress bar.
Add a new method named UpdateDisplay. This method will handle
the update of the information on-screen. It calls out to
DisplayProgressBar to create an on-screen progress bar showing the
value of the potentiometer.
private const uint _maxProgressWidth = 280;

private const uint _progressLeft = 20;

private const uint _progressTop = 40;

private const uint _progressHeight = 40;

private void DisplayProgressBar()

{

    uint progressWidth = (uint)(_maxProgressWidth * _currentSpeedPercentDouble);

    uint nonProgressWidth = _maxProgressWidth - progressWidth;

    uint nonProgressLeft = _progressLeft + progressWidth;


    Display.SimpleGraphics.DisplayRectangle(

        GT.Color.Blue,

        0,

        GT.Color.FromRGB(0x00, 0x00, 0xBA),

        nonProgressLeft, _progressTop, nonProgressWidth, _progressHeight);


    GT.Color progressColor;

    if (_ledTimer.IsRunning)

        progressColor = GT.Color.Green;

    else

        progressColor = GT.Color.Red;


    Display.SimpleGraphics.DisplayRectangle(

        GT.Color.Red,

        0,

        progressColor,

        _progressLeft, _progressTop, progressWidth, _progressHeight);


}


private void UpdateDisplay()

{

    DisplayProgressBar();


    Display.SimpleGraphics.DisplayText(

        _currentSpeedPercent.ToString() + "%", _largeFont, GT.Color.White, 60, 60);

}
This method needs to be called from a couple places. It also
requires an update to GetAdjustedSpeed to update some new
variables. For those reasons, it's best just to look at the final
source code in total.
Final Source Code
The final source code with everything in place looks like
this:
using System;

using Microsoft.SPOT;

using Microsoft.SPOT.Presentation;

using Microsoft.SPOT.Presentation.Controls;

using Microsoft.SPOT.Presentation.Media;


using GT = Gadgeteer;

using GTM = Gadgeteer.Modules;

using Gadgeteer.Modules.GHIElectronics;

using Gadgeteer.Interfaces;


namespace GadgeteerLarsonScanner

{

    public partial class Program

    {

        private GT.Timer _ledTimer;


        private DigitalOutput[] _scannerOutput;

        private int _currentOutput = 0;


        void ProgramStarted()

        {

            Debug.Print("Program Started");


            const int lowPin = 3;

            const int highPin = 9;


            _scannerOutput = new DigitalOutput[highPin - lowPin + 1];


            for (int pin = lowPin, i=0; pin <= highPin; pin++,i++)

            {

                _scannerOutput[i] = ScannerLedExtender.SetupDigitalOutput((GT.Socket.Pin)pin, false);

            }


            _ledTimer = new GT.Timer(100, GT.Timer.BehaviorType.RunContinuously);

            _ledTimer.Tick += new GT.Timer.TickEventHandler(OnTimerTick);

            //_ledTimer.Start();


            StartStopButton.ButtonPressed += StartStopButton_ButtonPressed;


            SetupDisplay();


        }


        private void StartStopButton_ButtonPressed(Button sender, Button.ButtonState state)

        {

            if (_ledTimer.IsRunning)

                _ledTimer.Stop();

            else

                _ledTimer.Start();


            UpdateDisplay();

        }


        private bool _movingLowToHigh = true;


        private void OnTimerTick(GT.Timer timer)

        {

            // turn off old LED

            _scannerOutput[_currentOutput].Write(false);


            if (_movingLowToHigh)

            {

                _currentOutput += 1;

                if (_currentOutput > _scannerOutput.Length - 1)

                {

                    // we were at the end, switch direction

                    _currentOutput = _scannerOutput.Length - 1;

                    _movingLowToHigh = false;

                }

            }

            else

            {

                _currentOutput -= 1;

                if (_currentOutput < 0)

                {

                    // we were at the end, switch direction

                    _currentOutput = 0;

                    _movingLowToHigh = true;

                }

            }


            // turn on new LED

            _scannerOutput[_currentOutput].Write(true);


            timer.Interval = new TimeSpan(0, 0, 0, 0, GetAdjustedSpeed());

        }


        private const int _minTimer = 10;

        private const int _maxTimer = 210;

        private int _currentSpeedPercent = 0;

        private double _currentSpeedPercentDouble = 0;


        private int GetAdjustedSpeed()

        {

            _currentSpeedPercentDouble = SpeedPot.ReadPotentiometerPercentage();


            _currentSpeedPercent = (int)(_currentSpeedPercentDouble * 100);


            UpdateDisplay();


            return (int)(_currentSpeedPercentDouble * (_maxTimer - _minTimer) + _minTimer);

        }


        private Font _largeFont;

        private Font _smallFont;


        private void SetupDisplay()

        {

            _largeFont = Resources.GetFont(Resources.FontResources.NinaB);

            _smallFont = Resources.GetFont(Resources.FontResources.small);


            Display.SimpleGraphics.BackgroundColor = GT.Color.Black;

            Display.SimpleGraphics.DisplayText("My Gadgeteer Demo", _smallFont, GT.Color.White, 10, 10);

        }


        private const uint _maxProgressWidth = 280;

        private const uint _progressLeft = 20;

        private const uint _progressTop = 40;

        private const uint _progressHeight = 40;

        private void DisplayProgressBar()

        {

            uint progressWidth = (uint)(_maxProgressWidth * _currentSpeedPercentDouble);

            uint nonProgressWidth = _maxProgressWidth - progressWidth;

            uint nonProgressLeft = _progressLeft + progressWidth;


            Display.SimpleGraphics.DisplayRectangle(

                GT.Color.Blue,

                0,

                GT.Color.FromRGB(0x00, 0x00, 0xBA),

                nonProgressLeft, _progressTop, nonProgressWidth, _progressHeight);


            GT.Color progressColor;

            if (_ledTimer.IsRunning)

                progressColor = GT.Color.Green;

            else

                progressColor = GT.Color.Red;


            Display.SimpleGraphics.DisplayRectangle(

                GT.Color.Red,

                0,

                progressColor,

                _progressLeft, _progressTop, progressWidth, _progressHeight);


        }


        private void UpdateDisplay()

        {

            DisplayProgressBar();


            Display.SimpleGraphics.DisplayText(

                _currentSpeedPercent.ToString() + "%", _largeFont, GT.Color.White, 60, 60);

        }

    }

}
In that, we see polling, event-driven sensing, digital outputs,
timers, and using the screen. Not too shabby for microcontroller
work :)
In this example, I didn't break anything out into classes, as I
normally would. In a real application, the progress bar, the
scanner, and the display functionality would all be pulled out into
separate classes which better encapsulate the functionality. In
addition, the painting is not efficient, but is instead just for
illustration. Enough disclaimers? :)
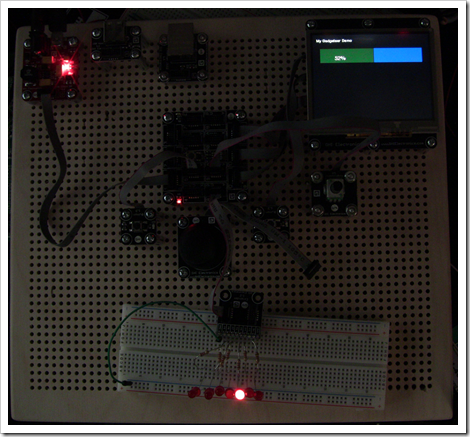
Photos
Here are some photos of the finished product showing the Larson
scanner complete with progress bar.
Where to Learn More
Be sure to visit the Gadgeteer forums for your hardware vendor.
In the case of the GHI boards, the FEZ Spider
and Hydra forums can be found here. There are tons of people
there, both from the community and from GHI, all willing to
help.
Update 11/11/11: Updated version of the circuit and some
additional information here.
