I used to play with CNC a bit. Shortly before my son was
born in 2006, I got involved in different things and left my
Sherline CNC mill to gather dust on the shelf in the shop room. In
fact, due to using that room for storage during mot of the home
renovation and my son's first several years, I couldn't even get to
the machine itself if I wanted to.
About six months ago, I appropriated a beat up old HP/AMD laptop
that was headed for the junk pile here. The kids had been rough on
it; it was missing a few keys and the space bar and the lid is
really loose. Of course, that would be perfect for the CNC
controller, so I set it up. However, I did that and then left
everything else in the dust for a while.
Today, I got it set back up and running. The inspiration was this
thread on the Gadgeteer forums at GHI. I just had to make one
of these boards myself. At the same time, I figured I'd finally
learn how to hand write a little G Code for my CNC controller.
Simple 2d repeating tasks like drilling 1300 holes are perfect for
hand-coded G code.
G Code
G Code (also called NC Code or GC or GCode) is the language of
most CNC machines. It's a series of commands that are sent to the
controller to tell it where you want to move the machine to, what
you want to do etc. Some controllers implement higher level
commands like drill cycles. Some even have looping and
subroutines.
GCode tells the controller WHAT you want to do, but not
necessarily how you want to do it. It's the responsibility of the
controller to find the best ways to approach movement, acceleration
and deceleration and much more. In that way, writing GCode is
relatively easy, but writing a GCode interpreter … not so much.
The IM Service / DeskCNC controller doesn't appear to have
looping, but it does have basic subroutine support in the form of
macros. It also supports the drill cycle. A drill cycle is a set of
steps where the Z axis is moved down, the hole is drilled, the Z
axis is retracted, and then X and or Y are moved to the next
location to start the next hole.
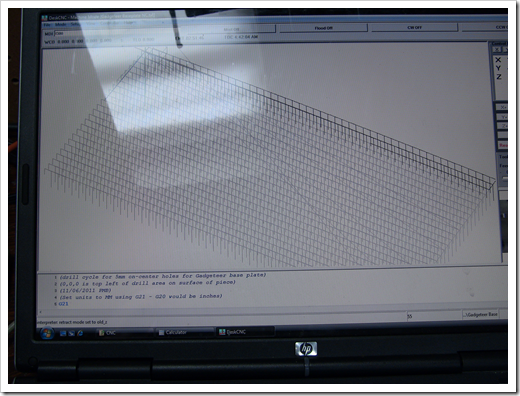
So, here's the NC code to drill out the board (it's amazing how
often basic coding skills come in handy in different hobbies)
(drill cycle for 5mm on-center holes for Gadgeteer base plate)

(0,0,0 is TOP LEFT of drill area on surface of piece)

(11/06/2011 PMB)

(Set units to MM using G21. G20 would be inches)

G21

G90 G01 X0.0 Y0.0 Z3.0

(Call subroutine once each for 26 lines.)

(I know, this is some ugly stuff with those repeated lines, but)

(it doesn't look like DeskCNC supports any looping. I could be wrong)

G65 P1

G65 P1

G65 P1

G65 P1

G65 P1

G65 P1

G65 P1

G65 P1

G65 P1

G65 P1

G65 P1

G65 P1

G65 P1

G65 P1

G65 P1

G65 P1

G65 P1

G65 P1

G65 P1

G65 P1

G65 P1

G65 P1

G65 P1

G65 P1

G65 P1

G65 P1

(move to home and retract Z)

G90 G01 X0.0 Y0.0 Z40.0

(start of positioning and drilling subroutine)

O%1 (--------------------------------------------)

(move to absolute left and retract Z to 5.0)

G90 G01 Z5.0

G90 G01 X0.0

(move to Z 0 in prep for drilling)

G01 Z0.0

(drill 50 holes in a single row with 5mm spacing)

(the G91 is for incremental distance G90 is absolute distance)

(G81 drill cycle drill 8.0mm deep, every 5mm on X)

(G98 means to retract Z to original position)

(R is retract distance)

(L is the repeat or loop word for the G81 drill cycle)

G91 G98 G81 X5.0 Y0.0 Z-14.0 R5 L50

(move Y axis 5mm in prep for next line)

G91 G01 Y-5.0

(end of subroutine)

M99 (--------------------------------------------)

(end of program)

M02
In the code above, O%1 defines "Subroutine 1". It is called
using G65 with PsubroutineNumber, in this case, P1.
My Sherline has a smaller work envelope than whatever Jeff used
to mill his board (unless he used multiple setups), so I went for a
smaller layout. The board is 11 x 11 3/4 in size, but only a small
portion is covered in holes. On the second board I make (the one
for Andrew) I'll try multiple setups and see if I can get it mostly
covered. I'll also make sure the hole array is square to the board
edges (I only approximated for this first one)
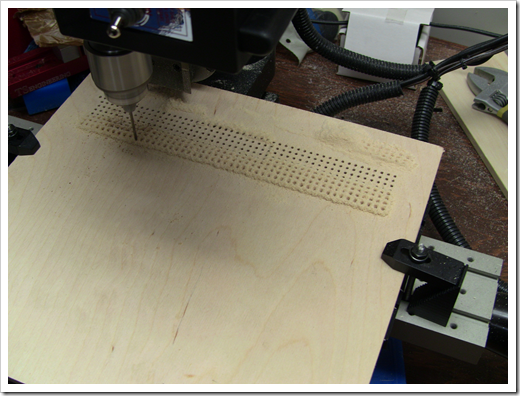
I had a few false starts, mostly with the drill bits I was
using, and the extremely slow feed DeskCNC defaulted to, so the
first third of the first row has holes that have been drilled a
good 5 times. I finally broke out the Sherline Jacobs Chuck, found
a good sharp drill bit in my toolbox upstairs, and then got it
running again.
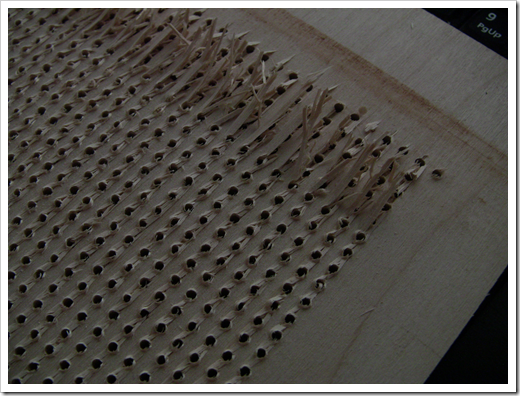
You can see by the board image that I have an off-by-one error
here, which you can also see in the board iself. The first hole
doesn't drill deeply enough to actually go through the board. After
I changed drill bits, the hole actually doesn't go deeply enough to
even mark the board, which is why everything after the first row
has only 49 holes instead of 50. I also ran into a problem with my
setup in that I left too much overhang on the Y axis, so I couldn't
complete all 26 rows. I had to stop at 24.
This was also a good first run because I haven't re-tuned the
mill, and I'm sure it has a little backlash. I did re-grease it,
though. In any case, this board is pretty non-critical in terms of
dimensions as long as the holes are pretty close to 5mm on center.
The mounting holes on the PCBs have a little wiggle room.
Here's a very short video of the Sherline mill making the
board.
Sherline
Mill making Gadgeteer base board
The top came out great, but the bottom had horrible tear out. I
had some scrap balsa under it deformed rather than help reduce
tearout. The part with no balsa support was even worse.Plus, the
drill bit I used wasn't great for plywood. I'll also try and gang a
few up or something both to help reduce tear-out, and also to make
it easier to produce more than one for my own use. I need to make a
trip to the story anyway, so I'll probably pick up a couple extra
drill bits while there.
For the next one (the one for Andrew), I'll flip the board
around and run a modified version of the code to drill the
remaining holes to fill the board. I'll use an existing row as the
new zero and move away from that, to keep the 5mm spacing
accurate.
