In previous versions of Silverlight, we didn't have the ability
to create new operating system windows. If we wanted to pop up
content over our other application, we had to use the Popup
element, or the derived ChildWindow control. Those were great, but
didn't act as operating system windows. Specifically, they couldn't
escape the bounds of your main application.
Please note that this article and the attached sample code was
written using the Silverlight 5 Beta, available at MIX11 in April
2011, and updated for the Silverlight 5 RC.
ChildWindow controls are great for most things, but sometimes
you just want something that acts like an operating system Window.
Silverlight 4 had a Window class which allowed you to work with the
chrome on the main hosting Window. Gladly, Silverlight 5 has
extended that to allow you to create new windows of your own,
almost like WPF.
Creating a Basic Window
First, you need to running an elevated trust
out-of-browser application. Native Windows don't work
inside the browser. Native Windows don't work in normal trust
applications.
Once you are sure you are running an elevated trust
out-of-browser application then we can go ahead and create
the window. But first, we'll need to create some content for the
window. I like to do that as a UserControl. I called this one,
rather uncreatively, PopupWindowContents
<UserControl x:Class="NativeWindowDemo.Views.PopupWindowContents"

             xmlns="http://schemas.microsoft.com/winfx/2006/xaml/presentation"

             xmlns:x="http://schemas.microsoft.com/winfx/2006/xaml"

             xmlns:d="http://schemas.microsoft.com/expression/blend/2008"

             xmlns:mc="http://schemas.openxmlformats.org/markup-compatibility/2006"

             mc:Ignorable="d"

             d:DesignHeight="300"

             d:DesignWidth="400">


    <Grid x:Name="LayoutRoot" Background="#FFFFE6CD">

        <TextBlock Text="This is a native window"

                   FontSize="20"/>

        <Rectangle Margin="44,49,136,131"

                   Name="rectangle1"

                   Stroke="Black"

                   StrokeThickness="1"

                   Fill="#FF4B86C4" />

        <Ellipse Margin="151,105,59,35"

                 Name="ellipse1"

                 Stroke="Black"

                 StrokeThickness="1"

                 Fill="#FF6CB964" />

    </Grid>

</UserControl>
Now, let's put some Xaml in our main window so we can have a UI
to launch our new Window.
<Grid x:Name="LayoutRoot" Background="White">

    <Button Content="Open"

            Height="23"

            HorizontalAlignment="Left"

            Margin="148,132,0,0"

            Name="OpenWindow"

            VerticalAlignment="Top"

            Width="75"

            Click="OpenWindow_Click" />

</Grid>
Double-click the "Open" button in the designer, and put the
following code in the event handler:
private void OpenWindow_Click(object sender, RoutedEventArgs e)

{

    Window wnd = new Window();

    wnd.Width = 500;


    wnd.Height = 350;

    wnd.Title = "This is a test window";

    wnd.Content = new PopupWindowContents();


    wnd.Visibility = Visibility.Visible;

}
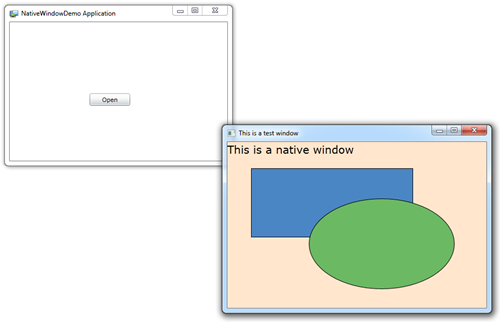
Then, when you run the application, you'll have your popup
native window. In the screen shot below, the window to the left is
the main application window, the window to the right is the native
window we created in code.
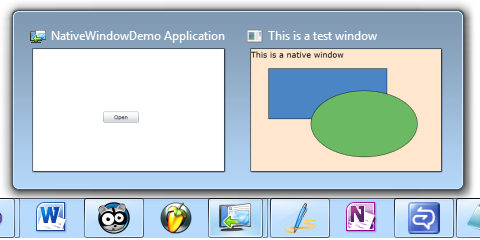
If you look in the taskbar, you'll see both of your windows open
and available in the thumbnail
You may have noticed that there's no Show method in the
examples. That's because in Silverlight, you simply set the
Visibility to make the window visible. It's not required, but I
like to do that as the last step after setting all the other window
properties.
Update September 2011: For the RC (and final release) a Show
method was indeed added. I'm glad to see that in there, as calling
Show() is much more natural vs. setting Visibility. Of course, you
can still use Visibility should you so desire.
Speaking of properties, you can open the window in the usual
states:
wnd.WindowState = WindowState.Minimized;

wnd.WindowState = WindowState.Maximized;

wnd.WindowState = WindowState.Normal;       // default
You can also set its startup location via the Left and Top
properties.
Native child windows also allow you to modify their window
chrome.
Setting the Window Style
When it comes to altering the chrome (borders and title bar) of
a window, you have three choices:
wnd.WindowStyle = WindowStyle.SingleBorderWindow;

wnd.WindowStyle = WindowStyle.BorderlessRoundCornersWindow;

wnd.WindowStyle = WindowStyle.None;
The first "SingleBorderWindow" is the default, shown in the
previous screenshots. Don't use BorderlessRoundCornersWindow. It
throws an exception right now (at least in the build I'm working
on)
And here is what WindowStyle.None gives you:
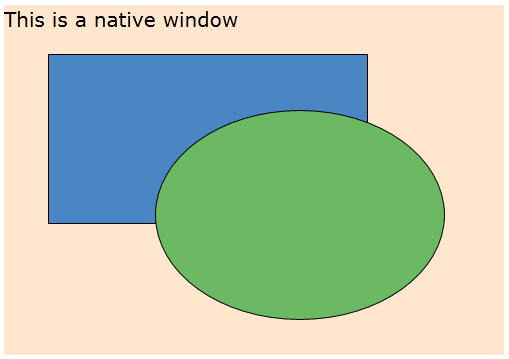
As expected, you get a window with no chrome at all; you are
responsible for creating all the fiddly bits required to resize and
move the window.
Creating Custom Window Chrome
Creating custom window chrome is more than just prettying up the
window itself. You need to provide elements for sizing and moving
the window. Luckily, Silverlight provides some helper methods to
help you avoid writing all that drag / move / resize code. I know
you love dealing with mouse capture, though :)
To help out with all this, I quickly whipped up a user control
that contains the window chrome as well as the functionality
required for wiring up to the parent window. If you want something
truly reusable, create it as a standard templatable control. Here's
the XAML for that control:
<UserControl x:Class="NativeWindowDemo.Controls.WindowChrome"

             xmlns="http://schemas.microsoft.com/winfx/2006/xaml/presentation"

             xmlns:x="http://schemas.microsoft.com/winfx/2006/xaml"

             xmlns:d="http://schemas.microsoft.com/expression/blend/2008"

             xmlns:mc="http://schemas.openxmlformats.org/markup-compatibility/2006"

             mc:Ignorable="d"

             d:DesignHeight="300"

             d:DesignWidth="400">


    <Grid x:Name="LayoutRoot" Background="Transparent">

        <Rectangle x:Name="TitleBar" Fill="Beige"

                   Height="30"

                   VerticalAlignment="Top" />


        <Rectangle x:Name="RightResize"

                   Fill="Beige"

                   StrokeThickness="0"

                   Width="5"

                   VerticalAlignment="Stretch"

                   HorizontalAlignment="Right"

                   Cursor="SizeWE" />


        <Rectangle x:Name="LeftResize"

                   Fill="Beige"

                   StrokeThickness="0"

                   Width="5"

                   VerticalAlignment="Stretch"

                   HorizontalAlignment="Left"

                   Cursor="SizeWE" />


        <Rectangle x:Name="BottomResize"

                   Fill="Beige"

                   StrokeThickness="0"

                   Height="5"

                   VerticalAlignment="Bottom"

                   HorizontalAlignment="Stretch"

                   Cursor="SizeNS" />


        <Rectangle x:Name="LeftBottomResize"

                   Fill="Beige"

                   StrokeThickness="0"

                   Width="5"

                   Height="5"

                   VerticalAlignment="Bottom"

                   HorizontalAlignment="Left"

                   Cursor="SizeNESW" />


        <Rectangle x:Name="RightBottomResize"

                   Fill="Beige"

                   StrokeThickness="0"

                   Width="5"

                   Height="5"

                   VerticalAlignment="Bottom"

                   HorizontalAlignment="Right"

                   Cursor="SizeNWSE" />


        <Button x:Name="CloseButton" Content="X" Width="20" Height="20"

                Margin="0,5,5,0"

                HorizontalAlignment="Right"

                VerticalAlignment="Top"

                Click="CloseButton_Click" />

    </Grid>

</UserControl>
The UI contains the main elements required for a resizable
window with custom chrome:
| Item |
Purpose |
| Title Bar |
Area to allow the user to click and
drag the window to move it. You could make your entire window
draggable (allowing the user to click on any empty area) but making
the rectangle take up the whole client area. |
| Close Button |
You need some way to close your
window. In this case, I created a simple close button. Note that
you may also want maximize and minimize/restore buttons as
well. |
| Left Resize, Right Resize, Bottom
Resize |
These are long skinny rectangles
docked to the edges of the window. This gives the user a place to
click and drag to resize the window. Each has been assigned the
appropriate resize cursor. |
| Left Bottom Resize, Right Bottom
Resize |
These are squares (Rectangles) that
sit in the bottom left and bottom right corners, above the other
resize rectangles in the z-order. These allow the user to resize
the window in two directions at once, and have the appropriate
diagonal resize cursors assigned to them. |
Due to the nice DragMove and DragResize methods, the code
required to resize and move the window is really simple. Here it
is, from the code-behind of the WindowChrome user control:
namespace NativeWindowDemo.Controls

{

    public partial class WindowChrome : UserControl

    {

        public WindowChrome()

        {

            InitializeComponent();

        }


        // used a property because the parent window isn't in the visual

        // tree when the user control is loaded


        private Window _parentWindow = null;

        public Window ParentWindow

        {

            get { return _parentWindow; }

            set { _parentWindow = value; WireUpParentWindow();  }

        }


        private void WireUpParentWindow()

        {

            if (_parentWindow != null)

            {

                // wire up all our Window goodness


                RightResize.MouseLeftButtonDown += (s, ea) =>

                    {

                        _parentWindow.DragResize(WindowResizeEdge.Right);

                    };


                LeftResize.MouseLeftButtonDown += (s, ea) =>

                    {

                        _parentWindow.DragResize(WindowResizeEdge.Left);

                    };


                BottomResize.MouseLeftButtonDown += (s, ea) =>

                    {

                        _parentWindow.DragResize(WindowResizeEdge.Bottom);

                    };


                LeftBottomResize.MouseLeftButtonDown += (s, ea) =>

                    {

                        _parentWindow.DragResize(WindowResizeEdge.BottomLeft);

                    };


                RightBottomResize.MouseLeftButtonDown += (s, ea) =>

                    {

                        _parentWindow.DragResize(WindowResizeEdge.BottomRight);

                    };


                TitleBar.MouseLeftButtonDown += (s, ea) =>

                    {

                        _parentWindow.DragMove();

                    };

            }

        }


        private void CloseButton_Click(object sender, RoutedEventArgs e)

        {

            if (_parentWindow != null)

            {

                _parentWindow.Close();

            }

        }

    }

}
You may have noticed the ParentWindow property in the comments.
During my initial tests with the control, I could not find a time
(via an event or an override) when I could count on the parent
Window to show up in the visual tree. So, I cheaped out and
provided a property. This, along with the addition of the chrome
control itself, necessitates some change to the main page's code
behind.
Overlaying the main Window with the Chrome
Again, for a truly reusable control, you'd want to make this a
templatable control rather than a usercontrol. In that case, I
would also make it a content control and have a true window client
area inside the chrome as opposed to the current overlay approach.
Either way will work, however.
Here's the main page's code from the code-behind.
private void OpenWindow_Click(object sender, RoutedEventArgs e)

{

    Window wnd = new Window();

    wnd.Width = 500;


    wnd.Height = 350;

    wnd.Title = "This is a test window";

    wnd.Content = BuildWindowContents(wnd);


    wnd.WindowStyle = WindowStyle.None;


    wnd.Visibility = Visibility.Visible;


}


private FrameworkElement BuildWindowContents(Window window)

{

    Grid grid = new Grid();


    WindowChrome chrome = new WindowChrome();

    chrome.ParentWindow = window;


    grid.Children.Add(new PopupWindowContents());

    grid.Children.Add(chrome);


    return grid;

}
Once you have all that in place, you'll have a window with
active, custom chrome:
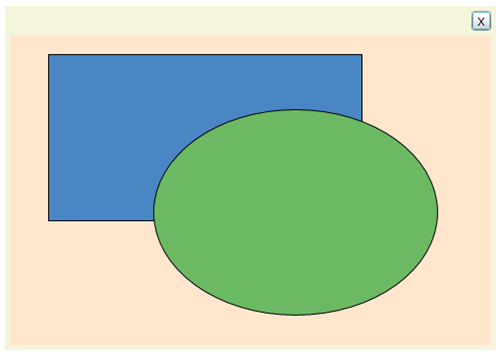
That's all there is to it. Well, except for bringing in a
designer that can create some truly attractive window chrome, that
is :)
Multiple Screens
One great advantage of the new native window class, is that you
can now support multiple screens in your applications. Cool!
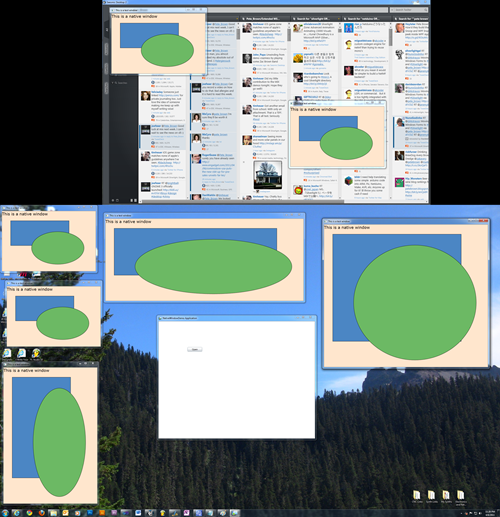
My workstation setup has two screens stacked on top of each
other. The bottom one is a 30" screen, top is a 20" screen. Those
windows are all from the same Silverlight application.
Easy as pie. Go forth and create real operating system windows
for your Silverlight applications. I can't wait to see what you all
come up with :)
Source code for the Silverlight 5 Beta version of this
application may be downloaded via the link below.
A video version of this tutorial will be on Silverlight.net
shortly.
