Silverlight for Windows Phone is one of the most exciting things
to come along since the original release of Silverlight. Now I can
take my same Silverlight/WPF skills and use them not only on the
web, and on the desktop, but also on the Windows Phone. Silverlight
for Windows Phone is an out-of-browser, chromeless, implementation
of Silverlight designed as the premier application development tool
for Windows Phone. Applications written in Silverlight for Windows
Phone are developed using Visual Studio and Expression Blend, and
sold/deployed using the Marketplace.
Along with Silverlight, we also have XNA 4.0, targeted more
towards game developers. I'll talk more about that in another
post.
You've installed the bits and now you want to build your first
application. Here's a walkthrough of building a "Hello World"
application using Silverlight for Windows Phone
NOTE: Everything here is based on pre-released bits from
around the MIX10 timeframe. Details below subject to change in
later releases.
When you open Visual Studio, you'll see three new project types
under the Silverlight for Windows Phone group (you'll also see a
new XNA Game Studio 4.0 group if you didn't already have that
installed)
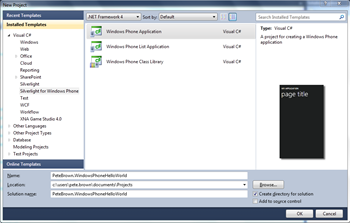
- Windows Phone Application
- Windows Phone List Application
- Windows Phone Library
The three default templates are fairly straight-forward. Select
the Windows Phone Application template if you want blank slate to
provide your own experience. Select Windows Phone List application
if you want the main page of your application to be based around a
list, typically a menu. Select the Windows Phone Library
application to create a reusable library.
I'm going to start with a Windows Phone List application.
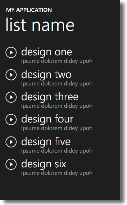
Creating the Windows Phone List Application
At this time, I'd like to thank the product team for producing a
template which includes ViewModels by default. I've advocated for
quite some time that even a simple ViewModel implementation, such
as is used here, is beneficial over sticking all your code in the
code-behind. If you want a more robust implementation,
incorporating interfaces, IOC or other common patterns, you are
free to build upon this to get there.
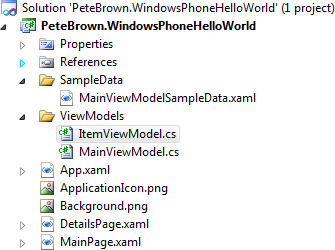
Happily, the templates even use the same function and variable
names I'd use (like NotifyPropertyChanged(string propertyName). One
difference in my typical implementation is the pages are at the
root. I'll usually keep them in a Views folder, although that does
make for uglier navigation uris.
Microsoft.Phone.* Namespaces
When you create a Silverlight for Windows Phone project, you get
a number of new references by default.
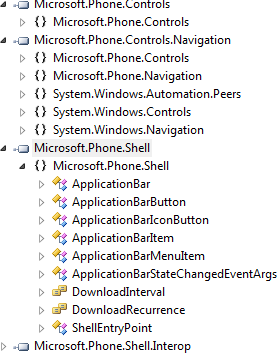
Let's take a brief look at them.
Microsoft.Phone.Controls
This is split between the Microsoft.Phone.Controls and
Microsoft.Phone.Controls.Navigation libraries.
In the Navigation library, you'll find PhoneApplicationPage and
PhoneApplicationFrame. The former is the base class for all pages.
If you open up MainPage.xaml, you'll see it is derived from
PhoneApplicationPage. The latter is a phone-optimized version of
the navigation frame control.
Also in this library, you'll find the PageOrientation enum. The
phone includes an accelerometer which provides orientation
information to the application.
Microsoft.Phone.Navigation
This contains support for the customized phone navigation.
Specifically, you'll find in here the navigation related classes,
controls and event args. This is also where
System.Windows.Navigation resides.
Microsoft.Phone.Shell
This is all shell goodness. We'll cover shell and application
bar integration in a future post.
Running the Application for the First Time
The template creates an application that you can run
immediately. It doesn't do much, but does let you baseline the app
and emulator experience.
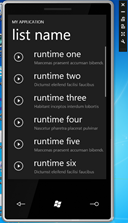
Click on any of the items to display the Details page. Click the
arrow at the bottom right to return to the main page.
My laptop has a touch screen, so the experience is like the
world's largest Windows Phone. :)
I should also note that my laptop is fairly low-powered. It has
an integrated graphics chip, and a relatively slow dual-core mobile
processor. I'm running Windows 7 64 bit with 5gig RAM. The emulator
is smooth as silk, with no stuttering or anything. Considering what
you're seeing here is a real emulation of the actual Windows Phone
product, I'm impressed. Now I just need to make my C64 Emulator work as well on this
class of machine :)
Leave the emulator running so you don't hit the startup time
again. End your Silverlight application from within Visual
Studio.
How the Navigation Menu Works
Navigation actually happens inside a couple functions on the
main page.
private void ListBoxOne_MouseLeftButtonUp(object sender, MouseButtonEventArgs e)
{
    // Capture selected item data
    _selectedItem = (sender as ListBox).SelectedItem;

    // Start page transition animation
    PageTransitionList.Begin();
}

private void PageTransitionList_Completed(object sender, EventArgs e)
{
    // Set datacontext of details page to selected listbox item
    NavigationService.Navigate(new Uri("/DetailsPage.xaml", UriKind.Relative));
    FrameworkElement root = Application.Current.RootVisual as FrameworkElement;
    root.DataContext = _selectedItem;
}
The page itself is hard-coded to be DetailsPage.xaml. You could
either put the url for each item inside your viewmodel, or you have
something else in here which decides what page to navigate to based
on the viewmodel content for that item.
In addition, the detail page's Back button support is handled
via a coupld handlers on the detail page. Note that the default
navigation support is overridden so that we can have an animated
transition.
// Handle navigating back to content in the two frames
private void PhoneApplicationPage_BackKeyPress(object sender, System.ComponentModel.CancelEventArgs e)
{
    // Cancel default navigation
    e.Cancel = true;

    // Do page transition animation
    PageTransitionDetails.Begin();
}

void PageTransitionDetails_Completed(object sender, EventArgs e)
{
    // Reset root frame to MainPage.xaml
    PhoneApplicationFrame root = (PhoneApplicationFrame)Application.Current.RootVisual;
    root.GoBack();
}
The BackKeyPress event is fired when you click the back button
on the phone. But what's that GoBack bit, and why is the root
visual a navigation frame? Simple, it's all defined in
app.xaml:
<!--RootFrame points to and loads the first page of your application-->
<Application.RootVisual>
    <phoneNavigation:PhoneApplicationFrame x:Name="RootFrame" Source="/MainPage.xaml"/>
</Application.RootVisual>
This way you don't need to have a main page that contains just a
frame and is otherwise empty.
If you poke around in app.xaml, you'll also find all the style
resources that make a windows phone app look like a windows phone
app. Nothing magic here, just good old fashioned styles and control
templates.
Responding to Orientation Changes
Orientation is something new to Silverlight. Desktop Silverlight
applications have never really had to respond to orientation
changes before. The phone is a different story: The form factor
means orientation is likely to change pretty regularly.
The page class has two orientation-related events. The first is
OrientationChanging, which lets you perform layout or other tasks
while the user is turning the device. The second one, which you
will likely use more often, is OrientationChanged.
You can also tell the runtime what page orientations your
application will support. This is done by setting the
SupportedOrientations property of the page, on a per-page basis. In
the template, this is done in the constructor. Possible values are
:
- Landscape
- Portrait
- PortraitOrLandscape
As it happens, the value of PortraitOrLandscape (3) is equal to
Landscape | Portrait. While the templates do relay on that at the
moment, I'm more comfortable recommending that you use the actual
enum rather than counting on the underling values. It's not
actually defined as a bitfield, so boolean ops seem a little
dubious.
Let's modify the application to support both modes of layout.
First we'll set the supported orientations for the main page in the
constructor:
SupportedOrientations = SupportedPageOrientation.PortraitOrLandscape;
Next we'll handle the OrientationChanged event. The event
handler wire-up goes in the constructor:
OrientationChanged += new EventHandler<OrientationChangedEventArgs>(MainPage_OrientationChanged);
The event handler itself just makes a change to the title of the
page. Ideally, you'd perform any layout changes here, such as
moving some actions from the bottom, to the right, for example. You
may invoke states using VSM as well.
void MainPage_OrientationChanged(object sender, OrientationChangedEventArgs e)
{
    switch (e.Orientation)
    {
        case PageOrientation.Landscape:
            textBlockPageTitle.Text = "HELLO WORLD - LANDSCAPE";
            break;
        case PageOrientation.LandscapeLeft:
            textBlockPageTitle.Text = "HELLO WORLD - LANDSCAPELEFT";
            break;
        case PageOrientation.LandscapeRight:
            textBlockPageTitle.Text = "HELLO WORLD - LANDSCAPERIGHT";
            break;
        case PageOrientation.Portrait:
            textBlockPageTitle.Text = "HELLO WORLD - PORTRAIT";
            break;
        case PageOrientation.PortraitDown:
            textBlockPageTitle.Text = "HELLO WORLD - PORTRAITDOWN";
            break;
        case PageOrientation.PortraitUp:
            textBlockPageTitle.Text = "HELLO WORLD - PORTRAITUP";
            break;
    }
}
Here are screenshots in various orientations. Look at the label
on the page to see the result of the switch statement.
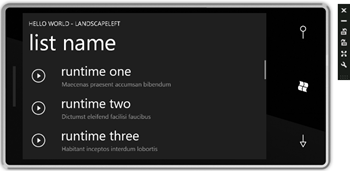
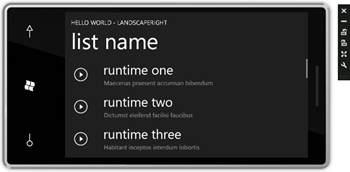
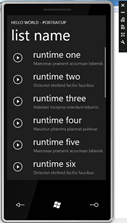
I wasn't able to get the emulator to turn upside down. That's
probably a, uh, feature of this pre-release version :) Note also
that the enum values for Portrait Landscape (without left/right
up/down) are never hit. TBD if that is something in the pre-release
bits, or a function of the emulator.
The rest is, well, mainly Silverlight. You'll be able to reuse
your existing Silverlight and WPF skills to create applications for
the Windows Phone. I can't wait to see what you all come up with
:)
More Information
