The last time I wrote C++ code that ran on Windows, the compiler
came in a box that looked like this:
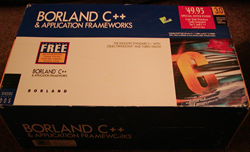
(interesting in buying that? This person has it for sale)
No, it didn't cost $49.95, that was just a special offer on an
add-on. I seem to recall it was more like $700. Yes, the box was
enormous. It weighed almost 25 pounds. It was full
of printed paper manuals. Oh, and you needed room for all those
3.5" and 5.25" floppies. Oh, but it looks so impressive occupying
that overhead shelf in your cube. If I wasn't the only dev in the
whole company, I'm sure other devs would have come by to give
worship to the awesome box that housed the pre-standardized C++
compiler considered the best of its day.
The Windows compiler and IDE would crawl on the average dev
machine of the day (and even on my awesome 8mb 486 beast). The
Object Windows Library (OWL) was pretty huge too, and apps written
with it had pretty hefty requirements, not to mention interesting
textured dialogs and huge chunky buttons.
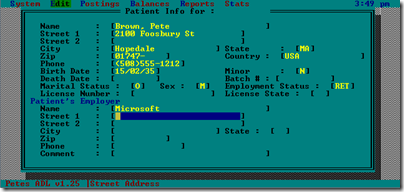
As it turned out, most of the apps I would write with that
compiler would be built as DOS apps anyway, like the screenshot
below (except less compressed and on a nicely rounded 14" CRT),
since most of the old PCs in our office had a hard time with the
Windows 3.1 system requirements even without all the cool 3d
additions.
After that, I discovered dBase, Visual Basic, PowerBuilder,
Delphi, Foxpro and all sorts of other dev products that were less
work to use to create business apps on a deadline. Oh, I still
loved my C++. I'd use it to write int21h handlers, do DOS graphics,
and other fun stuff at home. While I did dabble later with things
like writing the basics of a MUD for Linux in gnu C++, after 1993
or so, I'd never actually get paid to write C++ again.
Until now, that is :)
So, let's walk together through our first 32-bit C++ app. C++
gurus are encouraged to leave comments telling me how to fix any
horrible mistakes or worst practices I may have included in
here.
If you've never used C++, I encourage you to check out the C++ Beginner's Guide on MSDN.
Getting Started with Visual C++ 2010 - Win32 Style
I decided to go with Win32 for my first example. The other
primary in-box option is MFC.WTL (Windows Template Library) is also
a popular choice. You can find more information about it in the WTL MSDN article here.
Upon creating the project in Visual Studio 2010, I was presented
with the Win32 Application Wizard. The wizard walks you through the
project setup, providing options for Windows app, Console app, DLL,
or Static library projects.
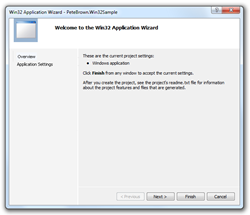
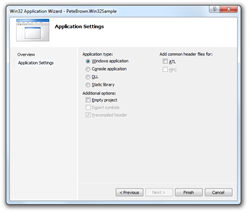
Once you complete that short wizard, you'll get the full project
with all the files you'll need, including the main cpp file
(PeteBrown.Win32Sample.cpp in this case)
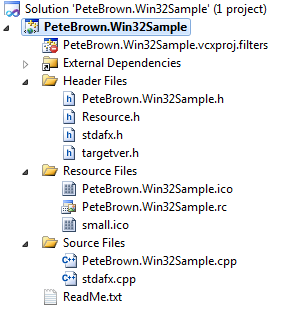
If you've never seen C++ before, but are used to C#, you'll
recognize some things and be complete baffled by others. The first
and major difference to realize is that C++ breaks class
definitions and code into two separate files: a header file for the
definition and a cpp file for the implementation.
The reason for the split is that, unlike C#, C++ (like many
languages from that era) requires that the definition of a function
or class or variable be located above its actual use. Back in the
days of C and Pascal, this helped keep compiler sizes small as they
didn't need to make multiple passes through the source. As machines
grew beefier, however, this standard has been dropped in favor of a
friendlier implementation=definition approach like we see with VB
and C#. No header files with function/class prototypes
required.
The vast majority of the language syntax itself will be clear to
C# developers, especially if you've done any unsafe code.
The other thing you'll notice is there's a lot of code. Compared
to working in .NET, C++ with Win32 requires a fair bit of ceremony
just to get an app up and running. That's hardly fair for me to
point out, though, as we're programming here at about as close to
the Windows "metal" as you can get. If you want less baggage,
that's where WTL and MFC come in.
The final thing you may notice is that the code is...not C++.
While housed in a .cpp file, the code provided to kickstart your
app is plain old C. Other code you create should be C++.
Main Entry Point
The main entry point in a Visual C++ 2010 Win32 project is
_tWinMain.
int APIENTRY _tWinMain(HINSTANCE hInstance,
                     HINSTANCE hPrevInstance,
                     LPTSTR    lpCmdLine,
                     int       nCmdShow)
_tWinMain was new to me. Examples I've seen in the past had
WINAPI as the macro and WinMain as the function. Presumably this is
something that changed just in the latest release of the templates.
I was curious, so I used the right-click menu to find the defintion
of APIENTRY.
#define APIENTRY WINAPI
Ok, no real difference there :)
The parameters are a combination of the types of things you'd
get in standard C along with windows-specific stuff
| hInstance |
Handle to the current instance of the
application |
| hPrevInstance |
Handle to the previous instance. If
you only want to allow one copy of your app to run, you'll activate
this and end the one being spun up |
| lpCmdLine |
Full command line, similar to a
flattened combination of argv we'd get in straight C apps |
| nCmdShow |
This tells the app how to display the
window. There are a bunch of constants that come into play here
including SW_SHOWMAXIMIZED and SW_SHOW |
I'm not going to do anything with these parameters in this Hello
World app, but you almost certainly will use them in an app of even
moderate complexity. For more information, see the MSDN docs on the WinMain function.
The other thing I found puzzling was this block of code:
UNREFERENCED_PARAMETER(hPrevInstance);
UNREFERENCED_PARAMETER(lpCmdLine);
I wondered what those macros were doing. As usual, I just
right-clicked and viewed the definitions. As it turns out, these
are just to eliminate compiler warnings when you are early in your
development. The language made it sound like they should probably
be removed once you get further along in development.
First Run
Curious to see what the templates give you out of the box, I ran
the application. You actually get a pretty decent shell for a
typical menu-driven Windows application.
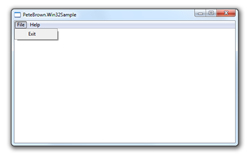
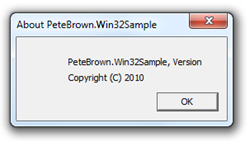
The menus are File->Exit and Help->About. If you click
About, you get a nice little generic About dialog. Hmm. Need to do
something about that button and background color, though.
Ok, still keeping this at the simple "Hello World" level, there
are a couple things I want to do.
- Add "Hello World" to our main window.
- Change the window background color
Adding "Hello World" to the main window: WndProc and
WM_PAINT
The heart of a Windows program is the WndProc function. Even developers in managed code have sometimes had to
implement this to hook low-level Windows messages to do
something otherwise unsupported by the platform.
LRESULT CALLBACK WndProc(HWND hWnd, UINT message, WPARAM wParam, LPARAM lParam)
{
    int wmId, wmEvent;
    PAINTSTRUCT ps;
    HDC hdc;

    switch (message)
    {
    ...
    case WM_PAINT:
        hdc = BeginPaint(hWnd, &ps);

          // TODO: Add any drawing code here...

        EndPaint(hWnd, &ps);
        break;
I've shown the first few lines of WndProc above. The message
we're interested in is WM_PAINT, sent each time the window needs to
paint itself or a portion of itself. Unlike higher-level systems
like WPF, the standard Windows drawing system is not a
retained-mode system. That means, each time you are asked to update
your display, you have to paint it fresh. Folks who have worked in
Windows
Forms are used to this as we used this approach to override the
Paint methods to provide GDI+ gradients and more interesting
UI.
If we want to put some text on the screen, and aren't playing
with something like DirectWrite, we'll need to use the TextOut
function. Here's the declaration for TextOut:
WinGDI.h

#ifdef UNICODE
#define TextOut  TextOutW
#else
#define TextOut  TextOutA
#endif // !UNICODE

...

__gdi_entry WINGDIAPI BOOL  WINAPI TextOutW( __in HDC hdc,
                __in int x, __in int y,
                __in_ecount(c) LPCWSTR lpString,
                __in int c);
First, you'll see that the declaration for TextOut is different
if you're on Unicode (wide) vs. ASCII. We're all on unicode systems
these days, so I included TextOutW here. The parameters are:
| hdc |
The handle to the device context. In
GDI, a device context is something you can paint on. |
| x |
X position to draw at * |
| y |
Y position to draw at * |
| lpString |
Pointer to the string to draw |
| c |
Count of characters in the
string. |
* Note "to draw at" x and y positions vary in interpretation
based on other function calls. See MSDN here.
I then added the function call into the WM_PAINT case in
WndProc, like this:
case WM_PAINT:
    hdc = BeginPaint(hWnd, &ps);
    // TODO: Add any drawing code here...
    TextOut(hdc, 100, 100, helloWorld, _tcslen(helloWorld));

    EndPaint(hWnd, &ps);
    break;
Note that the declaration for helloWorld is not inline there. I
originally had it right before the TextOut, but C++ doesn't care to
have you declare variables inside case statements; they're not
scoped like they are in C#. So, up above the switch statement it
went:
TCHAR helloWorld[] = _T("Hello World!");

switch (message)
{
...
TCHAR is the type you'll usually use for declaring a
constant/literal string (array of characters) in code. Similarly,
the _T macro is used to wrap the string. I've always seen it done
this way, but I can't for the life of me decipher what _T actually
does. The macro definition doesn't provide much insight:
tchar.h

/* Generic text macros to be used with string literals and character constants.
   Will also allow symbolic constants that resolve to same. */

#define _T(x)       __T(x)
#define _TEXT(x)    __T(x)

...

#define __T(x)      L ## x
If I remember correctly "##" concatenates two things, so the
ending string would be L"Hello World!". Perhaps the L is for long
pointer or something? I don't recall.
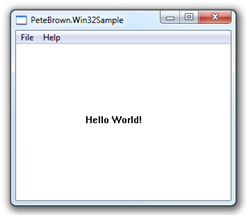
Once you run the app, you'll see some seriously old-school
aliased text on your window.
To do better than that, you'll need to hit up DirectWrite and/or
ClearType. There's a great set of samples in the Windows SDK that
will help you get started using those technologies.
The next thing we'll do is change the background color.
Changing the Background Color
Next "Hello World"-level challenge: change the background color
for the main window. By default, it uses a standard brush that is
pre-set to hold the system color for a window. It's defined in
WinUser.h along with the other system colors:
#define COLOR_SCROLLBAR         0
#define COLOR_BACKGROUND        1
#define COLOR_ACTIVECAPTION     2
#define COLOR_INACTIVECAPTION   3
#define COLOR_MENU              4
#define COLOR_WINDOW            5
#define COLOR_WINDOWFRAME       6
#define COLOR_MENUTEXT          7
#define COLOR_WINDOWTEXT        8
#define COLOR_CAPTIONTEXT       9
#define COLOR_ACTIVEBORDER      10
#define COLOR_INACTIVEBORDER    11
#define COLOR_APPWORKSPACE      12
#define COLOR_HIGHLIGHT         13
#define COLOR_HIGHLIGHTTEXT     14
#define COLOR_BTNFACE           15
#define COLOR_BTNSHADOW         16
#define COLOR_GRAYTEXT          17
#define COLOR_BTNTEXT           18
#define COLOR_INACTIVECAPTIONTEXT 19
#define COLOR_BTNHIGHLIGHT      20

#if(WINVER >= 0x0400)
#define COLOR_3DDKSHADOW        21
#define COLOR_3DLIGHT           22
#define COLOR_INFOTEXT          23
#define COLOR_INFOBK            24
#endif /* WINVER >= 0x0400 */

#if(WINVER >= 0x0500)
#define COLOR_HOTLIGHT          26
#define COLOR_GRADIENTACTIVECAPTION 27
#define COLOR_GRADIENTINACTIVECAPTION 28
#if(WINVER >= 0x0501)
#define COLOR_MENUHILIGHT       29
#define COLOR_MENUBAR           30
#endif /* WINVER >= 0x0501 */
#endif /* WINVER >= 0x0500 */

#if(WINVER >= 0x0400)
#define COLOR_DESKTOP           COLOR_BACKGROUND
#define COLOR_3DFACE            COLOR_BTNFACE
#define COLOR_3DSHADOW          COLOR_BTNSHADOW
#define COLOR_3DHIGHLIGHT       COLOR_BTNHIGHLIGHT
#define COLOR_3DHILIGHT         COLOR_BTNHIGHLIGHT
#define COLOR_BTNHILIGHT        COLOR_BTNHIGHLIGHT
#endif /* WINVER >= 0x0400 */
I've included the full list here just because it's interesting
to see the real underlying definitions of all the default Windows
colors. We've used these in WPF (and in Silverlight 4) through other enumerations, but
in the end, it comes down to these brush handles.
There are a few other stock brushes we can use. For the first
background color, let's pick one of those. Go into the
MyRegisterClass function and modify the properties of the
WNDCLASSEX window and set hbrBackground like so:
    //wcex.hbrBackground    = (HBRUSH)(COLOR_WINDOW+1);
    wcex.hbrBackground  = (HBRUSH)GetStockObject(LTGRAY_BRUSH);
That will give us a light gray background:
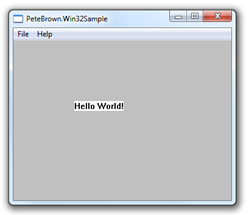
Notice how our text is still on a white background. The WM_PAINT
code that spit out the Hello World! text needs to also paint the
area behind the text with the correct background color. In this
case, it was painted white, but we want it to be gray. Before we do
that, though, let's create a new brush from scratch and use that
for the window background.
The first thing I did was declare the background brush in
PeteBrown.Win32Sample.h. That way it was accessible everywhere:
HBRUSH windowBackgroundBrush;
COLORREF windowBackgroundColor;
(I know, it should be hWindowBackgroundBrush or similar, but I
can't get over my aversion to Hungarian Notation <g>)
The next thing I did was put the creation/allocation code inside
_tWndMain in the spot where the template indicates to put new code.
Yes, I picked Salmon just for Rick Barraza, on the off chance he's
reading about Win32 :)
UNREFERENCED_PARAMETER(hPrevInstance);
UNREFERENCED_PARAMETER(lpCmdLine);

 // TODO: Place code here.
MSG msg;
HACCEL hAccelTable;

windowBackgroundColor = RGB(0xfa, 0x80, 0x72);
windowBackgroundBrush = CreateSolidBrush(windowBackgroundColor);

// Initialize global strings
LoadString(hInstance, IDS_APP_TITLE, szTitle, MAX_LOADSTRING);
LoadString(hInstance, IDC_PETEBROWNWIN32SAMPLE, szWindowClass, MAX_LOADSTRING);
MyRegisterClass(hInstance);
...
Next, I used that inside the MyRegisterClass function and
assigned hbrBackground to it.
//wcex.hbrBackground    = (HBRUSH)(COLOR_WINDOW+1);
//wcex.hbrBackground  = (HBRUSH)GetStockObject(LTGRAY_BRUSH);
wcex.hbrBackground  = windowBackgroundBrush;
To be a good citizen, I delete the brush inside WM_DESTROY in
WndProc. If this code were real C++, I'd probably do that in a
destructor. Either way, keep in mind that handles are a finite
resource in Windows. Back in the day when I did a lot more GDI
work, running out of handles was a big problem.
Finally, let's fix that background color behind the Text in the
window. That's easier than I thought. You simply need to call the
SetBkColor function before you draw the text. SetBkColor is why I
broke the brush definition up into a separate COLORREF and
HBRUSH.
case WM_PAINT:
    hdc = BeginPaint(hWnd, &ps);
    // TODO: Add any drawing code here...
    SetBkColor(hdc, windowBackgroundColor);
    TextOut(hdc, 100, 100, helloWorld, _tcslen(helloWorld));

    EndPaint(hWnd, &ps);
    break;
Run it and we have a beautiful salmon-colored window with some
standard text in the middle.
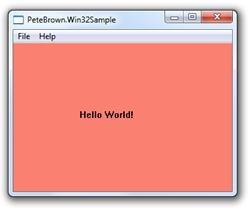
There you go, "Hello World" in Win32.
I was going to do some menu and dialog customization, but I
think I'll save those for the MFC "Hello World". Until then, here's
to your Salmon-colored Windows Applications :)
