I'm doing a MSDN GeekSpeak next week on Connecting Silverlight and wanted to make sure I had another shot at working with sockets before then, so here is part 2 of the Chat Application post.
This is Part 2 of the Silverlight 2 Beta 1 simple chat application how-to. In Part 1, we covered using Expression Design and Expression Blend to create and animate our chat balloon. In this part, we'll cover creating the main UI and then wiring it all up using Sockets.
If you haven't yet read Part 1, I encourage you to do so before jumping in here.
Coding The ChatBalloon Control
We need to add a little plumbing to the ChatBalloon before we can proceed. There are three things we want to do:
- Provide a constructor that takes our message (you'll want to extend this to take the image as well)
- Show the PopAndFade animation when it loads
- Fire an event when the animation is complete, so the main container knows it can remove this control. If you don't do this, you'll end up with a container with hundreds (or more) ChatBalloons taking up memory and rendering time.
The event to handle the third item is simply named "RemoveMe". We'll fire that off when the PopAndFade animation completes.
public partial class ChatBalloon : UserControl
{
    public event EventHandler RemoveMe;

    public ChatBalloon()
    {
        InitializeComponent();

        Loaded += new RoutedEventHandler(ChatBalloon_Loaded);
    }

    public ChatBalloon(string message)
        : this()
    {
        ChatMessage.Text = message;
    }

    void ChatBalloon_Loaded(object sender, RoutedEventArgs e)
    {
        // Set up an event source that will tell the container when
        // we have completed our animation
        PopAndFade.Completed += new EventHandler(PopAndFade_Completed);
        PopAndFade.Begin();
    }

    void PopAndFade_Completed(object sender, EventArgs e)
    {
        if (RemoveMe != null)
            RemoveMe(this, new EventArgs());
    }

}
Main Page UI
Next step is to create the main page UI. In a departure from the approach in the previous segment, I decided to do this one completely in Visual Studio using the Xaml editor. You'll find that Xaml is very easy to understand and to write, especially with the built-in VS2008 intellisense.
There are three parts to our main UI:
- The gradient background
- The input controls for typing and sending a message
- A container for our chat balloons, positioned behind our input controls in z-space
<UserControl x:Class="PeteBrown.SilverlightChat.Page"
    xmlns="http://schemas.microsoft.com/client/2007"
    xmlns:x="http://schemas.microsoft.com/winfx/2006/xaml"
    Width="600" Height="400">

    <Grid x:Name="LayoutRoot">

        <!-- Simple gradient for the grid's background -->
        <Grid.Background>
            <LinearGradientBrush StartPoint="0,0" EndPoint="0,1">
                <GradientStop Offset="0.0" Color="#002200" />
                <GradientStop Offset="0.5" Color="#000000" />
                <GradientStop Offset="1.0" Color="#002200" />
            </LinearGradientBrush>
        </Grid.Background>

        <!-- This is where our chat balloons will go -->
        <Canvas x:Name="ChatMessageContainer"/>

        <!-- Our input controls are here -->
        <Border HorizontalAlignment="Right" VerticalAlignment="Bottom"
                Height="35" Margin="10"
                BorderThickness="1" BorderBrush="#444444">

            <StackPanel Orientation="Horizontal" Margin="5">
                <TextBox x:Name="MessageText"
                         Margin="2" Width="200"
                         FontFamily="Verdana" FontSize="10"/>

                <Button x:Name="SendMessage"
                        Margin="2"
                        Content="Send"
                        Cursor="Hand"/>
            </StackPanel>

        </Border>

    </Grid>
</UserControl>
The result of that is a main page that looks like this:
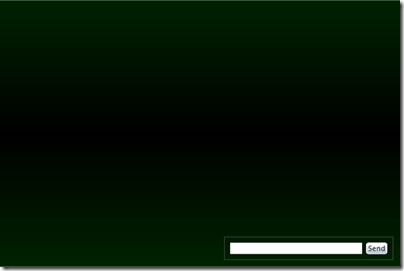
The textbox and button at the bottom right corner will be where the user types in their message.
UI Test Code
Now that we have the UI elements in place, it's a good time to wire up some animation and try it all out without the actual network connectivity.
In Page.xaml, we'll need to add a ShowMessage function. This will be directly triggered for now, but once we hook up the networking stack, this will be triggered by network events.
private void ShowMessage(string message)
{
    if (message.Trim() != "")
    {
        ChatBalloon balloon = new ChatBalloon(message);

        balloon.Visibility = Visibility.Collapsed;
        balloon.RemoveMe += new EventHandler(balloon_RemoveMe);

        Random rnd = new Random();

        balloon.SetValue(Canvas.LeftProperty,
            rnd.Next((int)(ChatMessageContainer.ActualWidth - balloon.ActualWidth)));
        balloon.SetValue(Canvas.TopProperty,
            rnd.Next((int)(ChatMessageContainer.ActualHeight - balloon.ActualHeight * 2)));

        ChatMessageContainer.Children.Add(balloon);
        balloon.Visibility = Visibility.Visible;

    }
}
Here's what the code does:
- Creates a new ChatBalloon and assigns the passed-in message to it
- Sets the ChatBalloon to invisible to avoid a possible ghost image showing up before the animation starts
- Randomly positions the balloon on the canvas, and adds it to the same canvas
- Sets the balloon to visible.
Next, we need to wire up a couple event handlers - one for the Send button, and one to handle the balloon's RemoveMe event.
public Page()
{
    InitializeComponent();

    SendMessage.Click += new RoutedEventHandler(SendMessage_Click);
}

void SendMessage_Click(object sender, RoutedEventArgs e)
{
    ShowMessage(MessageText.Text);
}
The RemoveMe code simply removes the sender from the canvas.
void balloon_RemoveMe(object sender, EventArgs e)
{
    ChatMessageContainer.Children.Remove((UIElement)sender);
}
Now, when run, you should see something like the screen below after you type a message and hit send a few times.

Networking
Now to the interesting part. Since we're working with Beta 1 of Silverlight, our best bet networking-wise is going to be Sockets. (Note: look for an update post Beta 2 or RTM as I'd like to use the WCF duplex communications bits that Eugene Osovetsky wrote about also note that there may be changes made to Silverlight for Beta 2 which make it so this code doesn't work after Beta 2. YMMV)
Networking Primer for Silverlight
Silverlight has a number of ways you can use it to connect to the rest of the world:
- Consume SOAP 1.1 services (WCF basicHttpBinding, or ASP.NET .asmx services, as well as other languages/platforms). This is one of the most common uses for internal apps.
- REST Services and other HTTP calls. This is very common for mashups.
- Sockets in the 4500 to 4532 range. Hardly anyone is doing sockets, but those that need it, really need it.
For a great overview of the options available, check out Tim Heuer's blog post on the topic.
There are two parts we'll need to build to make this work:
- Our Silverlight sockets client
- A stand-alone sockets server
Unlike the other connectivity options, this is not something you're likely to host under IIS. Most often, your sockets server will be a windows service running on a different machine. For purposes of this demo, we'll keep it simple and put everything on a single machine.
Socket Server
The sockets server is a basic Windows console application that listens on a pre-defined port. I snagged the basic framework and much of the code from here. That's also a great article to read to be able to extend my example to include pictures, names, 1:1 chat etc.
The socket server code itself is included with the zip for this post, but the walkthrough of it is out-of-scope. I refer you to the great article above should you want more details.
Socket Client Code
The client code, on the other hand, should be more interesting to us. Let me preface this by saying the sockets API, or at least the async sockets API, conjures up one word in my mind: Yuck.
Back in the mid 90s I wrote winsock code in VB (using a wrapper at the time), and also wrote from-scratch in GNU C++ a server on a Linux box I had, using berkeley sockets. I had created a text-based MUD and a MUD client in the style of the MUDs I used to waste too much time on in college. I remember next to nothing about how I set up the sockets server and client code, but I do remember that it seemed easier and more straight forward than this.
First, create a new class named SocketClient. This will be our class to wrap all the socket communication. Pulling it out into a separate class will allow us to easily replace it with WCF Duplex Communcations in the future should we wish to do so.
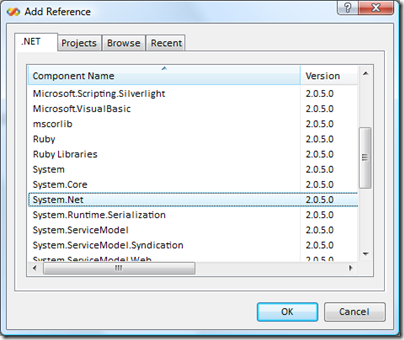
In order to do any sockets work, we'll need to add a reference to System.Net:
Next, you'll need to add a couple using statements to the SocketClient:
using System.Net;
using System.Net.Sockets;
using System.Text;
System.Net provides the common classes such as DnsEndPoint, while the .Sockets namespace provides the socket-specific classes we'll be using. System.Text is used for encoding.
Next, we'll add in the variables and constants we need.
private const string _host = "127.0.0.1";
private const int _port = 4532;

private Socket _socket;
private DnsEndPoint _endPoint;

private bool _connected = false;
The host and port combined make up the connection information for the server we're connecting to. The _socket is the main class we'll be working with, and the _endPoint is the class that encapsulates the information about the server we're connecting to. Finally, _connected just tells us if we're connected to the server or not.
Next we need to add in the code that does the work. I'll break it down here for you:
First, we need a way to connect to the server.
public void Connect()
{
    _endPoint = new DnsEndPoint(_host, _port);
    _socket = new Socket(AddressFamily.InterNetwork, SocketType.Stream, ProtocolType.Tcp);

    SocketAsyncEventArgs context = new SocketAsyncEventArgs();

    context.UserToken = _socket;
    context.RemoteEndPoint = _endPoint;

    context.Completed += new EventHandler<SocketAsyncEventArgs>(OnAsyncSocketOperationComplete);

    if (!_socket.ConnectAsync(context))
    {
        // this is the dumb part of sockets programming.
        // if ConnectAsync returns false, the event isn't
        // fired and you instead need to do your checking
        // here. IMHO, it should fire the event regardless

        HandleConnect(context);
    }
}
Unfortunately, the code immediately gets ugly here. One confusing thing is that you have to build an event args object and pass it into a function. It's pretty unusual (I can't think of any other examples) where you instantiate an event args object and then pass it into a method.
If you think of the event args as a "context" class instead of event args, it makes much more sense. It's named event args presumably because it is passed back in a raised event, and therefore has to derive from System.EventArgs to be compliant, and to pass fxcop checks, needs to be named XyzEventArgs.
The other ugly thing here is how synchronous vs asynchronous results are handled. Since a connect operation can return synchronously, the ConnectAsync method might return with the context object already populated. However, if it ends up being an async operation, the ConnectAsync operation returns True and you have to ensure you have an event handler wired up. IMHO, the event should have been fired either way. It's because of ugliness like this that you see all the net examples out there peppered with WaitOne and other not-so-great-for-async methods.
Next, we need to implement the event handling. The code here should be fairly self-explanatory for our simple send-only test. The event handler is OnAsyncSocketOperationComplete, and it delegates out to other methods as appropriate for the operation.
void OnAsyncSocketOperationComplete(object sender, SocketAsyncEventArgs e)
{
    switch (e.LastOperation)
    {
        case SocketAsyncOperation.Connect:
            HandleConnect(e);
            break;

        case SocketAsyncOperation.Receive:
            HandleReceive(e);
            break;

        case SocketAsyncOperation.Send:

            break;
    }
}

private void HandleConnect(SocketAsyncEventArgs context)
{
    if (context.SocketError != SocketError.Success)
    {
        throw new SocketException((int)context.SocketError);
    }
    else
    {
        _connected = true;

    }
}
Finally, we need a public method that will send a message via sockets. The code below simply builds a buffer from the message and then sends it asynchronously. Unlike Connect, we don't really care about the return value from SendAsync, so we ignore it for now.
public void SendMessage(string message)
{
    if (_connected)
    {
        byte[] bytes = Encoding.UTF8.GetBytes(message);

        SocketAsyncEventArgs context = new SocketAsyncEventArgs();
        context.SetBuffer(bytes, 0, bytes.Length);
        context.UserToken = _socket;
        context.RemoteEndPoint = _endPoint;
        context.Completed += new EventHandler<SocketAsyncEventArgs>(OnAsyncSocketOperationComplete);

        _socket.SendAsync(context);
    }
    else
        throw new SocketException((int)SocketError.NotConnected);
}
Now, we're only going to test sending at this point, so go back to the Page code behind, and modify it to add a reference to our socket client, and to change the button click event handler to send a message via the client.
private SocketClient _socketClient = new SocketClient();

public Page()
{
    InitializeComponent();

    SendMessage.Click += new RoutedEventHandler(SendMessage_Click);

    Loaded += new RoutedEventHandler(Page_Loaded);
}

void Page_Loaded(object sender, RoutedEventArgs e)
{
    _socketClient.Connect();
}

void SendMessage_Click(object sender, RoutedEventArgs e)
{
    //ShowMessage(MessageText.Text);
    _socketClient.SendMessage(MessageText.Text.Trim());
}
First Connectivity Test - Sending a Message
Fire up the server outside VS, then fire up the client. Once you get past the firewall prompts (if your machine is locked-down, you may find yourself blocked here with no way to continue - such is the nature of sockets), you can send a few messages and verify they come up on the console.

Two-Way Connectivity
Of course, a chat client that can only send messages is fairly useless, so let's implement the receive part. As you can imaging, the receive logic is a bit more complex, as we need to actually sit around and wait for messages to come to us. Obviously we don't want to block the UI thread while we wait. On the other hand, implementations I've seen that only force a receive when you send won't work well either. In fact, for the code camp, I was pressed for time and implemented that exact pattern. To force constant checks, I had a timer run and call the SendReceiveMessage method with an empty string a couple times a second. That's hardly a good pattern and I was determined to find a better way before I wrote this up.
That all known, what I ended up with is something a little better, but not without its own hacks.
First, create a new class named ChatMessageEventArgs. This is what we'll use in the event we raise from our socket client code.
Chat Message Event
public class ChatMessageEventArgs: EventArgs
{
    public DateTime Stamp { get; set; }
    public string Message { get; set; }
    // this is where you might add the username, pointer to image etc.

    public ChatMessageEventArgs(string message)
    {
        Stamp = DateTime.Now;
        Message = message;
    }

}
Final SocketClient Code
Back to our SocketClient class. The final code for both send and receive is below. I added in the StartReceiving and HandleReceive functions (see below for explanation), as well as an event which is raised when the Chat Message is received.
public class SocketClient
{
    private const string _host = "127.0.0.1";
    private const int _port = 4532;

    private Socket _socket;
    private DnsEndPoint _endPoint;

    private bool _connected = false;

    private UIElement _dispatcherObject = new TextBlock();

    public event EventHandler<ChatMessageEventArgs> ChatMessageReceived;

    public void Connect()
    {
        _endPoint = new DnsEndPoint(_host, _port);
        _socket = new Socket(
            AddressFamily.InterNetwork,
            SocketType.Stream,
            ProtocolType.Tcp
            );

        SocketAsyncEventArgs context = new SocketAsyncEventArgs();

        context.UserToken = _socket;
        context.RemoteEndPoint = _endPoint;

        context.Completed +=
            new EventHandler<SocketAsyncEventArgs>(OnAsyncSocketOperationComplete);

        if (!_socket.ConnectAsync(context))
        {
            // this is the dumb part of sockets programming.
            // if ConnectAsync returns false, the event isn't
            // fired and you instead need to do your checking
            // here. IMHO, it should fire the event regardless

            HandleConnect(context);
        }
    }


    public void Disconnect()
    {
        _connected = false;
        _socket.Close();
    }


    void OnAsyncSocketOperationComplete(object sender, SocketAsyncEventArgs e)
    {
        switch (e.LastOperation)
        {
            case SocketAsyncOperation.Connect:
                HandleConnect(e);
                break;

            case SocketAsyncOperation.Receive:
                HandleReceive(e);
                break;

            case SocketAsyncOperation.Send:
                break;
        }
    }

    // Handles the connect event, and starts receiving
    private void HandleConnect(SocketAsyncEventArgs context)
    {
        if (context.SocketError != SocketError.Success)
        {
            throw new SocketException((int)context.SocketError);
        }
        else
        {
            _connected = true;

            // we're connected, so start receiving
            StartReceiving();
        }
    }

    // Async receive
    private void StartReceiving()
    {
        // hey, at least it's longer than twitter :)
        byte[] buffer = new byte[255];

        SocketAsyncEventArgs context = new SocketAsyncEventArgs();
        context.SetBuffer(buffer, 0, buffer.Length);
        context.UserToken = _socket;
        context.RemoteEndPoint = _endPoint;
        context.Completed +=
            new EventHandler<SocketAsyncEventArgs>(OnAsyncSocketOperationComplete);

        if (!_socket.ReceiveAsync(context))
        {
            // same sync/async hackery as Connect.
            // Typically there wouldn't be a message here. If it
            // was the normal case that a message is always waiting,
            // this code would end up with a stackoverflow
            HandleReceive(context);
        }
    }

    // Process a newly received message
    private void HandleReceive(SocketAsyncEventArgs context)
    {
        string message =
            Encoding.UTF8.GetString(context.Buffer,
                context.Offset, context.BytesTransferred);

        // raise the event on the UI thread
        _dispatcherObject.Dispatcher.BeginInvoke(
            delegate
            {
                if (ChatMessageReceived != null)
                    ChatMessageReceived(this, new ChatMessageEventArgs(message));
            });

        // set up to receive next message
        StartReceiving();
    }


    // Send a message out through the socket
    public void SendMessage(string message)
    {
        if (_connected)
        {
            byte[] bytes = Encoding.UTF8.GetBytes(message);

            SocketAsyncEventArgs context = new SocketAsyncEventArgs();
            context.SetBuffer(bytes, 0, bytes.Length);
            context.UserToken = _socket;
            context.RemoteEndPoint = _endPoint;
            context.Completed +=
                new EventHandler<SocketAsyncEventArgs>(OnAsyncSocketOperationComplete);

            _socket.SendAsync(context);
        }
        else
            throw new SocketException((int)SocketError.NotConnected);
    }

}
Raising Events
The async socket events raised by the sockets api are raised on a different thread than what originally invoked the calls. Silverlight, like WPF, requires that all UI interaction be done on the main UI thread. You'll get an exception if you try and access UI elements from a non-UI thread.
I didn't want the Page client code to have to deal with events being raised on a different thread from the UI thread, so I had to do the dispatching inside the SocketClient. To do that, I needed a UIElement, created on the UI thread, so I could use its dispatcher.
You'll notice that in the SocketClient code above, I have a TextBlock named _dispatcherObject. This is created in the SocketClient class itself, which means the SocketClient class must be instantiated on the UI thread. If you're building something truly reusable, you'll want to come up with another mechanism for handling this, as it is atypical to build UI thread affinity into a non-UI component.
Final Page Code
In order to support both sending and receiving, I had to make a few changes to the page code. So you don't have to piece everything together from bits of this post, the full page code is below. The primary change is adding in the event handler for ChatMessageReceived and putting the ShowMessage call in there.
private SocketClient _socketClient;

public Page()
{
    InitializeComponent();

    _socketClient = new SocketClient();

    SendMessage.Click += new RoutedEventHandler(SendMessage_Click);

    Loaded += new RoutedEventHandler(Page_Loaded);
}

void OnChatMessageReceived(object sender, ChatMessageEventArgs e)
{
    ShowMessage(e.Message);
}

void Page_Loaded(object sender, RoutedEventArgs e)
{
    _socketClient.Connect();
    _socketClient.ChatMessageReceived +=
        new EventHandler<ChatMessageEventArgs>(OnChatMessageReceived);
}

void SendMessage_Click(object sender, RoutedEventArgs e)
{
    _socketClient.SendMessage(MessageText.Text.Trim());
}

private void ShowMessage(string message)
{
    if (message.Trim() != "")
    {
        ChatBalloon balloon = new ChatBalloon(message);

        balloon.Visibility = Visibility.Collapsed;
        balloon.RemoveMe += new EventHandler(balloon_RemoveMe);

        Random rnd = new Random();

        balloon.SetValue(Canvas.LeftProperty,
            rnd.Next((int)(ChatMessageContainer.ActualWidth - balloon.ActualWidth)));
        balloon.SetValue(Canvas.TopProperty,
            rnd.Next((int)(ChatMessageContainer.ActualHeight - balloon.ActualHeight * 2)));

        ChatMessageContainer.Children.Add(balloon);
        balloon.Visibility = Visibility.Visible;

    }
}

void balloon_RemoveMe(object sender, EventArgs e)
{
    ChatMessageContainer.Children.Remove((UIElement)sender);
}
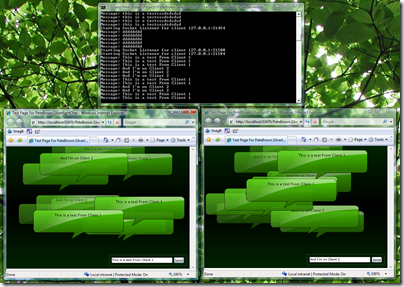
The end result of all this is a simple chat program that allows two or more Silverlight client instances to chat (broadcast chat, more like Twitter than Live Messenger). To test it, fire up the server and then run the Silverlight project. When the Silverlight instance is up, open it up in another window and chat between the two of them:
While I make no warranty to suitability of that sockets code in a production scenario (especially in terms of robustness - it doesn't handle things like the server going down), I hope you find it and this walkthrough helpful for your Silverlight work. There will be some additional considerations come Beta 2 and RTM, but this should be good to get you going.
You can download the source code for this example here.
Feel free to post questions/comments below.
