In Part 1, I discussed the new Silverlight 2 packaging model (xap). In Part 2 below, I cover the new application model and startup sequence, as well as how to show your own splash screen while loading your Silverlight app.
Keep in mind that since this is Beta technology, anything you see here is subject to change.
Application Model and Startup
In Silverlight 1.1, the first places you could run managed user code were in the page constructor (which usually didn't contain anything overly interesting) and the Loaded event for the main page.
Note that unlike Silverlight 1.0 and 1.1a, the entry point in Silverlight 2 applications is no longer a XAML file - it is an Application object. Inside the application object, you decide which XAML file to load and how to start.
The key bit of code is the this.RootVisual property set code below. You can easily change this to load a different Page based on parameters passed into the application, or other external configuration information (a call to a service to return personalization information, for example). Note, however, that the set is a one-time operation. Once you set the RootVisual, you cannot change it again. Any additional page changes would be handled by using UserControls much as you did in Silverlight 1.1a.
public partial class App : Application
{

    public App()
    {
        this.Startup += this.OnStartup;
        this.Exit += this.OnExit;

        InitializeComponent();
    }

    private void OnStartup(object sender, EventArgs e)
    {
        // Load the main control
        this.RootVisual = new Page();
    }

    private void OnExit(object sender, EventArgs e)
    {

    }
}
Startup Flow
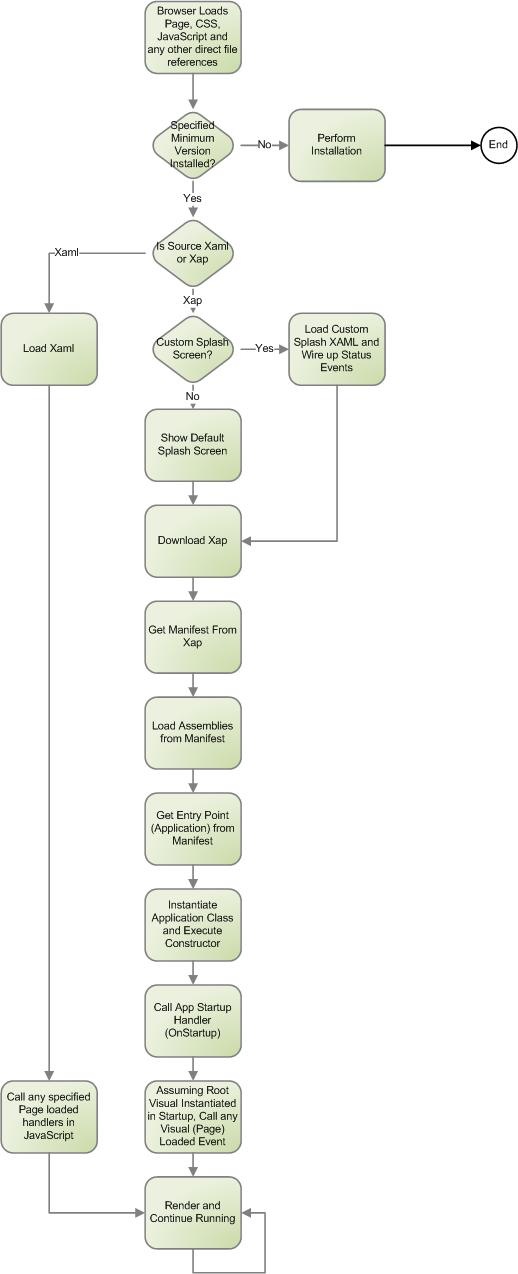
In a previous article, I described the 1.0/1.1 load process. Since that no longer applies, here's an updated version of the flowchart. Note that this doesn't include the DLR steps.

Showing a Custom Splash/Loading Screen
Showing a splash screen in Silverlight 2 Beta 1 is much easier than it was in 1.1 alpha. All the goo about shifting from an unmanaged to a managed root element is all handled for you. You can still handle much more complex pre-loader scenarios from code, but this is the way to handle the initial loading splash screen.
You can now create a loader XAML, and any associated unmanaged JavaScript, and set that as your startup using the splashscreensource property:
function createSilverlight()
{
    Silverlight.createObjectEx({
        source: "MyApplication.xap",
        parentElement:
        document.getElementById("SilverlightControlHost"),
        id: "SilverlightControl",
        properties: {
            width: "100%",
            height: "100%",
            version: "2.0",
            enableHtmlAccess: "true",
            splashscreensource: "SplashScreen.xaml"
        },
        events: {
            onSourceDownloadProgressChanged:'onSourceDownloadProgressChanged'
            /* onSourceDownloadComplete:'onSourceDownloadComplete' */
        }
    });


function onSourceDownloadProgressChanged(sender, eventArgs)
{
    sender.findName("progress").Text = "Downloading: " +
    Math.round((eventArgs.progress * 100)) + "%";
}
...
I suspect that splash screen approach may change after Beta 1, so use this only as informational for now.
There's a ton to talk about in Silverlight 2, but I hope this got you started in an understanding of how applications are deployed and started, and whet your appetite for more. :)