In late March 2003, I built a small bird house with a
transparent back wall. The layout of this bird house allows
us to lift up a small cloth flap and check inside for any eggs or
new chicks.
As of April 2003, no birds have yet taken residence in the
box. Usually it takes a full season or so before boxes are
used anyway (I suspect they stick out too much smell-wise when they
are brand new). I look forward to seeing some birds in this
box next year.
Construction
The bird house itself is constructed much like a standard Wren
box, except for two differences
1) The back of the bird box is made of clear Plexiglas, and is
non-structural
2) A notch has been cut into both sides to accommodate the
support bar that attaches it to the window
3) The entrance hole is 1 1/4" diameter
Here's a photo of the rear of the bird house showing the
Plexiglas and the support bar. The shavings inside are to
encourage cavity nesters such as chickadees which like to feel like
they are excavating a hollow branch for a house.
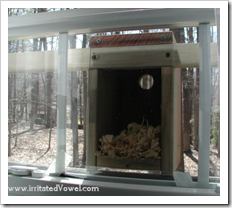
Note that the support bar is positioned in the notches in the
sides of the birdhouse, then screwed into the sides. The
Plexiglas rear then goes over the support bar and is screwed into
the main birdhouse box.
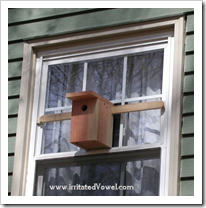
Here you can see a shot of the bird house mounted on the
window. The dark bit behind the house is a bit of cloth that
has been taped at the top to the inside of the window. This
allows us to keep the birdhouse inside relatively private, but also
provides a way by which we can simply lift up the cloth and peer
inside.
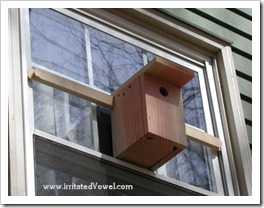
Here you can see the way the support bar is routed on the ends
to fit into the screen slots on the side. This needs to be a
snug fit, so the screen itself isn't supporting the weight of the
birdhouse, but not so snug that it ruins the screen tracks.
Update April 29, 2003
I was woken up this morning by a titmouse pecking on the bird
box and fluttering around (eventually he/she gave up and flew
away). It seems that no matter how large the hole is, the
titmouse wants to feel like it did something to make the hole it's
own :-) After seeing just how hard of a time he had trying to grip
the very smooth, very hard wood on the front of the house, I
decided to take it down and put a strip of rough-cut 1x4 cedar on
the front, with saw kerfs just below the hole. This did two
things:
1) Since the cedar went up the full front of the box and had its
own 1 1/4" hole, it made the hole deeper and therefore more
protected from pest birds and predators.
2) The saw kerfs and soft cedar make it easier for the titmouse
to peck at the hole like he wants to, and also to hold onto the
front of the box to feed babies etc.
At the same time I did that, I removed the shavings from the
inside of the box (It seems you only need sawdust, and even then,
only for woodpeckers, not titmouses* or chickadees), and also
scratched up the inside front so that it could be gripped by the
adults or babies from the inside.
With all the titmouses singing up a storm around here, I hope to
get some more visitors soon! :-)
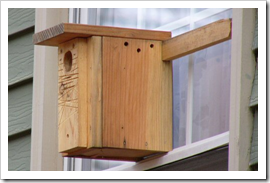
Here are two photos of the updated version as of April 29, 2003
:
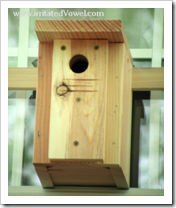
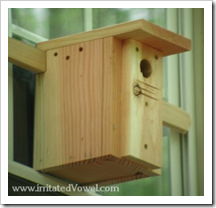
Here is a photo that shows the additional kerfs I put in the
front later on. It also shows what the box looked like after a
season of weathering.
Lessons Learned
If I redo this bird house, I would do a few things differently
:
1) I would make it taller. Currently it is only 8" tall on
the inside. I would make it 10" or 11" tall on the
inside. The size right now is good for chickadees, but not
really for titmouses or other similar birds
2) I would put more of a slant on the roof. The original
design of this box is based on a wren box. Luckily it tips
away from the house a little bit so water doesn't sit on it, but
still, it would be better (especially if I keep it up over winter)
to have more of a slant.
3) When I put more of a slant to it, I would also try to put
better vents in the side, much like I do on my bluebird
boxes. The vents right now are simply three little holes
drilled in each side. The reason the vents are done like that
is that the construction of the house, with no structural back,
really required more contact between the sides and the roof for
stability. I'll work around that issue on the next revision
:-)
4) I would still put the cedar on the front (I like the way it
looks, and according to my wife, the titmouse is hanging on it as I
write this, not 1/2 hour after putting the house back up), but I
would put it on from day 1.
5) I would make the hole 1 1/2" instead of 1 1/4". Melissa
informed me that the Audubon information indicates that the
titmouse will use 1 1/4" hole only if there isn't a house with 1
1/2" hole available. The larger hole will also make it more
attractive to Carolina Wrens and some other birds. Since we
don't have many cavity-nesting pest birds around here, the larger
size will likely not be a problem.
Update March 9, 2004
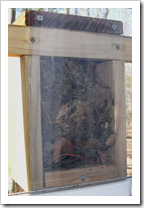
In early March 2004 we put the bird box back up against the
window. A few days later, we noticed it was full of leaves.
Definitely looked like the start of a Carolina Wren nest. I staked
the box out and eventually saw the little guy going back and forth
between the ground and the box. We keep the leaves on the ground
year-round to help with erosion and mud, so this little guy had the
perfect setup for his nest.
Unfortunately, as you can see, a Carolina Wren nest is a pretty
solid affair, and this photo is only of the half-completed nest.
Unlike some other nesting birds, Carolina Wrens build a nest of
leaves, leaf litter and moss that is almost completely enclosed,
except for the very front. That means that we won't get any peeks
into the nest this year. We'll still have a couple chicks if this
Wren can attract a mate and she approves of this particular nest,
though. I can't wait :-)
(The red leaf stem at the bottom of the nest is courtesy of Miss
Utility. They came out and spray-painted our lawn to mark power
lines in support of some work that was done on our well)
I'm thinking about possibly installing a webcam next year on a
regular bird house. We'll see :-)
For photos of a Carolina Wren, click here.
Update May 2004
The Carolina Wren absolutely did raise a brood of one or two
babies in this box. They sure were cute!
* Trivia : The plural of Titmouse is not Titmice, it is
Titmouses. Ref : http://7.1911encyclopedia.org/T/TI/TITMOUSE.htm