(disclaimer : I am absolutely not a plumber. When in
doubt, contact a real plumber)
In March 2004 I decided I was sick of the generic
dixie-cup-looking shower handles in the master bathroom shower. The
old compression knobs tended to wobble and just felt cheap. They
drove me nuts, even after I replaced them with a new identical
pair. I have done some other smaller plumbing jobs including
installing a new sink and faucet in the bathroom, and little things
like replacing toilet valves and whatnot, and swapping in new
handles and valves in the shower. I figured this one would not be
much more difficult.
Melissa and I went to Lowes and picked up a set of replacement
handles made by Price Pfister to match the sink I put in last year.
As it turns out, even though the original fixture was Price
Pfister, the newer handles and valves are not at all compatible. At
that point I decided to bite the bullet and replace the whole
fixture with what came in the Price Pfister box. I checked inside
the wall to see if the original fixture was threaded or soldered. I
found it to be soldered. After some research, I figured I'd give it
a try. From there went a project that took me two weekends to
complete.
Important Note: Some time after I completed
this work, when I was investigating getting a permit for wiring my
shed for my woodworking tools, I found out that 1. It would have
required a permit and 2. Homeowners where I live are not allowed to
apply for the permit or do the work themselves. In Anne Arundel
County in Maryland, even though Home Depot and Lowes sell all the
"do it yourself" stuff locally within the county,
any and all electrical, plumbing or mechanical work must be
permitted and the permit must be pulled by a master electrician,
plumber, etc. Obviously the county is not interested in safety,
only in the lobbying efforts of the professional groups. If safety
was the concern, they'd let a homeowner (who is likely going to do
a lot of things like this themselves anyway) apply for a permit and
get the work inspected and approved. Instead, the homeowners will
do the work themselves anyway and can't get it inspected.
In this Maryland county, a homeowner cannot even legally
replace a sink trap, replace a breaker, or install a
battery-operated smoke detecter themselves. Yet another
case of big money lobbying groups prevailing over common sense. In
any case, check your local codes before starting any work.
I went back to Lowes and picked up a MAPP torch, lead-free
solder, lead-free water soluable flux, flux brushes, emory cloth,
4-in-1 cleaning tool a thumb tube cutter, a regular tubing cutter,
1/2" type L copper pipe, some pipe coupling/joining sleeves, some
threaded 1/2" couplings, Oatey pipe joint compound (much easier
than the teflon tape, IMHO), a sheet of aluminum, a plumbing book,
and some thick leather gloves.
This is what the original fixture looked like
inside the wall. Notice the green corrosion that shows that the
original plumber likely did not wipe up the excess flux.
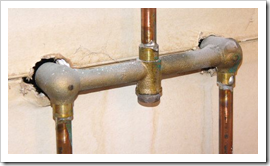
The copper was soldered directly to the brass fixture, so I had
no choice but to cut through the copper pipe and attach the new
fittings with solder. Up to this point I had hoped it possible that
everything was threaded. After I saw this, however, I made the
decision and went to Lowes for the plumbing/soldering supplies.
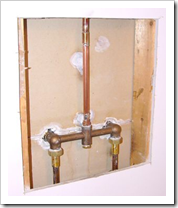

On the left is the final replacement after I finished up. The
cutout in the wall was resized twice after I originally opened it
to allow me to cut off the end of the shower head copper pipe and
start with a clean end. I left the wall open for several days after
I completed the work, just to make sure no links popped up. The
white stuff you see is the silicone caulk I used to seal up the
open and frayed edges of the drywall. Old drywall gets a bit
crumbly so I cleaned up the edges a bit before I caulked it.
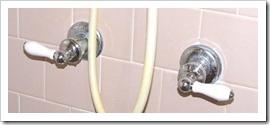
The photo on the right shows the new handles in place in our
shower. Hmm, I think that hose could use some bleaching :-)
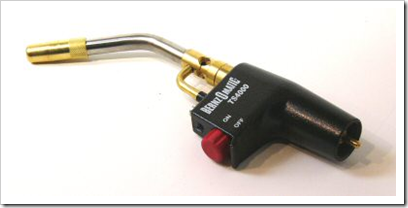
Tools and Supplies I Used
I used a MAPP torch, as the soldering instructions said to use a
very hot flame for the lead-free solder. A propane torch likely
would have been better as it would have had a pencil-point flame.
You can't even get MAPP gas anymore.

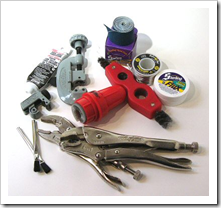
Some of the other tools I picked up especially for this project.
You'll noticed that I have two pipe cleaners (in red) and two pipe
cutters (gray). In both cases it was because one was much easier to
use in the wall, and one was much easier to use out of the
wall.
In the photo you can see a roll of emery cloth/sandpaper,
lead-free solder, lead free flux, two red pipe cleaners, two Vice
Grips, some flux brushers, a thumb tubing cutter, some Oatey thread
joint compound and a large tubing cutter with deburring point. I
also used a set of adjustable wrenches, a set of wide-mouth
adjustable pliers, screwdrivers etc.
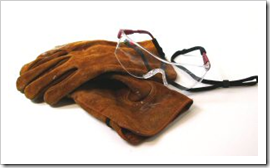
When working with any flame, especially one as hot as a MAPP
torch, safety is important. To protect my arms from any spattering
solder or flux, I wore a sweatshirt. I also wore leather gloves to
protect my hands, and safety glasses for my eyes. I kept a large
salad bowl of ice water (remember, the house water is off, so keep
some cold water handy), and a fire extinguisher handy.
The pipes get very hot and stay very hot for a while, so it is
important to protect yourself and your surroundings.
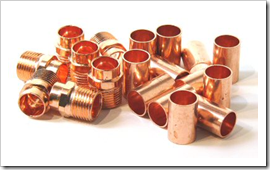
In addition to regular 1/2" Type-L copper pipe, and the brass
fittings that came with the fixture, I used two types of copper
fittings. The threaded fitting attached the copper pipe for the
shower head to the brass fixture. The sleeve made it possible for
me to put in a new piece of copper instead of ripping open the wall
all the way up and replacing the entire shower head pipe.
Code dictates that the only attachments that may be hidden in a
wall are threaded or soldered. You cannot put in compression other
types of quick-fixes.
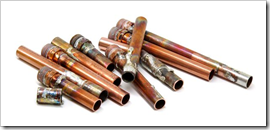
The Hall of Shame
It took me seven tries (yes, it looks like lucky 7 was the
winner) to get the soldering done in a way that didn't leak and
that made me feel that it was likely to last at least through a
couple showers. I think part of the difficulty I was having was
related to the fact that I was using a MAPP torch without a
pencil-point flame. Of course, the other 99% of the difficulty was
simple inexperience :-) Each time I messed-up, I'd pull out the
thumb pipe cutter and cut the new piece in half, remove the
threaded portion and unsolder the sleeve. If the copper pipe
leading to the shower head was too difficult to get 100% clean (as
I found, it must be absolutely clean with only copper - not the
slightest bit of silvery solder showing - otherwise the joint won't
take), I'd cut 1/2" or so off the end and start over.
Most of the failures were related to re-heating the joint.
Because this was in a hard-to-see area, I would solder the joint,
then turn off the flame and look at the back of the joint with a
mirror. If it didn't look right, I'd reheat and add more solder.
This is a very bad idea. I learned to keep the flame on the part
until I was complete with the soldering and never to reheat a
joint. More often than not, the threaded fixture at the bottom was
fine, it was the repair sleeve that would leak or have other
problems. That was an especially hard piece to do.
Some of the other errors were using way too much solder, too
much flux, using too little flux, too little heat, too much heat
but on the wrong part (heating the pipe or joint instead of the
sleeve/coupling) etc. There are lots of good tutorials on the web
related to sweating copper pipe, written by people who actually
know what they're doing, so I'll leave the details to them :-) The
most helpful to me, however, was this video with Bob Vila and
friends. It was worth downloading that nasty RealPlayer to watch it
:
Bob Vila on Sweating Copper Pipes
Here is a shot of the dreaded coupling sleeve that gave me such
fits. With this, you end up soldering two ends very close to each
other, so technique is important. As an aside, note how clean and
shiny the ends of the copper pipe are. Cleaning is a very important
part of the sweating process.
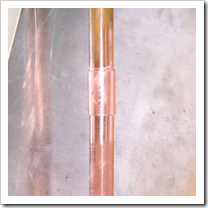
Note the aluminum sheet to protect the drywall behind the pipe.
A fire-resistant plumbers cloth probably would have been a better
choice, as the drywall still scorched a little behind the aluminum
(this is mainly because I was using too much heat for too long, and
I had not propped the aluminum away from the wall at first) We wet
the drywall and sanded off the scorched bits to help ensure they
won't be an easy target for fire in the future. Finally, to protect
the exposed drywall from water, I spread some of the silicone caulk
over the the sanded bits. You can see that in the photos above.
Conclusion
This was easily the most challenging house project I have done
to date. I learned a lot by doing this. While plumbing is still
definitely not the most enjoyable of home repair projects, I feel
that I can tackle relatively simple repairs and small upgrades like
the shower knobs and related. I'll still leave the big jobs to the
pros. Of course, now I'll be able to replace that pesky outside
faucet that always leaks :-) While this first project took me two
weekends of trial and error, I feel that I could do another like it
in significantly less time. There would still be trial and error,
though, as I am better with the torch and sweating the pipes, but
not yet good at it.
The new handles work great and just feel a million times more
solid than the old knobs. Unlike the old set, there are no leaks
and no wrist-twisting to tighten-up the handles.