This was my second real carpentry project here at the house (the
first was the workbench I built out in the shed out of the need to
have a decent place to build this mantel). I hesitate to call it
woodworking, as it's more trim carpentry on this project.
The main body of the mantel is made from from a laminate of 3/4"
MDF over 3/4" plywood held together with wood screws and wood
glue.
If you do something like this yourself, you may want to use wood
over the plywood rather than MDF, as routing the MDF made an
incredible mess of fine dust. If you go with MDF, definitely
wear eye, nose and mouth protection while working it.
The shelf portion of the mantel is made from crown molding and
poplar board. My Delta compound miter saw made cutting the
crown molding much easier than doing it by hand or with a simple
miter saw.
The detail is commercial molding, as well as some routed 1x6
oak. The inside trim is some commercial trim ripped to size
on my table saw.
The main body is held to the brick fireplace by masonary screws
hidden by the vertical moulding on each side. The shelf is
hung on a strip of 2x2 screws to the fireplace, and rests on top of
the main body, but is not otherwise attached to it.
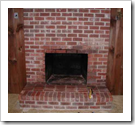
Here is a picture of the fireplace before the stove and mantel
(and carpet, for that matter) were installed. We ended up
replacing the old wood stove with a new pellet stove and had the
chimney relined because the previous owners never burnt a hot
enough fire (and used softwood) to burn off the stove gasses.
Because of that, the chimney was completely crusted in shiny,
flammable creosote as shown in the photo to the right. This
photo was taken on a cold January night, the night before the
chimney folks did the relining, and Melissa and I sat on the cold
fireplace scraping, picking and scrubbing as much soot as we could
out of the fireplace to help cut down on smell
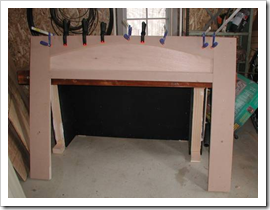
Here is the mantel MDF and plywood being glued together in my shed
workshop. You can see some of the initial pilot holes that
will be used to hold the washer and screw-head when the body is
attached to the wall. I used masonary screws with washers and
a masonary drill bit to attach it to the brick fireplace.
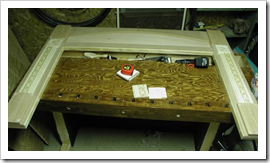
Here is a test-fit of the molding along the sides (the moulding
was not actually glued on until the mantel was screwed to the wall
inside the house, that way it hides the masonary screws.) The
side moulding is actually a leaf and vine pattern.
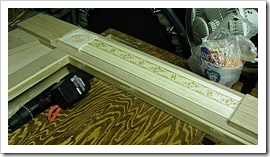
Here's a close-up of the right leg of the mantel. You can
see the moulding pattern, as well as the trim I put on the inside
to finish the edge off.
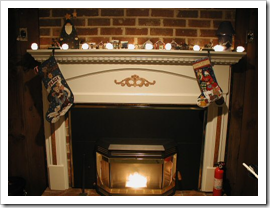
Here is the final mantel completely assembled, painted, stained
and with a bit of commercial wood decoration in the middle.
The top with the crown molding is not physically attached to the
base - it simply rests on top of it. Both the top and the
base are separately attached to the brick wall. The base uses
the method described above. The top, however, was a little
more difficult. First I measured and attached a length of 2x2
horizontally to the brick wall, in such a location as to allow the
top shelf to sit on it. Once that was done, I screwed the top
shelf (which was already attached to the crown molding, painted
etc) to the 2x2. The bottom of the crown moulding just rests
on the base. The most important part of that process was
measuring to ensure that the 2x2 supports the shelf, but also that
the base supports the shelf as well.
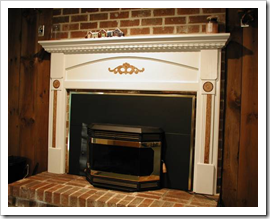
Here's the mantel in-use just before Christmas 2002.
Melissa hand-made me the stocking you see hanging on the right
:-)