In my previous post on creating a simple WPF Screen
Capture program, I showed the basics of using the Win32 API and
some WPF to take screen shots of other applications, regions on the
screen, or the full screen. In this post, we'll enhance that sample
to add a visible indicator of what window is being captured.
This example uses the full-screen almost-invisible WPF Window we
created in the previous example. However, I've refactored the code
and made a discrete window type. To the Window's xaml, I added the
transparency properties as well as a red selection region.
<Window x:Class="PeteBrown.ScreenCapture.CaptureWindow"

        xmlns="http://schemas.microsoft.com/winfx/2006/xaml/presentation"

        xmlns:x="http://schemas.microsoft.com/winfx/2006/xaml"

        Height="300" Width="300"

        WindowStyle="None"

        ShowInTaskbar="False"

        AllowsTransparency="True"

        Topmost="True">

    <Grid>

        <Rectangle x:Name="WindowHighlight"

                   Visibility="Collapsed"

                   Stroke="Red"

                   StrokeThickness="3" />

    </Grid>

</Window>
Those window style and transparency settings were set in code in
the previous version.
The capture window itself is very similar to what we had in the
previous example. However, I added two events (discussed below),
and the code to handle the highlight. Here's the highlight
code:
private IntPtr _hoveredHWnd = IntPtr.Zero;

void CaptureWindow_MouseMove(object sender, MouseEventArgs e)

{

    Point current = e.GetPosition(this);

    Point screenCoords = PointToScreen(current);


    // this hide and show causes flicker, but using this

    // approach, there's not much you can do about that.

    // Caching the window rect doesn't help in the case of overlapping

    // windows. One thing you could do is run through and cache *all*

    // window rects. You could do some interesting things with that

    // but unless you restrict yourself to top-level windows, you'll

    // have a lot of rects to deal with

    Hide();


    IntPtr hWnd = User32.WindowFromPoint(new Win32Point((int)screenCoords.X, (int)screenCoords.Y));


    Show();


    if (hWnd != IntPtr.Zero)

    {

        // don't bother changing things if this is the same

        // window we've been over

        if (hWnd != _hoveredHWnd)

        {

            // get the dimensions of the window we're hovered over

            Win32Rect rect = new Win32Rect();

            User32.GetWindowRect(hWnd, out rect);


            Point topLeft = PointFromScreen(new Point(rect.Left, rect.Top));


            WindowHighlight.Width = rect.Width;

            WindowHighlight.Height = rect.Height;

            WindowHighlight.Margin = new Thickness(

                topLeft.X,

                topLeft.Y,

                Width - rect.Width - topLeft.X,

                Height - rect.Height - topLeft.Y);


            WindowHighlight.Visibility = Visibility.Visible;

        }

    }

}
This code hides the window, calls the API call to get the hWnd
under the mouse cursor, then, if the window isn't already selected,
sizes and moves the red rectangle to highlight the bounds of that
hWnd. To be clear, there is a fair amount of flicker when you keep
the mouse relatively steady over the same window. I need to do
something about that.
As I mentioned, the selection code itself is very similar to
what we had before, but with the addition of WindowSelected and
Canceled events.
private Point _mouseDown;

void CaptureWindow_MouseLeftButtonDown(object sender, MouseButtonEventArgs e)

{

    _mouseDown = e.GetPosition(this);

}


void CaptureWindow_MouseLeftButtonUp(object sender, MouseButtonEventArgs e)

{

    Point current = e.GetPosition(this);


    if (Math.Abs(_mouseDown.X - current.X) < 10.0 &&

        Math.Abs(_mouseDown.Y - current.Y) < 10.0)

    {

        // this is the window they want


        Point screenCoords = PointToScreen(current);

        Hide();


        IntPtr hWnd = User32.WindowFromPoint(new Win32Point((int)screenCoords.X, (int)screenCoords.Y));

        User32.SetForegroundWindow(hWnd);


        SelectedHWnd = hWnd;


        OnWindowSelected();

    }

}


protected void OnWindowSelected()

{

    if (WindowSelected != null)

        WindowSelected(this, EventArgs.Empty);

}
The attached source code includes the cancel and event wire-up
code as well.
I then modified the calling code in the main window to use the
new window and sink the new events. Originally, I had this as a
modal window with a regular DialogResult. However, due to the need
to actually hide the window before making the Win32 API call
(setting visibility or opacity wouldn't work), and re-show it, that
doesn't work. So, I went from a modal approach to an event-driven
approach.
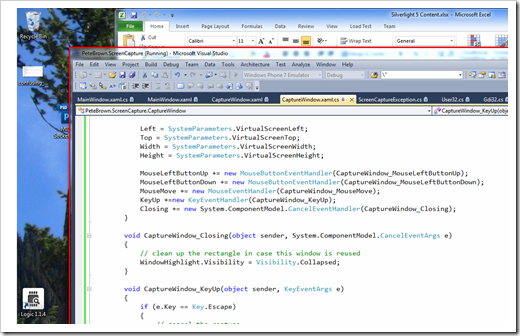
In this partial screen shot (taken with normal print screen) you
can see the red selection highlight around Visual Studio.
Note that as was the case in the previous version of the code,
the calls here do not restrict you to the main window hWnd. I'll
want to modify the code to do that for this specific scenario
(where we're expanding the size to include the border and shadow),
but still retain an "any hWnd" mode, as that's pretty useful as
well.
The Clipboard functionality is still disabled. I'll address that
in an upcoming post. I promise! :)
