I like gadgets. Some of the coolest gadgets are add-on boards
like the Freescale board that works with the Win7 Sensor
and Location API. Recently, Arduino and Netduino caught my eye.
Arduino is an open source hardware platform / microcontroller with
a long history. The specification for the board is completely open,
allowing anyone to build one themselves, or purchase a pre-built
one. Coding is typically done in C++. Tons of projects have been
built on it over the years.
License and Specs
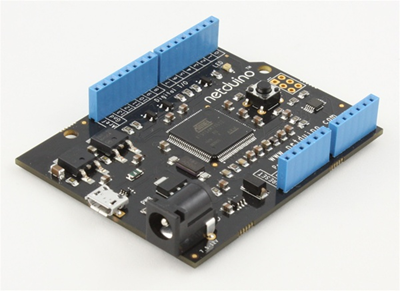
Netduino
is brand new Arduino-compatible board. It runs the .NET Micro
Framework and, like the Arduino, is open source with a published schematic, making it possible for
anyone to build or buy one. The .NET Micro Framework 4.1 source code is
available under the Apache 2.0 license,
making it easy to build custom boards. The licenses for Netduino
itself are:
- Hardware: Creative Commons-Attribution
- Documentation: Creative Commons-Attribution+ShareAlike
- Firmware: Apache 2.0 License
The boards are built to common specs. I've listed the
interesting processor, memory, and I/O specs below.
Processor / Memory Specs
- Atmel 32-bit microcontroller
- Speed: 48MHz, ARM7
- Code Storage: 128 KB
- RAM: 60 KB
Digital and Analog I/O Specs
- all 20 digital and analog pins: GPIO
- digital pins 0-1: UART 1 RX, TX
- digital pins 2-3: UART 2 RX, TX
- digital pins 5-6: PWM, PWM
- digital pins 7-8: UART 2 RTS, CTS
- digital pins 9-10: PWM, PWM
- digital pins 11-13: SPI MOSI, MISO, SPCK
- analog pins 4-5: I2C SDA, SCL
The board itself can be powered via USB, a separate 9v power
supply, or a 9v battery brick. The battery option lets you build
robots and other mobile awesomeness with this board.
What can you do with it?
Imagine you just built a computer, but have left off the
keyboard, mouse, display and drives. All you have included is the
motherboard, CPU, memory, power LED and one extra LED. That's
basically the situation you're in with this board. The real
fun of working with a Microcontroller is wiring it up to other
stuff. There are servo controllers, GPS units, wireless networking, 7-segment LEDs,
temperature and light sensors and more. If you're not skilled in
electronics (I am not), you can pick up project packs and tutorial
books that will help you out.
Since I'm on campus at the moment, using my tablet PC, in a
spare office, I don't have anything else I can wire this to. The
bare board configuration really only provides one I/O device: a LED
you can blink :)
Getting Started
What you'll need:
- Netduino
- USB Cable (early Netduino units come with the USB cable)
- Visual Studio 2010 and the .NET Micro Framework 4.1 SDK (you can
use C# Express 2010 if you don't have Visual Studio)
- Netduino SDK in 32 bit or 64 bit, depending on your host OS.
- Optional: shields and starter kits to do cool things with
netduino. Existing Arduino shields are compatible. A shield is just
an add-on card that fits the pins on the board.
The SDK installs a device driver for talking to the Netduino.
Make sure you select the one with the appropriate bitness, and that
you install it before connecting the Netduino to the
PC. I installed the VS2010 bits before the SDK, but it
shouldn't matter.
Once you plug in the Netduino, using the USB cable, you should
see the device driver get installed, and the power LED on the board
light up.
First Netduino Program
Open up Visual Studio. With the correct install of the Micro
Framework 4.1 SDK for Visual Studio 2010, you should see a new
category and some new project types:
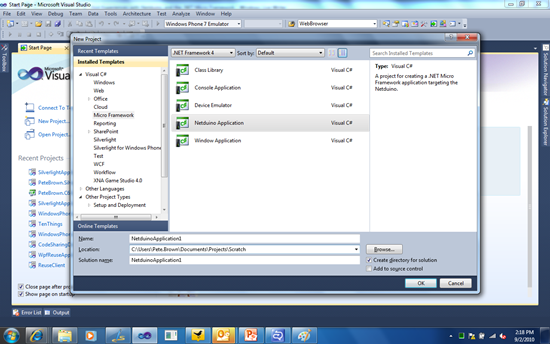
Once the project is created, you'll end up with a single code
file: Program.cs. Think of this structure the same way you would a
console app. It starts off looking like this:
using System;
using System.Threading;
using Microsoft.SPOT;
using Microsoft.SPOT.Hardware;
using SecretLabs.NETMF.Hardware;
using SecretLabs.NETMF.Hardware.Netduino;

namespace NetduinoApplication1
{
    public class Program
    {
        public static void Main()
        {
            // write your code here


        }

    }
}
Hmm. Looks like someone forgot to FXCop their namespace names
:)
Der BlinkenLED
Earlier, I mentioned that about the only thing you can do with a
bare board is blink the LED. So, that's what we'll do.
I'm going to make the assumption that almost everyone reading
this is a .NET programmer. If you're not a .NET programmer, check
out our beginner dev center on MSDN.
Getting the LED to blink is pretty simple. You create an
OutputPort instance that you use as a wrapper for a particular pin
or port on the board. Then you tell it to send true or false to
this port. True turns the LED on, false turns it off. Complete the
code by adding thread sleeps in between, and you get an LED that
turns on for half a second, then off for half a second.
public static void Main()
{
    OutputPort onboardLed = new OutputPort(Pins.ONBOARD_LED, false);

    while (true)
    {
        onboardLed.Write(true);
        Thread.Sleep(500);

        onboardLed.Write(false);
        Thread.Sleep(500);
    }
}
With that code in place, it's time to deploy and test.
Deployment
The project will run in an emulator by default. To change this,
go into the project properties, click the .NET Micro Framework tab,
and change the transport to USB.
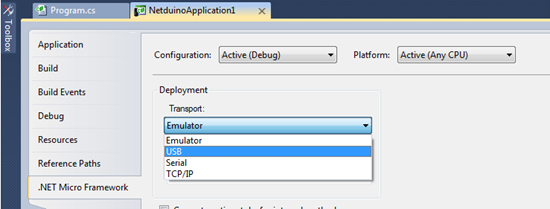
Once you do that, save and build/run your project. If all goes
well, you'll see the blinking LED.
Stopping it
Stop debugging. Hmm. The board is still blinking. Of course it
is! We added an endless loop. How on earth do I stop it? Unplugging
it doesn't work because your new BlinkenLED program is on the
firmware.
The easiest way to stop it is to deploy an empty application. Of
course, if you deploy when the LED is on, the LED will stay on
(presumably) forever. If you want to be clean about it, make it an
application that turns the LED on once as a test, then turns it off
for good.
public static void Main()
{
    OutputPort onboardLed = new OutputPort(Pins.ONBOARD_LED, true);
    Thread.Sleep(2000);
    onboardLed.Write(false);
}
Unplug the board and plug it back in. You'll see the same two
second LED each time. You'll notice a single flicker in that
because the board naturally lights the LED for a second or so
during startup anyway.
More complex interactions with boards are usually just a wrapped
set of inputport and outputport interactions. Those friendly
wrappers are called "drivers" in the arduino world.
To be Continued
I'm off to Fry's here in WA to get something unrelated, but
while there, I'll see what kind of goodies they have that I can use
with the Netduino. If anything cool, I'll put up another post while
I'm here on campus :)
