This is adapted from my recent "Creating your First WPF Application"
post. I felt the dynamic overlay was interesting enough to pull
out into a separate post.
WPF has
good integration with the Windows 7 taskbar. One of the more
interesting ways to integrate with the taskbar is to show an
overlay icon. Most examples of this show how to overlay a static
image or some visuals. I wanted to go one step further and display
something more dynamic, generated at runtime.
Creating the Project
Create a new WPF windows application Project. The name is not
important.
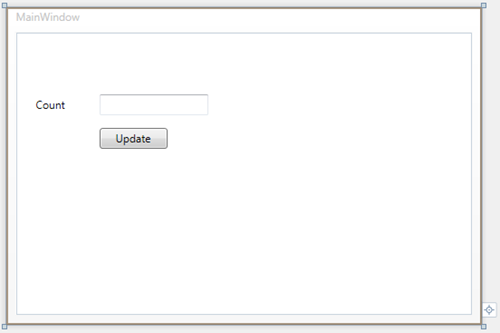
On the MainWindow, drag a textblock, a textbox, and a button.
Name the TextBox "EnteredCount" and set the text property of the
TextBlock to "Count". Finally, name the button "UpdateCount" with
content of "Update".
<Grid>
    <TextBlock Height="23"
                HorizontalAlignment="Left"
                Margin="22,71,0,0"
                x:Name="textBlock1"
                Text="Count"
                VerticalAlignment="Top" />
    <TextBox Height="23"
                HorizontalAlignment="Left"
                Margin="92,68,0,0"
                x:Name="EnteredCount"
                VerticalAlignment="Top"
                Width="120" />
    <Button Content="Update"
            Height="23"
            HorizontalAlignment="Left"
            Margin="92,105,0,0"
            x:Name="UpdateCount"
            VerticalAlignment="Top"
            Width="75" />
</Grid>
The resulting window (in the designer) will look something like
this:
Assigning the Application Icon
Find or create an interesting icon for the application. I picked
up a set of free icons some time ago.
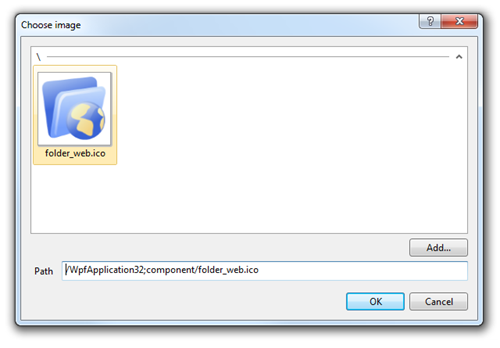
Drag the icon into your project. Then, open up the properties
for MainWindow and click the […] button to the right of the Icon
property. Pick the icon you just added. Here's what it looks like
on my application:
The XAML for the MainWindow will be modified to reflect the new
icon property, as seen in the following section.
Supporting Taskbar Integration
Overlay icons can be static bitmaps or vectors set up as XAML
resources, or they can be images you create on the fly in code.
Last December, I wrote about how to use taskbar icons in your WPF 4
applications. I want to show an overlay icon that displays a
value entered in the TextBox. Of course, in your own applications,
this value would likely be a count of items in a collection or some
other calculated value.
The first thing we need to do is create an instance of the
TaskbarItemInfo class. You can do this from code, or as I prefer,
directly in the XAML for the window.
<Window x:Class="WpfApplication32.MainWindow"
        xmlns="http://schemas.microsoft.com/winfx/2006/xaml/presentation"
        xmlns:x="http://schemas.microsoft.com/winfx/2006/xaml"
        Title="MainWindow" Height="350" Width="525"
        Icon="/WpfApplication32;component/folder_web.ico">
    <Window.TaskbarItemInfo>
        <TaskbarItemInfo />
    </Window.TaskbarItemInfo>
...
TaskbarItemInfo provides access to any taskbar-related
functionality you will use in your application. Its capabilities
extend beyond the simple overlay seen here. For other ways to use
it, be sure to visit the Windows 7 videos section on
WindowsClient.net.
The next step is to create some code and XAML that will take the
entered number, and create an image with that number. The image
will be a red circle with a white border and white text.
Adding the Icon Template
For this, I used a data template, much like you would for a
ListBox. However, I included the template as a resource for the
Window rather than as a child assigned to a property of another
control. As it is a resource, we can load it pretty much anywhere
we need to. In this case, I load it via code.
Here's the template. Place it in the xaml between the ending
TaskbarItemInfo tag and the opening grid tag
<Window.Resources>
    <DataTemplate x:Key="OverlayIcon">
        <Grid Width="20" Height="20">
            <Ellipse Fill="Red"
                        Stroke="White"
                        StrokeThickness="2"/>

            <TextBlock Text="{Binding}"
                        TextAlignment="Center"
                        Foreground="White"
                        FontWeight="Bold"
                        Height="16"
                        VerticalAlignment="Center"
                        FontSize="12">
                <TextBlock.Effect>
                    <DropShadowEffect ShadowDepth="0" />
                </TextBlock.Effect>
            </TextBlock>
        </Grid>
    </DataTemplate>
</Window.Resources>
Rendering the Icon
Here's the code to load the template and render it to a bitmap.
Double-click the button on the form and put this into the event
handler.
private void UpdateCount_Click(object sender, RoutedEventArgs e)
{
    int iconWidth = 20;
    int iconHeight = 20;

    string countText = EnteredCount.Text.Trim();

    RenderTargetBitmap bmp =
        new RenderTargetBitmap(iconWidth, iconHeight, 96, 96, PixelFormats.Default);

    ContentControl root = new ContentControl();

    root.ContentTemplate = ((DataTemplate)Resources["OverlayIcon"]);
    root.Content = countText;

    root.Arrange(new Rect(0, 0, iconWidth, iconHeight));

    bmp.Render(root);

    TaskbarItemInfo.Overlay = (ImageSource)bmp;
}
In this listing, I first get the count value from the TextBox. I
then create a RenderTargetBitmap. The RenderTargetBitmap allows you
to take visuals (from code or xaml) and render them out to a
bitmap. That bitmap is what I pass to the Overlay property of the
TaskBarItemInfo as the last step.
Before that, however, I create a ContentControl and assign the
OverlayIcon resource (from xaml) as its data template. There are
other ways to accomplish this using LoadContent and setting the
data context, but the ContentControl approach is both easy and
efficient.
I then tell the content control to render the context class as
its template. Doing this makes the binding statements in our
template work correctly.
Finally, I render the content control to the bitmap, and assign
the bitmap to the overlay icon.
When you run the application, enter a value and hit the button,
you'll see the taskbar icon displays an overlay:

Looks pretty good. You can play around with the visuals, of
course, to create any type of notification you may want. In most
Windows installations, it will render at 16x16 resolution, but
you'll need to support 20x20 for higher DPI displays.
Conclusion
That's all there is to creating your own dynamic icon overlays
from XAML markup. I hope to see functionality like this in your own
upcoming applications.